달력

4

« 2024/4 »

  • 21
  • 22
  • 23
  • 24
  • 25
  • 26
  • 27
  • 28
  • 29
  • 30
2013. 3. 19. 14:30

Radeon HD 7950 Mac® Edition News2013. 3. 19. 14:30


뉴스 진원지는 독일의 ComputerBase 사라는 군요.  Sapphire HD 7950 이 언급되어 졌는데, 일반적인 Radeon 카드하고는 다르답니다.  이 카드는 Mac Pro 를 위한 그래픽 카드라고 하는 군요.

이 Mac Edition 7950 은 거의 Windows 버전과 차이점이 있느데, 쿨러가 다르고, clock speeds 와 firmware가 다르답니다. 이 카드는 구형 7950 ASIC 칩으로 만들어졌는 데, 이는 PowerTune을 사용할 수 없고, 나아가 Boost clocks이 없답니다. ASIC의 clock speeds는 800 MHz 코어를 사용했고 메모리 속도는 5000 MHz입니다. 램은 3 GB GDDR5 의 384-bit 인터페이스를 갖추고 있다고 합니다.

clock speeds 이면에는, 다른 쿨러를 사용했다는 것은 특별한 흥미를 끌지 않지만, 동일한 기존 베이직 레퍼런스 디자인이면서 검은색이나 빨간색이 아닌 하얀색이라는 군요. 이름하여 "Radeon HD 7950 Mac® Edition". 

마지막으로 차이점은 펌웨어인데 Mac Pro를 위한 펌웨어를 가지고 있지만, 간단한 스위칭만으로 Windows BIOS를 위한 펌웨어로 전환이 가능하여 PC에서도 사용이 가능합니다.

Power 는 두개의 6-pin PCIe 커넥터이고, single dual-link DVI port, HDMI 그리고 두개의 mini-DisplayPorts 를 갖춘 디스플레이 출력 포트를 가지고 있다고 하는 군요 .

가격은 €400 에서 €450 정도 예상이 됩니다. 기존의 일반적인 HD 7950보다 대략 €250 정도 비싸겟군요. 


'News' 카테고리의 다른 글

롯트와일러 전기톱 살해사건 전말  (3) 2013.03.30
김용만씨 10억대 사설 도박  (0) 2013.03.21
Apple released 10.8.3(12D76)  (0) 2013.03.06
한컴오피스 한/글 Mac Edition Pre Test  (12) 2012.12.29
demonoid.me Back  (2) 2012.11.13
:
Posted by Ritz®™
2013. 2. 16. 07:00

Intel HD4000 QE/CI 가속 설정 Hackintosh/Graphic Card2013. 2. 16. 07:00


원문 : http://blog.stuffedcow.net/2012/07/intel-hd4000-qeci-acceleration/

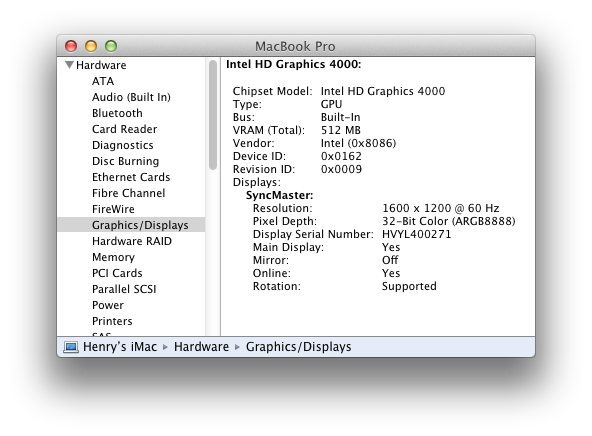
Intel HD Graphics 4000 (Ivy Bridge CPU에 내장)의 Graphics 가속 (Core Image, Quartz Extreme)을 Mac OS X 에서 지원한다. 드라이버는 MacBook Pro (Mid 2012) Software Update 1.0, Lion 10.7.5, 그리고 Mountain Lion 10.8 에 포함되어 있다. (물론, BridgeHelper 5.0 에도 포함되어 있다).  관련 드라이버는 다음과 같다.

  • AppleIntelGraphicsHD4000.kext
  • AppleIntelGraphicsFramebufferCapri.kext
  • 이외에도 추가적으로 관련 드라이버가 존재할 수 있다.

ElNono 와 proteinshake에 의해 밝혀진 바에 따르면 해킨토시에서 그래픽 카드의 AAPL,ig-platform-id 를 로딩하기 위한 HD4000 드라이버에는 심각하게도 설정되지 않은 항목이 있다.물론 Apple 하드웨어가 아니라면 이 항목은 존재하지 않고 반드시 추가해주어야 한다.

AAPL,ig-platform-id 항목은 32-bit 숫자로서 다음과 같은 테이블의 값 중에 하나이다. 이 항목들을 규명하여 준 ElNono 에게 이 기회를 빌어 감사함을 전한다.

AAPL,ig-platform-idMemory (MB)PipesPortsComment
016600009634
016600019634
016600026431No DVI
016600036422
016600043231No DVI
016200053223
01620006000No display
01620007000No display
016600086433
016600096433
0166000a3223
0166000b3223

AAPL,ig-platform-id 는 그래픽 카드에 할당된 구성에 따라 사용될 값이다. AAPL,ig-platform-id 를 세팅할 12자리의 세팅값은 HD4000 드라이버를 로딩할 것이지만 몇 가지 관련사항이 있다.

첫째, 세팅값은 어떤 포트를 enabled 할지에 영향을 준다. 0 포트 구성은 가급적 피해야 한다.(no output?). 구성에 서 찾고 있는 포트가 아닐 수 있으므로 단지 한 포트는 피한다. GA-Z77M-D3H 보드인 경우, 한 포트를 구성하기 위해 enabled된 포트는 DVI 포트가 아니었다.  두개 혹은 그 이상의 포트를 구성할때는 DVI 포트 구성이 가능하다. 어떤 구성이건간에 VGA 포트는 enabled 되지 않는다.  HDMI 포트는 확인하지 못했다.

두번째로 그래픽 카드의 메모리 구성은 반드시 BIOS 세팅값과 일치해야 한다. 만약 일치하지 않는다면 드라이버는 커널패닉(kernel panic, gen7_memory.cpp:721)을 야기하거나 혹은 화면이 제대로 출력이 안된다. 예를 들면 구성을 0x01660000 (96 MB, 3 pipes, 4 ports) 값을 사용하였다면, 그래픽 카드의 메모리 크기는 96MB로 일치시켜 주어야 한다. OS X 는 DVMT Total Memory Size 세팅값(시스템 메모리가 8GB인 경우 항상 512 MB) 값과는 무관하므로, 최대값으로 내버려 둔다.

결과물


| +-o GFX0@2 
| | | {
| | | "assigned-addresses" = <1010008200000000000080f70000000000004000181000c20f000000000000100000000000000010201000810000000000f000000000000040000000>
| | | "IOInterruptSpecifiers" = (<1000000007000000>,<0400000000000100>)
| | | "class-code" = <00000300>
| | | "IODeviceMemory" = (({"address"=4152360960,"length"=4194304}),({"address"=64692944896,"length"=268435456}),"IOSubMemoryDescriptor is not serializable")
| | | "AAPL,gray-page" = <01000000>
| | | "IOHibernateState" = <00000000>
| | | "IOPowerManagement" = {"MaxPowerState"=2,"ChildrenPowerState"=2,"CurrentPowerState"=2}
| | | "subsystem-vendor-id" = <58140000>
| | | "built-in" = <00>
| | | "acpi-device" = "IOACPIPlatformDevice is not serializable"
| | | "IOPCIMSIMode" = Yes
| | | "IOInterruptControllers" = ("io-apic-0","IOPCIMessagedInterruptController")
| | | "name" = "display"
| | | "vendor-id" = <86800000>
| | | "device-id" = <62010000>
| | | "IOPCIResourced" = Yes
| | | "compatible" = <"pci1458,d000","pci8086,162","pciclass,030000">
| | | "AAPL,iokit-ndrv" = 
| | | "acpi-path" = "IOACPIPlane:/_SB/PCI0@0/GFX0@20000"
| | | "model" = <"Intel HD Graphics 4000">
| | | "subsystem-id" = <00d00000>
| | | "revision-id" = <09000000>
| | | "AAPL,ig-platform-id" = <00006601>
| | | "AAPL,gray-value" = 
| | | "pcidebug" = "0:2:0"
| | | "IOName" = "display"
| | | "device_type" = <"display">
| | | "reg" = <0010000000000000000000000000000000000000101000020000000000000000000000000000400018100042000000000000000000000000000000102010000100000000000000000000000040000000>
| | | }

ioreg -l -p IODeviceTree 라는 명령어를 이용하여 그래픽카드의 항목이 정확하게 추가되었는지 확인할 수 있다. AAPL,ig-platform-id 항목은 ioreg 출력으로 확인할 수 있다.  정확한 값만이 AppleIntelGraphicsHD4000.kext 를 로딩할 수 있다.

AAPL,ig-platform-id 설정하기

목표는 테이블 항목 (예를들면, 01660000) 중 32비트값을 가진 AAPL,ig-platform-id 라는 디바이스 항목을 인젝션하는 것이다.  디바이스를 인젝션하는 많은 방법이 있고 그중 한가지이다.  특히, HENRY가 사용하는 방법은 카멜레온 부트로더의 GraphicsEnabler의 소스코드, GraphicsEnabler=y (gma.c),를 수정하는 방법이다. 몇가지 여기에 나열하여 보면:

  • 부트로더의 GraphicsEnabler 소스코드를 수정하는 방법. HENRY는 Chimera 1.10 (rev 1999, i386/libsaio/gma.c) 소스코드를 수정하여 새로운 디바이스 항목값을 추가하였다.
  • 부트로드에서 사용하는 org.chameleon.Boot.plist 화일의 “device-properties” 값을 이용하여 디바이스를 인젝션하는 방법. 정확하게 이러한 string값이 어떻게 생성되는지 모르지만 몇가지 방법을 확인할 수 있다.: this thread. gfxutil 과 관련이 있는 듯 하다.
  • 마지막으로 DSDT 값을 수정하여 그래픽 카드의 항목을 추가시켜 주는 방법.

Chameleon 부트로더를 수정하는 방법

HENRY는 Chameleon/Chimera 부트로드의 GraphicsEnabler 소스코드를 수정하는 방법을 택하였다. 수정하여 적용된 소스크드는 svn을 이용 다운로드 받을 수 있다. svn (http://forge.voodooprojects.org/svn/chameleon). 또한, HENRY는 Chameleon (rev. 2012) 과 Chimera (rev. 1999) 를 컴파일하여 다음과 같이 공개하였다.

AAPL,ig-platform-id 는 단지 하드웨어 가속을 enable시켜주기 위한 값일 뿐이다. HENRY는 다음과 같이 몇가지 사항과 관련없는 사항을 변경하였다.

device-id 와 revision. 드라이버는 mobile (0166) 혹은 desktop (0162)을 구별하지 않는다. 예상컨대 둘중 하나는 kext를 로딩하기 위해 필요한 듯 보이지만, high-order 16 bits 의 AAPL,ig-platform-id 를 일치시키는 것은 그닥 중요하지 않다.  HENRY는 01660000 설정값을 이용하여 그의 설정값 0162:0009 를 그대로 남겨 두었다.

DSDT에서의 GFX0 와 IGPU . 이것도 그다지 중요하지 않다. 둘다 동일하게 동작하므로 그의 설정값, GFX0,을 그대로 남겨두었다. 

SMBios version 과productname.  HENRY는 smbios.plist 가 있든 없든 몇가지 시도를 하였다. 드라이버는 모든 경우에 로딩되었다. (Mac Pro, iMac, MacBook Pro 모두 로딩 되었다.)

관련 있는 Settings 값

AAPL,ig-platform-id. 이건 둘다 관련있다.

BIOS에서 Graphics memory 설정값. 이 값은 반드시 일치시켜 주어야 한다.

Connectors. 모든 커넥트 포트가 enabled 되는 것은 아니다. 잘못된 display 설정은 현재 사용되는 connector를 disabled 시키는 현상을 일으킨다. AAPL,ig-platform-id 값을 변경하는 것은 connectors enabled 혹은 disabled 시킬 것이다.

:
Posted by uno-ani
2011. 1. 21. 02:34

OS X driver 설치 방법 macOS2011. 1. 21. 02:34

1. 터미널에서 수동설치.

  • 먼저 /tmp/ 폴더에 드라이버(예제 82566MM.kext) 화일을 복사합니다.
  • 다음 명령어를 이용하여 시스템 디렉토리에 복사를 합니다.
  • #sudo -s
  • passwd
  • #cd /tmp
  • #cp -Rf ./82566MM.kext /System/Library/Extensions/
  • 터미널에서 다음과 같은 명령어를 이용하여 로딩시도하여 봅니다.
  • #chown -R root:wheel 82566MM.kext << 이 부분은 관련 드라이버명
  • #chmod -R 755 82566MM.kext << 이 부분은 관련 드라이버명
  • #kextload -t 82566MM.kext << 이 부분은 관련 드라이버명
  • 이렇게 설치 여부를 확인하여 봅니다.
  • 재 부팅시 옵션을 "-f -v" 주셔서 부팅합니다.
2. Kext Helper로 설치하기
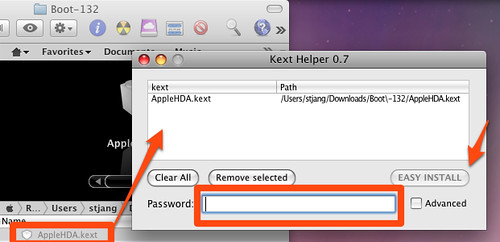
Snow Leopard에서도 잘 먹힙니다만, 프로그램 마칠때 강제종료를 해야 할때가 많습니다.
Picture6

'macOS' 카테고리의 다른 글

지정 어플리케이션으로 항상 열기 지정하기  (0) 2011.07.07
맥에서 디스크 이름 바꾸기  (0) 2011.01.31
OSX 용 파티션 만들기  (0) 2011.01.16
HP Officejet 6310 all-in-one  (0) 2010.09.20
서비스 포트  (0) 2010.04.05
:
Posted by Ritz®™

Requirement : Chameleon 2.0-RC2~RC4

Symptom:

1. Install Chameleon 2.0.RC2 ~ 4.

2. ati_9442_1002.rom in /Extra/

3. Modify com.apple.boot.plist


com.apple.Boot.Plist(without kernel flags like UUID !) *

<?xml version="1.0" encoding="UTF-8"?>
<!DOCTYPE plist PUBLIC "-//Apple//DTD PLIST 1.0//EN" "http://www.apple.com/DTDs/PropertyList-1.0.dtd">
<plist version="1.0">
<dict>
<key>Graphics Mode</key>
<string>1920x1080x32</string>
<key>Kernel</key>
<string>mach_kernel</string>
<key>Kernel Flags</key>
<string>arch=i386</string>
<key>Timeout</key>
<string>2</string>
<key>GraphicsEnabler</key>
<string>Yes</string>
<key>EthernetEnabler</key>
<string>Yes</string>
</dict>
</plist>


/Extra/Store_Kexts/:

-EvoEnabler.kext in S/L/E or /Extra/Store_Kexts/_For_System
-LegacyATI4800Controller.kext in /Extra/Store_Kexts


10.6.2 Working:

1. Good Luck!


:
Posted by Ritz®™
2009. 12. 6. 19:24

Code injection via DSDT for NVIDIA graphics Hackintosh/DSDT2009. 12. 6. 19:24

Created by Team EvOSX86
In this third guide, board and add to our DSDT code, graphics injection that will enable us to stop using Efi strings or injectors
Nvidia video card.
* Note: We've had success with this technique for some GMA950, ATI X3100 and some of the series X1xxx but not yet in HD.
Tools needed:
Ioregistry explorer
Nvidia graphics card working 100% including video outputs needed (QE and Hardware CI).
Having previously read chapter one and two of the guide
Content:
1. How to recognize where our video card in the registry and its associated devices.
2. Decompilation file and added COFIG DSDT.aml chart.
2a. The loader code.
3. Comparison of our code with Ioreg added Nvcaps, reg and renamed.
4. Basic structure of video devices and the DSDT added to our code.
4a. Example portable.
4b. Example computer tower.
5. Compiling and testing.
APPENDIX: How to clean our DSDT video inputs nonfunctional
1. How to recognize where our video card and registration devices
partners.
After downloading the program Ioregistry explorer, executive, we walk the tree of entries until we find the reference for our
video card, usually tends to be quite clear:
This example is from a laptop with a 256MB Nvidia 8600GT using the latest patches as Nvinject video and injector.
Pic1

As you will see, is not marked in green line corresponds to the card, but the upper, and has an explanation: in the DSDT code does not find his name, but with
the device that houses it.
Let me explain a bit these devices:
Marked in red is the AGP device @ 1, which depends on PCI @ 0, this device houses a device called a sub-VID @ 0, which is our video card.
In turn, the device VID @ 0 contains other devices that do not see, such as LCD, VGA, etc.
2. Decompilation of the code and added dsdt.aml chart.

Assuming that prior to this guide you have got to have a fixed DSDT and operational (HPET and RTC patched etc ...) you make a backup file and DSDT.aml
We have to work on.
In previous guides we have spoken of the binary called "iasl" found inside the folder "tools" created by the patcher Fassler. I repeat the recommendation that
copieis this file in / usr / bin with this I will always be available when you open the terminal and not have to be Recordade where we have given, or drag it to the terminal
every time we change our archive dst.dsl
That said, having copied the binary to start with where we mentioned decompilation of DSDT.aml:
Open terminal as root logueamos us and agree to the folder where we alamacenado the DSDT (cd "path to the folder")
once inside type in "-d iasl dsdt.aml"
This will create DSDT.dsl, we make a copy for backup and have it move away from the tools folder to avoid overcrowding of.
Now prodeas DSDT.dsl edit using a text editor of our choice (suggested textmate)
For this example we will use a DSDT from a laptop.
Note: The code marked in red is not used.
   
The blue outlines the part that we must adapt to our video card.


CODE

Device (PEGP)  

  {

  Name (_ADR, 0x00010000)

  Device (GFX0)

  {

  Name (_ADR, Zero)

  Name (_SUN, One)

  Method (_DSM, 4, NotSerialized)

  {

  Store (Package (0x1A)

  {

  "@0,compatible",

  Buffer (0x0B)

  {

  "NVDA,NVMac"

  },

  "@0,device_type",

  Buffer (0x08)

  {

  "display"

  },

  "@0,name",

  Buffer (0x0F)

  {

  "NVDA,Display-A"

  },

  "@1,compatible",

  Buffer (0x0B)

  {

  "NVDA,NVMac"

  },

  "@1,device_type",

  Buffer (0x08)

  {

  "display"

  },

  "@1,name",

  Buffer (0x0F)

  {

  "NVDA,Display-B"

  },

  "NVCAP",   <----------------   Nuestro NVCAP para salidas múltiples extraído de IOREG.

  Buffer (0x18)

  {

  /* 0000 */   0x04, 0x00, 0x00, 0x00, 0x00, 0x00, 0x01, 0x00,

  /* 0008 */   0x06, 0x00, 0x00, 0x00, 0x00, 0x00, 0x00, 0x00,

  /* 0010 */   0x00, 0x00, 0x00, 0x00

  },

  "NVPM",   <----------------   Nuestro NVPM (gestión de energía), normalmente no hay que cambiarlo, pero es bueno compararlo en IOREG.

  Buffer (0x20)

  {

  /* 0000 */   0x01, 0x00, 0x00, 0x00, 0x00, 0x00, 0x00, 0x00,

  /* 0008 */   0x00, 0x00, 0x00, 0x00, 0x00, 0x00, 0x00, 0x00,

  /* 0010 */   0x00, 0x00, 0x00, 0x00, 0x00, 0x00, 0x00, 0x00,

  /* 0018 */   0x00, 0x00, 0x00, 0x00

  },

  "VRAM,totalsize",

  Buffer (0x04)

  {

     0x00, 0x00, 0x00, 0x20

  },

   "device_type",

  Buffer (0x0D)

  {

  "NVDA,GeForce"

  },

  "model",

     Buffer (0x1F)   <----------------   Dependerá de la longitud del nombre + los espacios + 1.

     {

  "Nvidia GeForce 8600M GS 256 MB"   <----------------   El nombre de nuestra tarjeta y su memoria (a vuestra elección).

  },

   "rom-revision",

  Buffer (0x20)

     {

  "DSDT ROM v.1a #irc.osx86.es (c)"

  },

  "reg",   <----------------   Nuestro REG extraído de IOREG.

   Buffer (0x78)

   {

  /* 0000 */   0x00, 0x00, 0x01, 0x00, 0x00, 0x00, 0x00, 0x00,

/* 0008 */   0x00, 0x00, 0x00, 0x00, 0x00, 0x00, 0x00, 0x00,

/* 0010 */   0x00, 0x00, 0x00, 0x00, 0x10, 0x00, 0x01, 0x02,

/* 0018 */   0x00, 0x00, 0x00, 0x00, 0x00, 0x00, 0x00, 0x00,

/* 0020 */   0x00, 0x00, 0x00, 0x00, 0x00, 0x00, 0x00, 0x01,

/* 0028 */   0x14, 0x00, 0x01, 0x42, 0x00, 0x00, 0x00, 0x00,

/* 0030 */   0x00, 0x00, 0x00, 0x00, 0x00, 0x00, 0x00, 0x00,

/* 0038 */   0x00, 0x00, 0x00, 0x10, 0x1C, 0x00, 0x01, 0x02,

/* 0040 */   0x00, 0x00, 0x00, 0x00, 0x00, 0x00, 0x00, 0x00,

/* 0048 */   0x00, 0x00, 0x00, 0x00, 0x00, 0x00, 0x00, 0x02,

/* 0050 */   0x24, 0x00, 0x01, 0x01, 0x00, 0x00, 0x00, 0x00,

/* 0058 */   0x00, 0x00, 0x00, 0x00, 0x00, 0x00, 0x00, 0x00,

/* 0060 */   0x80, 0x00, 0x00, 0x00, 0x30, 0x00, 0x01, 0x02,

/* 0068 */   0x00, 0x00, 0x00, 0x00, 0x00, 0x00, 0x00, 0x00,

/* 0070 */   0x00, 0x00, 0x00, 0x00, 0x00, 0x00, 0x02, 0x00

  }

  }, Local0)

  DTGP (Arg0, Arg1, Arg2, Arg3, RefOf (Local0))

  Return (Local0)

  }

  }

  }


Renowned for our card in the code outsider.
                                                     
If you look at the letters in blue is suggested, you will see that marked the buffer and the name of the card, why?, It is simple, you will have to change the name of the card
for yours, and the buffer indicating the number of characters (including spaces) is in the name quoted 1 if you change the name but not the buffer, the
compilation will fail.
How to find the buffer (which is also in hexadecimal).
It is very simple, we need a converter decimal to hexadecimal and vice versa.
A site that you can come very convenient is this:
http://www.parkenet.com/apl/HexDecConverter.html
or this:
http://www.paulschou.com/tools/xlate/
Well, he began:
Sample buffer for the line "Nvidia GeForce 8600M GS 256MB, the number of letters and spaces contained here is 30 (decimal), add 1 to the result (actually it
The problem is that the account number starts from zero), which gives us 31, using the websites listed above, we put 31 in decimal and as a result gives us 1F
hexadecimal, ie, the buffer used.
If we change the name to our card, we use the same approach to calculate the size of the buffer.

2a. The loader code.

We will give an overview of the concept of loader code already discussed in the previous guide.
Our code is not ACPI is a string of information that add to the ACPI code, and if we as-is, our record's not OSX not being charged this compatible
ACPI, so this is loaded, we must use a "shipper" which is nothing more than a bit of code that define our entry code and allow its load by
system.
Where to insert the "shipper"?
This is simple, you must seek with the text editor area code _WAK called, and when the definition of it, fit the loader code.
Charger Code:


CODE

Method (DTGP, 5, NotSerialized)

{

If (LEqual (Arg0, Buffer (0x10)

{

/* 0000 */ 0xC6, 0xB7, 0xB5, 0xA0, 0x18, 0x13, 0x1C, 0x44,

/* 0008 */ 0xB0, 0xC9, 0xFE, 0x69, 0x5E, 0xAF, 0x94, 0x9B

}))

{

If (LEqual (Arg1, One))

{

If (LEqual (Arg2, Zero))

{

Store (Buffer (One)

{

0x03

}, Arg4)

Return (One)

}

If (LEqual (Arg2, One))

{

Return (One)

}

}

}

Store (Buffer (One)

{

0x00

}, Arg4)

Return (Zero)

}


Cargo Area:
The code in this area will depend on the machine, and basically you have to find the end _WAK code, which ends:


CODE

Return (Package (0x02)

{

Zero,

Zero

})

}


I include below the code loader.
EXAMPLE:
More cargo area shipper:


CODE

Method (_WAK, 1, NotSerialized)

{

P8XH (One, 0xAB)

If (LOr (LEqual (Arg0, 0x03), LEqual (Arg0, 0x04)))

{

If (And (CFGD, 0x01000000))

{

If (LAnd (And (CFGD, 0xF0), LEqual (OSYS, 0x07D1)))

{

TRAP (0x3D)

}

}

}

If (LEqual (RP2D, Zero))

{

Notify (\_SB.PCI0.RP02, Zero)

}

If (LEqual (Arg0, 0x03)) {}

If (LEqual (Arg0, 0x04))

{

\_SB.PCI0.LPCB.EC0.SELE ()

}

P8XH (Zero, 0xCD)

Return (Package (0x02)

{

Zero,

Zero

})

}

Method (DTGP, 5, NotSerialized)

{

If (LEqual (Arg0, Buffer (0x10)

{

/* 0000 */ 0xC6, 0xB7, 0xB5, 0xA0, 0x18, 0x13, 0x1C, 0x44,

/* 0008 */ 0xB0, 0xC9, 0xFE, 0x69, 0x5E, 0xAF, 0x94, 0x9B

}))

{

If (LEqual (Arg1, One))

{

If (LEqual (Arg2, Zero))

{

Store (Buffer (One)

{

0x03

}, Arg4)

Return (One)

}

If (LEqual (Arg2, One))

{

Return (One)

}

}

}

Store (Buffer (One)

{

0x00

}, Arg4)

Return (Zero)

}


Salváis the file and compile to see if there were errors in the code.
Open the terminal, as root logueamos us and tune into the DSDT folder (cd "path to the folder) then type
iasl-f dsdt.dsl

If errors occur is that you put the wrong charger, if warnings occur, is that it may come before, not do them much attention now.
If no error occurs, delete the file that was generated DSDT.aml and continued work within DSDT.dsl
3. Comparison of our code with Ioreg added Nvcaps, reg and
renamed.
We now proceed to seek the necessary data on our IOREG for insertion into each unit in the code.
NVCAPS or seek first the configuration of the outputs of our video card and NVPM or energy management.
We opened the IOREG and seek our video card, pointing device and look for the entry child NVCAP and NVPM:


Pic2

Once we have NVCAP values and NVPM, amend our code.
Now look at the value of the input REG:


Pic 3

Change value of REG in the graphical code, so you get the real value is in our system.

4. Basic structure of video devices and the DSDT added
of our code.
4a. Example using a laptop.
Let's open the DSDT.dsl and look through the keyword "device" until we get to:


CODE

Device (AGP)


We will find the device tree in this way (different colors for each device):
In short without our code:


CODE

Device (AGP) (Dispositivo madre)

{

Nombre y dirección.

DEVICE VID0 (Dispositivo hijo)

{

   Nombre y dirección de VID0

Inicio del método

{

   Método

   }

   Device (TV)

Device (CRT)

   Device (LCD)

Device (DVI)

}

}


Briefly our code:


CODE

Device (AGP) (Dispositivo madre)

{

Nombre y dirección.

DEVICE VID0 (Dispositivo hijo)

{

   Nombre y dirección de VID0

Inicio del método

{

   Método

   }

   Device (TV)

Device (CRT)

   Device (LCD)

Device (DVI)

Device (GFX) <-------- Nuestro codigo.

}

}

Extended:


CODE

Device (AGP)

{

Name (_ADR, 0x00010000)

Device (VID)

{

Name (_ADR, Zero)

Method (_DOS, 1, NotSerialized)

{

Store (Arg0, MIS4)

SMI (0x9E, MIS4)

}

Method (_DOD, 0, NotSerialized)

{

Store (SMI (0x6D, Zero), Local0)

If (LEqual (Local0, One))

{

Return (Package (0x04)

{

0x00010100,

0x00010200,

0x00010110,

0x00010210

})

}

Else

{

Return (Package (0x04)

{

0x00010100,

0x00010200,

0x00010118,

0x00010120

})

}

}

Device (TV)

{

Method (_ADR, 0, NotSerialized)

{

Return (0x0200)

}

Method (_DCS, 0, NotSerialized)

{

Store (SMI (0x8E, 0x04), Local0)

Return (Local0)

}

Method (_DGS, 0, NotSerialized)

{

Store (SMI (0x99, 0x04), Local0)

Return (Local0)

}

Method (_DSS, 1, NotSerialized)

{

DSS (0x04, Arg0)

}

}

Device (CRT)

{

Method (_ADR, 0, NotSerialized)

{

Return (0x0100)

}

Method (_DCS, 0, NotSerialized)

{

Store (SMI (0x8E, 0x02), Local0)

Return (Local0)

}

Method (_DGS, 0, NotSerialized)

{

Store (SMI (0x99, 0x02), Local0)

Return (Local0)

}

Method (_DSS, 1, NotSerialized)

{

DSS (0x02, Arg0)

}

}

Device (LCD)

{

Method (_ADR, 0, NotSerialized)

{

Store (SMI (0x6D, Zero), Local0)

If (LEqual (Local0, One))

{

Return (0x0110)

}

Else

{

Return (0x0118)

}

}

Method (_DCS, 0, NotSerialized)

{

Store (SMI (0x8E, One), Local0)

Return (Local0)

}

Method (_DGS, 0, NotSerialized)

{

Store (SMI (0x99, One), Local0)

Return (Local0)

}

Method (_DSS, 1, NotSerialized)

{

DSS (One, Arg0)

}

Name (BTVL, 0x64)

Name (DBCL, Package (0x0A) {})

Method (_BCL, 0, NotSerialized)

{

SX10 ()

SX30 (0x19)

SX30 (Zero)

SX11 ()

Store (SX40 (), Index (DBCL, Zero))

Store (SX40 (), Index (DBCL, One))

Store (SX40 (), Index (DBCL, 0x02))

Store (SX40 (), Index (DBCL, 0x03))

Store (SX40 (), Index (DBCL, 0x04))

Store (SX40 (), Index (DBCL, 0x05))

Store (SX40 (), Index (DBCL, 0x06))

Store (SX40 (), Index (DBCL, 0x07))

Store (SX40 (), Index (DBCL, 0x08))

Store (SX40 (), Index (DBCL, 0x09))

SX12 ()

Return (DBCL)

}

Method (_BCM, 1, NotSerialized)

{

SX10 ()

SX30 (0x19)

SX30 (One)

SX30 (Arg0)

Store (Arg0, BTVL)

SX11 ()

SX12 ()

}

Method (_BQC, 0, NotSerialized)

{

SX10 ()

SX30 (0x19)

SX30 (0x02)

SX11 ()

Store (SX40 (), Local0)

Store (Local0, BTVL)

SX12 ()

Return (Local0)

}

}

Device (DVI)

{

Method (_ADR, 0, NotSerialized)

{

Store (SMI (0x6D, Zero), Local0)

If (LEqual (Local0, One))

{

Return (0x0210)

}

Else

{

Return (0x0120)

}

}

Method (_DCS, 0, NotSerialized)

{

Store (SMI (0x8E, 0x08), Local0)

Return (Local0)

}

Method (_DGS, 0, NotSerialized)

{

Store (SMI (0x99, 0x08), Local0)

Return (Local0)

}

Method (_DSS, 1, NotSerialized)

{

DSS (0x08, Arg0)

}

}

Device (GFX0) <------------- Comienzo de nuestro codigo

{

Name (_ADR, Zero)

Name (_SUN, One)

Method (_DSM, 4, NotSerialized)

{

Store (Package (0x1A)

{

"@0,compatible",

Buffer (0x0B)

{

"NVDA,NVMac"

},

"@0,device_type",

Buffer (0x08)

{

"display"

},

"@0,name",

Buffer (0x0F)

{

"NVDA,Display-A"

},

"@1,compatible",

Buffer (0x0B)

{

"NVDA,NVMac"

},

"@1,device_type",

Buffer (0x08)

{

"display"

},

"@1,name",

Buffer (0x0F)

{

"NVDA,Display-B"

},

"NVCAP",

Buffer (0x18)

{

/* 0000 */ 0x04, 0x00, 0x00, 0x00, 0x00, 0x00, 0x01, 0x00,

/* 0008 */ 0x06, 0x00, 0x00, 0x00, 0x00, 0x00, 0x00, 0x00,

/* 0010 */ 0x00, 0x00, 0x00, 0x00

},

"NVPM",

Buffer (0x20)

{

/* 0000 */ 0x01, 0x00, 0x00, 0x00, 0x00, 0x00, 0x00, 0x00,

/* 0008 */ 0x00, 0x00, 0x00, 0x00, 0x00, 0x00, 0x00, 0x00,

/* 0010 */ 0x00, 0x00, 0x00, 0x00, 0x00, 0x00, 0x00, 0x00,

/* 0018 */ 0x00, 0x00, 0x00, 0x00

},

"VRAM,totalsize",

   Buffer (0x04)

   {

0x00, 0x00, 0x00, 0x20

},

"device_type",

Buffer (0x0D)

{

"NVDA,GeForce"

},

"model",

Buffer (0x1F)

{

"Nvidia GeForce 8600M GS 256 MB"

},

"rom-revision",

Buffer (0x20)

{

"DSDT ROM v.1a #irc.osx86.es (c)"

},

"reg",

   Buffer (0x78)

{

/* 0000 */ 0x00, 0x00, 0x01, 0x00, 0x00, 0x00, 0x00, 0x00,

   /* 0008 */ 0x00, 0x00, 0x00, 0x00, 0x00, 0x00, 0x00, 0x00,

   /* 0010 */ 0x00, 0x00, 0x00, 0x00, 0x10, 0x00, 0x01, 0x02,

   /* 0018 */ 0x00, 0x00, 0x00, 0x00, 0x00, 0x00, 0x00, 0x00,

   /* 0020 */ 0x00, 0x00, 0x00, 0x00, 0x00, 0x00, 0x00, 0x01,

   /* 0028 */ 0x14, 0x00, 0x01, 0x42, 0x00, 0x00, 0x00, 0x00,

   /* 0030 */ 0x00, 0x00, 0x00, 0x00, 0x00, 0x00, 0x00, 0x00,

   /* 0038 */ 0x00, 0x00, 0x00, 0x10, 0x1C, 0x00, 0x01, 0x02,

   /* 0040 */ 0x00, 0x00, 0x00, 0x00, 0x00, 0x00, 0x00, 0x00,

   /* 0048 */ 0x00, 0x00, 0x00, 0x00, 0x00, 0x00, 0x00, 0x02,

   /* 0050 */ 0x24, 0x00, 0x01, 0x01, 0x00, 0x00, 0x00, 0x00,

   /* 0058 */ 0x00, 0x00, 0x00, 0x00, 0x00, 0x00, 0x00, 0x00,

   /* 0060 */ 0x80, 0x00, 0x00, 0x00, 0x30, 0x00, 0x01, 0x02,

   /* 0068 */ 0x00, 0x00, 0x00, 0x00, 0x00, 0x00, 0x00, 0x00,

   /* 0070 */ 0x00, 0x00, 0x00, 0x00, 0x00, 0x00, 0x02, 0x00

}

}, Local0)

DTGP (Arg0, Arg1, Arg2, Arg3, RefOf (Local0))

Return (Local0)

}

   } <------------- Fin de nuestro codigo (No incluir esta reseña en el DSDT)

}

}


4b. Example using a computer tower.
We will seek to explore our IOregistry video card, and here we notice a difference with the code on the laptop, and is as follows:
In the computer tower, we will find the video devices that we saw in the previous example, LCD, CRT etc., except in cases of integrated graphics, we
ioreg to look at the site of our graph, usually it be under some PCI devices such as PC1, P0P1 etc. .. depends
motherboard manufacturer, but sometimes we do not see the device with a clear demarcation in ioreg and appears as PCI2BRIDGE or in this case PCIBRIDGE
add the entry directly into the ICP as all these devices have the device "mother" to the main PCI ..... In plates with integrated graphics
we can find something closer to the example of the laptop, but we must not fall into errors, the code must be added in the code
for the device that is located not on our card and the integrated video board.
Set in the PCI code.


CODE

Device (PCI0)

{

Name (_HID, EisaId ("PNP0A03"))

Name (_ADR, 0x00)

Name (_UID, 0x01)

Name (_BBN, 0x00)

Method (_S3D, 0, NotSerialized)

{

If (LEqual (OSFL, 0x02))

{

Return (0x02)

}

Else

{

Return (0x03)

}

}

   Method (_STA, 0, NotSerialized)

{

Return (0x0F)

}

Method (_CRS, 0, NotSerialized)

{

Name (BUF0, ResourceTemplate ()

{


The code continues much longer, but we will take this as a reference.
Here we would have our code added to the PCI video:


CODE

Device (PCI0)

{

Name (_HID, EisaId ("PNP0A03"))

Name (_ADR, 0x00)

Name (_UID, 0x01)

Name (_BBN, 0x00)

   Device (PEGP)

{

Name (_ADR, 0x00060000)

Device (GFX0)

{

Name (_ADR, Zero)

Name (_SUN, One)

Method (_DSM, 4, NotSerialized)

{

Store (Package (0x1C)

{

   "AAPL,slot-name",

   Buffer (0x0D)

   {

"PCI-E Slot-1"

}, },

"@0,compatible",

Buffer (0x0B)

{

"NVDA,NVMac"

},

"@0,device_type",

Buffer (0x08)

{

"display"

},

"@0,name",

Buffer (0x0F)

{

"NVDA,Display-A"

},

"@1,compatible",

Buffer (0x0B)

{

"NVDA,NVMac"

},

"@1,device_type",

Buffer (0x08)

{

"display"

},

"@1,name",

Buffer (0x0F)

{

"NVDA,Display-B"

},

"NVCAP",

Buffer (0x18)

{

/* 0000 */ 0x04, 0x00, 0x01, 0x00, 0x00, 0x00, 0x03, 0x00,

/* 0008 */ 0x0C, 0x00, 0x00, 0x00, 0x00, 0x00, 0x00, 0x07,

/* 0010 */ 0x00, 0x00, 0x00, 0x00

},

"NVPM",

Buffer (0x20)

{

/* 0000 */ 0x01, 0x00, 0x00, 0x00, 0x00, 0x00, 0x00, 0x00,

/* 0008 */ 0x00, 0x00, 0x00, 0x00, 0x00, 0x00, 0x00, 0x00,

/* 0010 */ 0x00, 0x00, 0x00, 0x00, 0x00, 0x00, 0x00, 0x00,

/* 0018 */ 0x00, 0x00, 0x00, 0x00

},

"VRAM,totalsize",

Buffer (0x04)

{

0x00, 0x00, 0x00, 0x20

},

"device_type",

Buffer (0x0D)

{

"NVDA,GeForce"

},

"model",

Buffer (0x22)

{

"POV Nvidia GeForce 8800 GT 512 MB"

},

"rom-revision",

Buffer (0x23)

{

"DSDT ROM v.1a by #irc.osx86.es (c)"

},

"reg",

Buffer (0x78)

{

/* 0000 */ 0x00, 0x00, 0x01, 0x00, 0x00, 0x00, 0x00, 0x00,

/* 0008 */ 0x00, 0x00, 0x00, 0x00, 0x00, 0x00, 0x00, 0x00,

/* 0010 */ 0x00, 0x00, 0x00, 0x00, 0x10, 0x00, 0x01, 0x02,

/* 0018 */ 0x00, 0x00, 0x00, 0x00, 0x00, 0x00, 0x00, 0x00,

/* 0020 */ 0x00, 0x00, 0x00, 0x00, 0x00, 0x00, 0x00, 0x01,

/* 0028 */ 0x14, 0x00, 0x01, 0x42, 0x00, 0x00, 0x00, 0x00,

/* 0030 */ 0x00, 0x00, 0x00, 0x00, 0x00, 0x00, 0x00, 0x00,

/* 0038 */ 0x00, 0x00, 0x00, 0x10, 0x1C, 0x00, 0x01, 0x02,

/* 0040 */ 0x00, 0x00, 0x00, 0x00, 0x00, 0x00, 0x00, 0x00,

/* 0048 */ 0x00, 0x00, 0x00, 0x00, 0x00, 0x00, 0x00, 0x02,

/* 0050 */ 0x24, 0x00, 0x01, 0x01, 0x00, 0x00, 0x00, 0x00,

/* 0058 */ 0x00, 0x00, 0x00, 0x00, 0x00, 0x00, 0x00, 0x00,

/* 0060 */ 0x80, 0x00, 0x00, 0x00, 0x30, 0x00, 0x01, 0x02,

/* 0068 */ 0x00, 0x00, 0x00, 0x00, 0x00, 0x00, 0x00, 0x00,

/* 0070 */ 0x00, 0x00, 0x00, 0x00, 0x00, 0x00, 0x02, 0x00

}

}, Local0)

DTGP (Arg0, Arg1, Arg2, Arg3, RefOf (Local0))

Return (Local0)

}

}

}

Method (_S3D, 0, NotSerialized)

{

If (LEqual (OSFL, 0x02))

{

Return (0x02)

}

Else

{

Return (0x03)

}

}

Method (_STA, 0, NotSerialized)

{

Return (0x0F)

}


5. Compiling and testing.

Now we only save the file and compile it to check for syntax errors or not.
Open the terminal, as root logueamos us and tune into the folder where we have our DSDT (cd "path to folder") Keyboards
iasl dsdt.dsl

If errors occur is that you put the wrong charger, if warnings occur, is that it may come before, not do them much attention now.
If you have them, make certain that brackets have not been orphaned, or deleted.
If not, you can rename the file you have in DSDT.aml the root of the system to "DSDTold.aml" and copy the new (to open created when compiling) to the root of the disk.
We delete the injector that we are using (Nvkush, Nvinject or NVdarwin) or EFI string if we use this method and proceed to reboot. If our site has
been right and proper coding of our graphics should be fully recognized and activated yet.
If you fail the new DSDT.aml (eg freezes the system), you can boot the system using the command DSDTold.aml DSDT = (introducidlo when you see the boot
chameleon by pressing F8 and selecting the installation of Leopard).
We hope that this third guide on the possibilities of DSDT system has been of your liking.
We will be updating the guidelines as new data have ....


ANNEX
In this annex, see how to optimize a laptop, removing the graphic code is not used by OSX, obtaining with this a greater fluidity in the video
because the register is only the code that is functional, our code added.
In the summary view can better see the tree of devices, so we can determine who should stay and who must not be erased to useful code and
prepare for the inclusion of our code of video.
In summary, our code should look like in after deleting unnecessary devices:
BEFORE:


CODE

Device (AGP)

{

Nombre y dirección.

Cabezera de VID0

{

   Nombre y dirección de VID0

Inicio del método

{

   Método

   }

   Device (TV)

Device (CRT)

   Device (LCD)

Device (DVI)

}

}


LATER:


CODE

Device (AGP)

{

Nombre y dirección.

Cabezera de VID0

{

   Nombre y dirección de VID0

Inicio del método

{

   Método

   }

   }

}

}


Extended BEFORE:


CODE

Device (AGP)

{

Name (_ADR, 0x00010000)

Device (VID)

{

Name (_ADR, Zero)

Method (_DOS, 1, NotSerialized)

{

Store (Arg0, MIS4)

SMI (0x9E, MIS4)

}

Method (_DOD, 0, NotSerialized)

{

Store (SMI (0x6D, Zero), Local0)

If (LEqual (Local0, One))

{

Return (Package (0x04)

{

0x00010100,

0x00010200,

0x00010110,

0x00010210

})

}

Else

{

Return (Package (0x04)

{

0x00010100,

0x00010200,

0x00010118,

0x00010120

})

}

}

Device (TV)

{

Method (_ADR, 0, NotSerialized)

{

Return (0x0200)

}

Method (_DCS, 0, NotSerialized)

{

Store (SMI (0x8E, 0x04), Local0)

Return (Local0)

}

Method (_DGS, 0, NotSerialized)

{

Store (SMI (0x99, 0x04), Local0)

Return (Local0)

}

Method (_DSS, 1, NotSerialized)

{

DSS (0x04, Arg0)

}

}

Device (CRT)

{

Method (_ADR, 0, NotSerialized)

{

Return (0x0100)

}

Method (_DCS, 0, NotSerialized)

{

Store (SMI (0x8E, 0x02), Local0)

Return (Local0)

}

Method (_DGS, 0, NotSerialized)

{

Store (SMI (0x99, 0x02), Local0)

Return (Local0)

}

Method (_DSS, 1, NotSerialized)

{

DSS (0x02, Arg0)

}

}

Device (LCD)

{

Method (_ADR, 0, NotSerialized)

{

Store (SMI (0x6D, Zero), Local0)

If (LEqual (Local0, One))

{

Return (0x0110)

}

Else

{

Return (0x0118)

}

} If (LEqual (Local0, One))


Method (_DCS, 0, NotSerialized)

{

Store (SMI (0x8E, One), Local0)

Return (Local0)

}

Method (_DGS, 0, NotSerialized)

{

Store (SMI (0x99, One), Local0)

Return (Local0)

}

Method (_DSS, 1, NotSerialized)

{

DSS (One, Arg0)

}

Name (BTVL, 0x64)

Name (DBCL, Package (0x0A) {})

Method (_BCL, 0, NotSerialized)

{

SX10 ()

SX30 (0x19)

SX30 (Zero)

SX11 ()

Store (SX40 (), Index (DBCL, Zero))

Store (SX40 (), Index (DBCL, One))

Store (SX40 (), Index (DBCL, 0x02))

Store (SX40 (), Index (DBCL, 0x03))

Store (SX40 (), Index (DBCL, 0x04))

Store (SX40 (), Index (DBCL, 0x05))

Store (SX40 (), Index (DBCL, 0x06))

Store (SX40 (), Index (DBCL, 0x07))

Store (SX40 (), Index (DBCL, 0x08))

Store (SX40 (), Index (DBCL, 0x09))

SX12 ()

Return (DBCL)

}

Method (_BCM, 1, NotSerialized)

{

SX10 ()

SX30 (0x19)

SX30 (One)

SX30 (Arg0)

Store (Arg0, BTVL)

SX11 ()

SX12 ()

}

Method (_BQC, 0, NotSerialized)

{

SX10 ()

SX30 (0x19)

SX30 (0x02)

SX11 ()

Store (SX40 (), Local0)

Store (Local0, BTVL)

SX12 ()

Return (Local0)

}

}

Device (DVI)

{

Method (_ADR, 0, NotSerialized)

{

Store (SMI (0x6D, Zero), Local0)

If (LEqual (Local0, One))

{

Return (0x0210)

}

Else

{

Return (0x0120)

}

}

Method (_DCS, 0, NotSerialized)

{

Store (SMI (0x8E, 0x08), Local0)

Return (Local0)

}

Method (_DGS, 0, NotSerialized)

{

Store (SMI (0x99, 0x08), Local0)

Return (Local0)

}

Method (_DSS, 1, NotSerialized)

{

DSS (0x08, Arg0)

}

}

   }

   }


Extended LATER:


CODE

Device (AGP)

{

Name (_ADR, 0x00010000)

Device (VID)

{

Name (_ADR, Zero)

Method (_DOS, 1, NotSerialized)

{

Store (Arg0, MIS4)

SMI (0x9E, MIS4)

}

Method (_DOD, 0, NotSerialized)

{

Store (SMI (0x6D, Zero), Local0)

If (LEqual (Local0, One))

{

Return (Package (0x04)

{

0x00010100,

0x00010200,

0x00010110,

0x00010210

})

}

Else

{

Return (Package (0x04)

{

0x00010100,

0x00010200,

0x00010118,

0x00010120

})

}

}

   }

}


Obviously, if we are to compile after erasing all those devices, we report a number of errors will disappear as many references as well
that we look for the lines marked as errors and remove them as follows:


CODE

Errores generados al compilar cuando eliminamos el device "LCD":

/Users/xxx/Desktop/pruebas dsdt/Tools/DSDToriginal.dsl 721: Notify (\_SB.PCI0.AGP.VID.LCD, 0x86)

Error 4063 - Object does not exist ^ (\_SB.PCI0.AGP.VID.LCD)

/Users/xxx/Desktop/pruebas dsdt/Tools/DSDToriginal.dsl 726: Notify (\_SB.PCI0.AGP.VID.LCD, 0x87)

Error 4063 - Object does not exist ^ (\_SB.PCI0.AGP.VID.LCD)


We move to the line 721 and 726 as shown and we find:

CODE

If (LGreaterEqual (OSID (), 0x20))

{

If (And (Local0, 0x04))

{

Notify (\_SB.PCI0.AGP.VID.LCD, 0x86)

Notify (\_SB.PCI0.VID.LCD, 0x86)

}

If (And (Local0, 0x02))

{

Notify (\_SB.PCI0.AGP.VID.LCD, 0x87)

Notify (\_SB.PCI0.VID.LCD, 0x87)

}

}


If we remove those two entries, and compile again, the errors are gone.

CODE

If (LGreaterEqual (OSID (), 0x20))

{

If (And (Local0, 0x04))

{

Notify (\_SB.PCI0.VID.LCD, 0x86)

}

If (And (Local0, 0x02))

{

Notify (\_SB.PCI0.VID.LCD, 0x87)

}

}


It is recommended to compile every time you delete an entry, so you can gradually correct our code.
Guide by: Roisoft and Pere

'Hackintosh > DSDT' 카테고리의 다른 글

DSDT 생성  (4) 2010.06.19
8600 GTS 256 MB DSDT  (0) 2010.02.18
Fix'y DSDT for ASUS P5W DH Deluxe and Snow & Leopard  (0) 2009.11.06
Windows용 DSDT 추출 및 Patcher  (0) 2009.10.30
Enabling ACPI, EIST, etc for ASUS P5W DH DELUXE  (0) 2009.10.25
:
Posted by Ritz®™
2009. 11. 13. 11:46

Network Setup!! Hackintosh/Lan Card2009. 11. 13. 11:46

1. 부팅시에 f8을 누르거나 Chameleon 같은 경우 스페이스 바를 눌러 부팅옵션을

"-v -f" 로 주어 부팅하여 다음 그림과 같이 실행합니다.


:
Posted by Ritz®™
2009. 10. 28. 03:07

Chameleon 설치 가이드 Hackintosh/Chameleon2009. 10. 28. 03:07


Update : http://cafe.naver.com/uefi/6

- 리얼맥 시스템에 조금 더 가깝게 만들어주는 부트로더로 요즈음 더 인기가 많은 부트로더를 소개합니다.

Chameleon 설치 가이드

Chameleon은 오픈소스코드를 충실하게 준수하는 GUI환경의 부트로더입니다.
Leopard는 물론, Snow Leopard, Lion, Mountain Lion(10.8.?) 까지 지원을 하여 주고 조금은 복잡하지만, Mac OS X 사용자들에게 많은 사랑을 받아오는 부트로더입니다.
물론, 2012년 Chimera 라는 이름으로 바뀌긴 했지만 어쨌든 혼용하여 여전히 사용되고 있습니다.
Windows 하드디스크가 있다면 일단 사타케이블을 떼어놓고 설치작업 합니다.  물론, mbr이든 guid 파티션이든 상관없이 설치할 수 있습니다.
I. Chameleon을 다운로드 받습니다.
II. 압축을 풀면 다음과 같은 화일이 생성됩니다.


III. 패키지를 더블클릭하면 설치과정이 진행됩니다. 계속을 누릅니다.

IV. 계속을 누릅니다.


V. 계속을 누르고 사용권 계약에서 동의를 클릭합니다.


VI. 설치할 대상 디스크를 선택하고 계속을 누릅니다.


VII. 사용자화를 클릭하면 다음과 같은 화면이 나옵니다.


VIII. 여러가지 선택사항들이 있지만, 처음 설치하시는 분들은 그대로 설치에 들어갑니다.
특히,  EFI 선택은 시스템 안정화를 시키고 난 후 설치해주어도 늦지 않습니다.  안정화도 안된 상황에서  EFI 문제로 질문을 하시는 분들을 보면 답답합니다.하드디스크 부팅으로 안정화 시킨다음 EFI로 설정해 주시는 것이 여러사람 피곤하게 하지 않고 스스로의 정신건강에도 좋습니다.


VIIII. 자 이제 설치를 마쳤습니다. 역시나 dsdt.aml, com.apple.Boot.plist, 그리고 Extra 폴더내의 해킨 드라이버 설치 작업이 남았습니다.
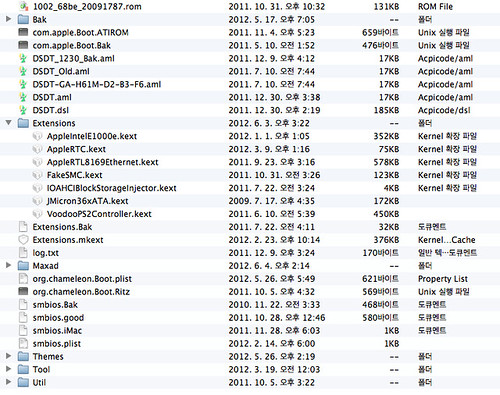
X. Chameleon을 설치하고 난 후, 중요한 파일들의 목록입니다. /Extra/Extensions 폴더에 자신의 시스템에 맞는 해킨 드라이버를 설치하여 줍니다.
Kext 종류

- 위 그림에서 AHCIPortInjector.kext 혹은 IOAHCIBlockStorageInjector.kext 와 fakesmc.kext화일은 기본적으로 들어가야 합니다.
- 또한 메인보드에서 추출한 dsdt 패치화일(dsdt.aml) 과 시스템 설정에 필요한 smbios.plist 화일이 반드시 필요하겠지요.
- 네 아래 그림과 같이 핵심점일 화일들은 다 들어가 있습니다.
- com.apple.Boot.plist 화일은 Chimera로 변경된 이후 요즈음은 org.chameleon.Boot.plist 화일명으로 변경되었습니다.

- Bak 화일들은 신경쓰지 마세요.  백업 화일들입니다.

Chameleon

부트로드를 설치하는 방법에는 여러가지 방법이 있는데 Multibeast를 이용하여 설치할 수도 있습니다.

http://osx86.tistory.com/1334


:
Posted by Ritz®™
2009. 10. 27. 21:51

HP Compaq nx7400 laptop Hackintosh/NoteBook2009. 10. 27. 21:51

I. 첫번째 설치

설치 이미지 : iDeneb 1.3 (10.5.5)

시스템 : HP Compaq nx7400 laptop.


II. 재시도

specs:

HP Compaq nx7400
Intel C2D T7200 @2GHz
3GB 667MHz RAM
HDD WD 320GB SATA
Intel GMA950 & WSXGA+ screen
Intel 3945ABG WiFi
Broadcom 440x Ethernet
ADI1981 audio
Wireless USB Linksys WUSB54GC (Ralink)
설치이미지 : iDeneb v1.3 10.5.5.

Hardware issues:
  1. cpus=1:
    항상 부팅 플래그를 "cpus=1" 을 주어서 부팅해야 합니다.
    Chameleon with DSDT overrideDSDT patcher 1.0.1d 또한, vanilla 커널과 voodoo_beta2c 9.5.0 커널을 적용하여 보았지만 불안정하게 운용이 됩니다..
    잠자기는 잘 되고 있습니다.
    참고: http://forum.insanelymac.com/index.php?s=&...st&p=962566
  2. Broadcom 440x ethernet:
    불안정하여 한시간마다 재부팅하여 주면 작동이 됩니다. 인터넷에서 다운로드 도중에 멈추어서 USB wifi 카드를 이용합니다.
  3. Intel 3945ABG:
    동작하지 않는 군요.
  4. Audio:
    Headphones/mic 동작하지 않고, 스피커는 adi1981 드라이버를 이용하여 작동이 됩니다.
  5. Shutdown:
    하드드라이버는 멈추었다 깨어나기를 반복하는 듯 보입니다.
  6. 터치패드는 ACPIPS2Nub.kext 와 수정된 ApplePS2Controller.kext 를 이용하여 동작이 됩니다.


:
Posted by Ritz®™