달력

5

« 2024/5 »

  • 5
  • 6
  • 7
  • 8
  • 9
  • 10
  • 11
  • 12
  • 13
  • 14
  • 15
  • 16
  • 17
  • 18
  • 19
  • 20
  • 21
  • 22
  • 23
  • 24
  • 25
  • 26
  • 27
  • 28
  • 29
  • 30
  • 31
2010. 9. 8. 13:40

com.apple.Boot.plist 수정하기 Hackintosh/Chameleon2010. 9. 8. 13:40

com.apple.Boot.plist화일 위치는 /Extra 폴더와 /Library/Preferences/SystemConfiguration/com.apple.Boot.plist 로서 2군데에 위치한다.
먼저 /Extra 폴더의 com.apple.Boot.plist를 textedit를 이용하여 원하는 대로 수정을 한다.
그리고 터미널을 실행하여 다음과 같은 명령어를 이용하여 /Extra/com.apple.Boot.plist를 이용하여 /Library/Preferences/System Configuration/com.apple.Boot.plist 화일도 동일하게 변경하여 준다.

걍 간단하게 복사해주는 명령어입니다.


:
Posted by Ritz®™
2010. 4. 1. 15:16

Chameleon 2.0-RC4 is out! Hackintosh/Chameleon2010. 4. 1. 15:16

Update!!

Chameleon 2.0-RC4 is out!


About the new options

Hide Partition
Using this option you can enumerate all your partitions what you would like to remove from the boot menu, the syntax is similar to the Default Partition option but here you can specify many volumes in your /Library/Preferences/SystemConfiguration/com.apple.Boot.plist or /Extra/com.apple.Boot.plist:

<key>Hide Partition</key>
<string>hd(0,1) hd(2,5)</string>

In the above example the booter won’t display partition 1 on BIOS drive 0 and partition 5 on disk 2.

PciRoot
This is a similar option what you can find in PC_EFI, but we’re doing this a bit different: The default value is still 0 but you can set to any arbitrary value like:

<key>PciRoot</key>
<string>1</string>

About the patches and fixes applied in RC4-r684

Here is a quick Changelog highlight:

Fixed booting the default partition when using timeout. Added Intel Core i5 detection.
Applied rivig’s patch against all stage 1 loaders. Now linear address mapping uses 12 bit offsets. Added DigitalDJ’s SMBIOS CPU detection patch. Applied IntVar’s system-id patch. Applied hnak’s read_lba register saving patch. Added radekg’s HFS filesystem fix to handle 2GB+ file sizes. Backported ATI device injection EFI64 tables and hibernation fix from netkas’PC_EFI. Thanks and credits goes for them!

Download information

You can get the binaries here: Chameleon-2.0-RC4-r684-bin.tar.gz

Sources: Chameleon-2.0-RC4-r684-src.tar.gz


The boot: prompt waits for you to type advanced startup options.


If you don't type anything, the computer continues starting up normally. It


uses the kernel and configuration files on the startup device, which it also


uses as the root device.


Advanced startup options use the following syntax:


[device]<kernel> [arguments]


Example arguments include


device: rd=<BSD device name> (e.g. rd=disk0s2)


rd=*<IODeviceTree path> (e.g. rd=*/PCI0@0/CHN0@0/@0:1)


kernel: kernel name (e.g. "mach_kernel" - must be in "/" )


flags: -v (verbose) -s (single user mode),


-x (safe mode) -F (ignore boot configuration file)


"Graphics Mode"="WIDTHxHEIGHTxDEPTH" (e.g. "1024x768x32")


kernel flags (e.g. debug=0x144)


io=0xffffffff (defined in IOKit/IOKitDebug.h)


Example: mach_kernel rd=disk0s1 -v "Graphics Mode"="1920x1200x32"


If the computer won't start up properly, you may be able to start it up using


safe mode. Type -x to start up in safe mode, which ignores all cached


driver files.


Special booter hotkeys:


F5 Rescans optical drive.


F10 Scans and displays all BIOS accessible drives.


Special booter commands:


?memory Displays information about the computer's memory.


?video Displays VESA video modes supported by the computer's BIOS.


?norescan Leaves optical drive rescan mode.


Additional useful command-line options:


config=<file> Use an alternate Boot.plist file.


Options useful in the com.apple.Boot.plist file:


Wait=Yes|No Prompt for a key press before starting the kernel.


"Quiet Boot"=Yes|No Use quiet boot mode (no messages or prompt).


Timeout=8 Number of seconds to pause at the boot: prompt.


"Instant Menu"=Yes Force displaying the partition selection menu.


"Default Partition" Sets the default boot partition,


=hd(x,y) where 'x' is the disk number, 'y' the partition number.


"Hide Partition" Remove unwanted partition(s) from the boot menu.


=hd(x,y) [hd(m,n)]


GUI=No Disable the GUI (enabled by default).


"Boot Banner"=Yes|No Show boot banner in GUI mode (enabled by default).


"Legacy Logo"=Yes|No Use the legacy grey apple logo (disabled by default).


PciRoot=<value> Use an alternate value for PciRoot. (default value: 0).


GraphicsEnabler=Yes|No Automatic device-properties generation for graphics cards.


VideoROM=<file> Use an alternate ROM image (default path: /NVIDIA.ROM).


VBIOS=Yes|No Inject VBIOS to device-properties.


EthernetBuiltIn=Yes|No Automatic "built-in"=yes device-properties generation


for ethernet interfaces.


USBBusFix=Yes Enable the EHCI and UHCI fixes (disabled by default).


EHCIacquire=Yes Enable the EHCI fix (disabled by default).


UHCIreset=Yes Enable the UHCI fix (disabled by default).


Wake=No Disable wake up after hibernation (enbaled by default).


ForceWake=Yes Force using the sleepimage (disabled by default).


WakeImage=<file> Use an alternate sleepimage file


(default path is /private/var/vm/sleepimage).


DropSSDT=Yes Skip the SSDT tables while relocating the ACPI tables.


DSDT=<file> Use an alternate DSDT.aml file


(default path: /DSDT.aml /Extra/DSDT.aml)


SMBIOS=<file> Use an alternate smbios.plist file


(default path: /smbios.plist /Extra/smbios.plist


bt(0,0)/Extra/smbios.plist).


SMBIOSdefaults=No Don't use the Default values for SMBIOS overriding


if smbios.plist doesn't exist, factory


values are kept.


"Scan Single Drive" Scan the drive only where the booter got loaded from.


=Yes|No Fix rescan issues when using a DVD reader in AHCI mode.


Rescan=Yes Enable CD-ROM rescan mode.


"Rescan Prompt"=Yes Prompts for enable CD-ROM rescan mode.


Installation Guide

Open the Terminal and command as Followings

$ sudo dd if=boot1h of=/dev/rdisk0s2

$ sudo cp boot /

$ sudo cp -Rf i386 /usr/standalone/

If you used MBR Partition, you need install boot0 to the MBR, additionally:


$ sudo fdisk -f boot0 -u -y /dev/rdisk0


Followings is com.apple.Boot.plist:

<?xml version="1.0" encoding="UTF-8"?>

<!DOCTYPE plist PUBLIC "-//Apple//DTD PLIST 1.0//EN" "http://www.apple.com/DTDs/PropertyList-1.0.dtd">

<plist version="1.0">

<dict>

<key>Graphics Mode</key>

<string>1280x960x60</string>

<key>GraphicsEnabler</key>

<string>Yes</string>

<key>Kernel</key>

<string>mach_kernel</string>

<key>Kernel Flags</key>

<string></string>

<key>SMBIOS</key>

<string>/Extra/smbios.plist</string>

<key>USBBusFix</key>

<string>Yes</string>

<key>VBIOS</key>

<string>Yes</string>

<key>VideoROM</key>

<string>nVidia8600GTS.rom</string>

</dict>

</plist>


'Hackintosh > Chameleon' 카테고리의 다른 글

Chameleon 2 RC5 rev. 747 (Trunk 699)  (0) 2011.02.22
com.apple.Boot.plist 수정하기  (0) 2010.09.08
USB Boot issue with Chameleon 2.0-RC2~RC4  (0) 2009.12.18
Chameleon-2.0-RC3-r658-bin  (0) 2009.11.22
Chameleon 설치 가이드  (0) 2009.10.28
:
Posted by Ritz®™
2009. 12. 18. 13:42

USB Boot issue with Chameleon 2.0-RC2~RC4 Hackintosh/Chameleon2009. 12. 18. 13:42

Chameleon 2.0-RC2~RC4

Symptom:

There were some issue, chameleon installed in USB.


Com.apple.Boot.plist:

Check /Extra/com.apple.Boot.plist and /Library/Preferences/SystemConfigurations/com.apple.Boot.plist


Solution:

1. Instsll Chameleon to H.D.D not USB.

2. Modified com.apple.Boot.plist. Remove " <key>USBBusFix</key>" contents.

3. If your Nvidia Graphic card nor working, you should install nvidia.rom file in /Extra folder.


Boot Log.:

Dec 15 13:40:34 localhost kernel[0]: USBF:       1.181   AppleUSBUHCI[0xffffff8049523000]::start unable to initialize UIM
Dec 15 13:40:34 localhost kernel[0]: USBF:      1.182   AppleUSBUHCI[0xffffff8049526000]::start unable to initialize UIM
Dec 15 13:40:34 localhost kernel[0]: com.apple.AppleFSCompressionTypeZlib load succeeded
Dec 15 13:40:34 localhost kernel[0]: AppleIntelCPUPowerManagementClient: ready
Dec 15 13:40:34 localhost kernel[0]: FireWire runtime power conservation disabled. (2)
Dec 15 13:40:34 localhost kernel[0]: USBF:      1.742   AppleUSBEHCI[0xffffff8009b61000]: unable to get filterInterruptEventSource
Dec 15 13:40:34 localhost kernel[0]: USBF:      1.744   AppleUSBEHCI[0xffffff8009b61000]::UIMInitialize - Error occurred (0xe00002be)
Dec 15 13:40:34 localhost kernel[0]: USBF:      1.750   AppleUSBEHCI[0xffffff8009b61000]::start unable to initialize UIM
Dec 15 13:40:34 localhost kernel[0]: Got boot device = IOService:/AppleACPIPlatformExpert/PCI0@0/AppleACPIPCI/IDE0@1F,2/AppleAHCI/PRT4@4/IOAHCIDevice@0/AppleAHCIDiskDriver/IOAHCIBlockStorageDevice/IOBlockStorageDriver/WDC WD1600BEVS-22RST0 Media/IOGUIDPartitionScheme/Untitled 1@2
Dec 15 13:40:34 localhost kernel[0]: BSD root: disk1s2, major 14, minor 5
Dec 15 13:40:34 localhost kernel[0]: ApplePS2Trackpad: Synaptics TouchPad v7.0
Dec 15 13:40:34 localhost kernel[0]: FireWire (OHCI) VendorID 1180 ID 832 PCI now active, GUID 384fc000297355e1; max speed s400.
Dec 15 13:40:34 localhost kernel[0]: Kernel is LP64
Dec 15 13:40:34 localhost kernel[0]: AppleIntelCPUPowerManagement: initialization complete
Dec 15 13:40:34 localhost kernel[0]: USBF:      6.345   AppleUSBUHCI[0xffffff804951d000]::start unable to initialize UIM
Dec 15 13:40:34 localhost kernel[0]: USBF:      6.418   AppleUSBUHCI[0xffffff8049434000]::start unable to initialize UIM
Dec 15 13:40:35 localhost kernel[0]: systemShutdown false
Dec 15 21:40:00 Ujens-MacBook-Pro kernel[0]: ERROR: FireWire unable to determine security-mode; defaulting to full-secure.
Dec 15 21:40:03 Ujens-MacBook-Pro kernel[0]: Waiting for DSMOS...
Dec 15 21:40:03 Ujens-MacBook-Pro kernel[0]: NVDANV50HAL loaded and registered.
Dec 15 21:40:03 Ujens-MacBook-Pro kernel[0]: Sound assertion "0 != setupHostInterrupt ()" failed in "/SourceCache/AppleHDA/AppleHDA-179.1.4/AppleHDAController/AppleHDAController.cpp" at line 312 goto Exit
com.apple.Boot.plist
<?xml version="1.0" encoding="UTF-8"?>
<!DOCTYPE plist PUBLIC "-//Apple//DTD PLIST 1.0//EN" "http://www.apple.com/DTDs/PropertyList-1.0.dtd">
<plist version="1.0">
<dict>
        <key>Boot Banner</key>
        <string>No</string>
        <key>Default Partition</key>
        <string>hd(1,1)</string>
        <key>Graphics Mode</key>
        <string>1920x1200x32</string>
        <key>GraphicsEnabler</key>
        <string>Yes</string>
        <key>Kernel</key>
        <string>mach_kernel</string>
        <key>Kernel Flags</key>
        <string></string>
        <key>PciRoot</key>
        <string>0</string>
        <key>Timeout</key>
        <string>3</string>
        <key>USBBusFix</key>
        <string>Yes</string>
        <key>VBIOS</key>
        <string>No</string>
</dict>
</plist>
Modified com.apple.Boot.plist 
<?xml version="1.0" encoding="UTF-8"?>
<!DOCTYPE plist PUBLIC "-//Apple//DTD PLIST 1.0//EN" "http://www.apple.com/DTDs/PropertyList-1.0.dtd">
<plist version="1.0">
<dict>
        <key>Kernel</key>
        <string>mach_kernel</string>
        <key>Kernel Flags</key>
        <string>-pci0</string>
        <key>Timeout</key>
        <string>8</string>
        <key>GraphicsEnabler</key>
        <string>y</string> 
</dict>
</plist>

<?xml version="1.0" encoding="UTF-8"?>

<!DOCTYPE plist PUBLIC "-//Apple//DTD PLIST 1.0//EN" "http://www.apple.com/DTDs/PropertyList-1.0.dtd">

<plist version="1.0">

<dict>

<key>DSDT</key>

<string>/Extra/DSDT.aml</string>

<key>Default Partition</key>

<string>hd(1,2)</string>

<key>Graphics Mode</key>

<string>1280x960x32@60Hz</string>

<key>GraphicsEnabler</key>

<string>y</string>

<key>Kernel</key>

<string>mach_kernel</string>

<key>Kernel Flags</key>

<string>-x32</string>

<key>Legacy Logo</key>

<string>yes</string>

<key>SMBIOS</key>

<string>/Extra/smbios.plist</string>

<key>Timeout</key>

<string>5</string>

<key>VideoROM</key>

<string>nVidia.rom</string>

</dict>

</plist>

기타 도움이 될 만한 글들 :


:
Posted by Ritz®™
2009. 11. 22. 09:08

Chameleon-2.0-RC3-r658-bin Hackintosh/Chameleon2009. 11. 22. 09:08

1. download in ✒here.

    download pkg ✒here.  

2. Some guide as followings.

About the new options

SMBIOS
Finally you can specify your smbios.plist location using a device selector prefix like “SMBIOS=rd(0,0)/Extra/smbios.plist”.

VideoROM
You can pass an alternate video ROM image file to the system.

VBIOS
Using this boolean switch, you can control the injection of your video BIOS to device-properties. We got various reports if this switch is really needed to make your graphics device handled correctly by the system.

You can use the same booter partition for both Leopard and the recent Snow Leopard; to do that you can put your OS version specific KEXTs/MKEXT this way:
/Extra/10.(5|6)/Extensions[.mkext]

3.So I make a following folder for switching Windows, Snow and Leopard OSX even Linux.

* 다음 그림과 같이 폴더를 만들어주면 부트로더 하나로 Leopard와 Snow Leopard를  멀티부팅할수 있다.

4. Boot Helper

The boot: prompt waits for you to type advanced startup options.

If you don't type anything, the computer continues starting up normally. It

uses the kernel and configuration files on the startup device, which it also

uses as the root device.


Advanced startup options use the following syntax:


   [device]<kernel> [arguments]


Example arguments include


device: rd=<BSD device name> (e.g. rd=disk0s2)

   rd=*<IODeviceTree path> (e.g. rd=*/PCI0@0/CHN0@0/@0:1)


kernel: kernel name (e.g. "mach_kernel" - must be in "/" )


flags: -v (verbose) -s (single user mode),

   -x (safe mode) -F (ignore boot configuration file)


"Graphics Mode"="WIDTHxHEIGHTxDEPTH" (e.g. "1024x768x32")


kernel flags (e.g. debug=0x144)

io=0xffffffff (defined in IOKit/IOKitDebug.h)


Example: mach_kernel rd=disk0s1 -v "Graphics Mode"="1920x1200x32"


If the computer won't start up properly, you may be able to start it up using

safe mode. Type -x to start up in safe mode, which ignores all cached

driver files.


Special booter hotkeys:

F5 Rescans optical drive.

F10 Scans and displays all BIOS accessible drives.

Special booter commands:

?memory Displays information about the computer's memory.

?video Displays VESA video modes supported by the computer's BIOS.

?norescan Leaves optical drive rescan mode.


Additional useful command-line options:

config=<file> Use an alternate Boot.plist file.


Options useful in the com.apple.Boot.plist file:

Wait=Yes|No Prompt for a key press before starting the kernel.

"Quiet Boot"=Yes|No Use quiet boot mode (no messages or prompt).

Timeout=8 Number of seconds to pause at the boot: prompt.

"Instant Menu"=Yes Force displaying the partition selection menu.


"Default Partition" Sets the default boot partition,

   =hd(x,y) where 'x' is the disk number, 'y' the partition number.


GUI=No Disable the GUI (enabled by default).

"Boot Banner"=Yes|No Show boot banner in GUI mode (enabled by default).

"Legacy Logo"=Yes|No Use the legacy grey apple logo (disabled by default).

GraphicsEnabler=Yes|No Automatic device-properties generation for graphics cards.

VideoROM=<file> Use an alternate ROM image (default path: /NVIDIA.ROM).

VBIOS=Yes|No Inject VBIOS to device-properties.


EthernetBuiltIn=Yes|No Automatic "built-in"=yes device-properties generation

   for ethernet interfaces.


USBBusFix=Yes Enable the EHCI and UHCI fixes (disabled by default).

EHCIacquire=Yes Enable the EHCI fix (disabled by default).

UHCIreset=Yes Enable the UHCI fix (disabled by default).


Wake=No Disable wake up after hibernation (enbaled by default).

ForceWake=Yes Force using the sleepimage (disabled by default).

WakeImage=<file> Use an alternate sleepimage file

   (default path is /private/var/vm/sleepimage).


DropSSDT=Yes Skip the SSDT tables while relocating the ACPI tables.

DSDT=<file> Use an alternate DSDT.aml file

   (default path: /DSDT.aml /Extra/DSDT.aml)


SMBIOS=<file> Use an alternate smbios.plist file

   (default path: /smbios.plist /Extra/smbios.plist

   bt(0,0)/Extra/smbios.plist).


SMBIOSdefaults=No Don't use the Default values for SMBIOS overriding

   if smbios.plist doesn't exist, factory

   values are kept.


"Scan Single Drive" Scan the drive only where the booter got loaded from.

   =Yes|No Fix rescan issues when using a DVD reader in AHCI mode.

Rescan=Yes Enable CD-ROM rescan mode.

"Rescan Prompt"=Yes Prompts for enable CD-ROM rescan mode.


3. Installation
Open the Terminal and command as Followings

$ sudo dd if=boot1h of=/dev/rdisk0s2

$ sudo cp boot /

$ sudo cp -Rf i386 /usr/standalone/

If you used MBR Partition, you need install boot0 to the MBR, additionally:

$ sudo fdisk -f boot0 -u -y /dev/rdisk0

Followings is com.apple.Boot.plist:

<?xml version="1.0" encoding="UTF-8"?>

<!DOCTYPE plist PUBLIC "-//Apple//DTD PLIST 1.0//EN" "http://www.apple.com/DTDs/PropertyList-1.0.dtd">

<plist version="1.0">

<dict>

<key>Graphics Mode</key>

<string>1280x960x60</string>

<key>GraphicsEnabler</key>

<string>Yes</string>

<key>Kernel</key>

<string>mach_kernel</string>

<key>Kernel Flags</key>

<string></string>

<key>SMBIOS</key>

<string>/Extra/smbios.plist</string>

<key>USBBusFix</key>

<string>Yes</string>

<key>VBIOS</key>

<string>Yes</string>

<key>VideoROM</key>

<string>nVidia8600GTS.rom</string>

</dict>

</plist>


When Chameleon loaded kexts following is the procedure.
➊ - /Extra/Extensions/
➋ - /Extra/0.(5/6)/extensions.mkext.  It depends on OS Version.
➌ - It finally load /System/Library/Extensions.mkext


:
Posted by Ritz®™
2009. 10. 28. 03:07

Chameleon 설치 가이드 Hackintosh/Chameleon2009. 10. 28. 03:07


Update : http://cafe.naver.com/uefi/6

- 리얼맥 시스템에 조금 더 가깝게 만들어주는 부트로더로 요즈음 더 인기가 많은 부트로더를 소개합니다.

Chameleon 설치 가이드

Chameleon은 오픈소스코드를 충실하게 준수하는 GUI환경의 부트로더입니다.
Leopard는 물론, Snow Leopard, Lion, Mountain Lion(10.8.?) 까지 지원을 하여 주고 조금은 복잡하지만, Mac OS X 사용자들에게 많은 사랑을 받아오는 부트로더입니다.
물론, 2012년 Chimera 라는 이름으로 바뀌긴 했지만 어쨌든 혼용하여 여전히 사용되고 있습니다.
Windows 하드디스크가 있다면 일단 사타케이블을 떼어놓고 설치작업 합니다.  물론, mbr이든 guid 파티션이든 상관없이 설치할 수 있습니다.
I. Chameleon을 다운로드 받습니다.
II. 압축을 풀면 다음과 같은 화일이 생성됩니다.


III. 패키지를 더블클릭하면 설치과정이 진행됩니다. 계속을 누릅니다.

IV. 계속을 누릅니다.


V. 계속을 누르고 사용권 계약에서 동의를 클릭합니다.


VI. 설치할 대상 디스크를 선택하고 계속을 누릅니다.


VII. 사용자화를 클릭하면 다음과 같은 화면이 나옵니다.


VIII. 여러가지 선택사항들이 있지만, 처음 설치하시는 분들은 그대로 설치에 들어갑니다.
특히,  EFI 선택은 시스템 안정화를 시키고 난 후 설치해주어도 늦지 않습니다.  안정화도 안된 상황에서  EFI 문제로 질문을 하시는 분들을 보면 답답합니다.하드디스크 부팅으로 안정화 시킨다음 EFI로 설정해 주시는 것이 여러사람 피곤하게 하지 않고 스스로의 정신건강에도 좋습니다.


VIIII. 자 이제 설치를 마쳤습니다. 역시나 dsdt.aml, com.apple.Boot.plist, 그리고 Extra 폴더내의 해킨 드라이버 설치 작업이 남았습니다.
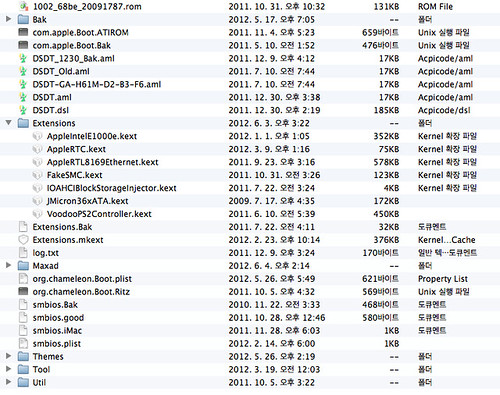
X. Chameleon을 설치하고 난 후, 중요한 파일들의 목록입니다. /Extra/Extensions 폴더에 자신의 시스템에 맞는 해킨 드라이버를 설치하여 줍니다.
Kext 종류

- 위 그림에서 AHCIPortInjector.kext 혹은 IOAHCIBlockStorageInjector.kext 와 fakesmc.kext화일은 기본적으로 들어가야 합니다.
- 또한 메인보드에서 추출한 dsdt 패치화일(dsdt.aml) 과 시스템 설정에 필요한 smbios.plist 화일이 반드시 필요하겠지요.
- 네 아래 그림과 같이 핵심점일 화일들은 다 들어가 있습니다.
- com.apple.Boot.plist 화일은 Chimera로 변경된 이후 요즈음은 org.chameleon.Boot.plist 화일명으로 변경되었습니다.

- Bak 화일들은 신경쓰지 마세요.  백업 화일들입니다.

Chameleon

부트로드를 설치하는 방법에는 여러가지 방법이 있는데 Multibeast를 이용하여 설치할 수도 있습니다.

http://osx86.tistory.com/1334


:
Posted by Ritz®™

Source : http://ipis-osx.wikidot.com/forum/t-135336 

1. Boot from Apple Install DVD, wait all the stuffs to load, and launch Disk Utility.
2. Unmount your OSX partition in Disk Utility
3. Close Disk Utility, open Terminal and type:

diskutil list

— you will see something similar to this:
/dev/disk0
   #:                       TYPE NAME                    SIZE       IDENTIFIER
   0:     FDisk_partition_scheme                        *149.1 Gi   disk0
   1:               Windows_NTFS SYSTEM                  80.0 Gi    disk0s1
   2:                  Apple_HFS OSX                     69.0 Gi    disk0s2
   3:                                                    39.2 Mi    disk0s3
/dev/disk1
   #:                       TYPE NAME                    SIZE       IDENTIFIER
   0:     Apple_partition_scheme                        *4.4 Gi     disk1
   1:        Apple_partition_map                         31.5 Ki    disk1s1
   2:                  Apple_HFS iDeneb v1.3 10.5.5      4.4 Gi     disk1s3
/dev/disk2
   #:                       TYPE NAME                    SIZE       IDENTIFIER
   0:     FDisk_partition_scheme                        *111.8 Gi   disk2
   1:               Windows_NTFS eMag                    111.8 Gi   disk2s1
/dev/disk3
   #:                       TYPE NAME                    SIZE       IDENTIFIER
   0:                            untitled               *467.0 Ki   disk3
/dev/disk4
   #:                       TYPE NAME                    SIZE       IDENTIFIER
   0:                            untitled               *467.0 Ki   disk4
/dev/disk5
   #:                       TYPE NAME                    SIZE       IDENTIFIER
   0:                            untitled               *95.0 Ki    disk5
/dev/disk6
   #:                       TYPE NAME                    SIZE       IDENTIFIER
   0:                            untitled               *95.0 Ki    disk6

— at this stage remember the correct ID for Apple_HFS OSX and id of the physical HDD.

4. Now we gonna install boot0 part of Darwin boot loader in the Master Boot Record by typing:

dd if=/usr/standalone/i386/boot0 of=/dev/disk0 bs=400 count=1

— if your path to Darwin boot loader package differs, feel free to change the path. It is important to identify the disk ID of your MBR; if it is not 'disk0' feel free to change it too.
5. Now we should install boot1h part of Darwin boot loader in the boot sector of our OSX partition:
dd if=/usr/standalone/i386/boot1h of=/dev/rdisk0s2 bs=512 count=1

As I said before, it is always a good idea to have a tool for Win you can use to display and modify your OSX files. In mine case I own MacDrive 7.
6. Type reboot in Terminal and return to your Windows.
7. Boot in Windows and check you got this line in your boot.ini:
C:\chain0="Mac OS X 10.5.6 Leopard"

8. Copy from /usr/standalone/i386/ a fresh copy of chain0 in your C:\ partition.
9. You may also want to refresh from /usr/standalone/i386/ your copy of boot which is in the root volume of your OSX partition.
10. Restart, you should see the Windows boot loader menu and if everything was properly set clicking on „Mac OS X 10.5.6 Leopard“ will bring you back to your beloved OSX part of life.

Hope this will help someone in trouble as I was.

:
Posted by Ritz®™

Introduction

When running non-modified retail version of Mac OS X on a generic PC, a special boot loader is needed in order to trick the vanilla Apple operating system to think it’s running on a genuine Mac[1]. One of these boot loaders is called Chameleon[2]. But Chameleon installation requires some tweaking in order to do the magic. It’s not enough just to install Chameleon on the system disk but you also need some hardware-specific configuration in order to enjoy a fully working Hackintosh system.

The configuration consists of multiple files. You could install these files directly to the system disk you’re booting from or the EFI file partition if using hard disk with GPT partition layout. But it’s also possible to bundle all the needed stuff except boot configuration inside a single disk image file which Chameleon loads on startup and reads the files inside the image. This way you only need to install this preboot image file and boot configuration file and your system disk remains less polluted. I find this approach much more appealing as it allows me to keep the system as clean as possible.

In this guide we’re going to create a Chameleon preboot image from the scratch in a generic way. It is assumed that the machine and motherboard in particular in use has good compatibility with vanilla Mac OS X Snow Leopard. In practice this means Intel Core 2 processor with Intel chipset on the motherboard. You’ll also need a working Mac OS X 10.5 or 10.6 installation running on a genuine Mac or Hackintosh with root shell access. The whole process is being done in the shell using command-line tools. Also if you’re going to patch your DSDT, you’re probably going to need a way to boot Linux on the machine if you don’t have Mac OS X already installed. Ubuntu Live CD would do it just fine[3].

Preparing the preboot image

  1. Create the preboot disk image and mount it. We’re using the file~/Desktop/Hackintosh/Preboot.dmg in this guide.

    ~: $ hdiutil create -size 4m -layout MBRSPUD -fs HFS+ -uid 0 -gid 0 \
            -volname Preboot ~/Desktop/Hackintosh/Preboot.dmg
    ~: $ hdiutil attach -noverify ~/Desktop/Hackintosh/Preboot.dmg
    
    
  2. Write down the device name for the preboot disk. In the guide we’re using /dev/disk3.

  3. Fix the preboot mountpoint so that file can be owned by root.

    ~: $ sudo diskutil enableOwnership /dev/disk3s1
    
    
  4. Mark the file system so that fseventsd doesn’t keep any logs there.

    ~: $ sudo rm -rf /Volumes/Preboot/.fseventsd
    ~: $ sudo install -o root -g admin -m 700 -d /Volumes/Preboot/.fseventsd
    ~: $ sudo touch /Volumes/Preboot/.fseventsd/no_log
    ~: $ sudo chmod 400 /Volumes/Preboot/.fseventsd/no_log
    ~: $ sudo chown root:admin /Volumes/Preboot/.fseventsd/no_log


Kernel extensions

Chameleon needs to load some kernel extensions prior to booting the Mac OS X kernel in order to fix some issues running the Apple operating system on non-Apple hardware. Also Mac OS X may not include drivers for all of your hardware so you need to add any 3rd party drivers that your hardware needs to function. You can read this article[4] to find more about kernel extensions.

  1. Create directory to hold the kernel extensions. You must not change the path as Chameleon expects to find the kernel extensions under Extra/Extensions directory under the root of the preboot volume.

    ~: $ sudo mkdir -p /Volumes/Preboot/Extra/Extensions
    
    
  2. Download the following mendatory kernel extensions saving each .kext file under/Volumes/Preboot/Extra/Extensions.

    • fakesmc.kext [5],[6]
      • System Management Controller emulator. Mac OS X won’t boot on a Hackintosh without this.
    • OpenHaltRestart.kext [7]
      • Fixes shutdown/restart issues.
  3. You may want to include the following additional generic kernel extensions.

  4. Download any 3rd party driver kernel extensions for your hardware and place them under/Volumes/Preboot/Extra/Extensions too. Good places to find additional kernel extensios are kexts.com[11] and myHack[10]. For a real-world example, you can read my posting Technical details of my Hackintosh installation.

  5. Fix permissions and ownership of the kernel extensions. Kernel extensions won’t load if the files are not owned by root:wheel[12].

    ~: $ sudo find /Volumes/Preboot/Extra/Extensions -type f -exec chmod 644 {} \;
    ~: $ sudo find /Volumes/Preboot/Extra/Extensions -type d -exec chmod 755 {} \;
    ~: $ sudo chown -R root:wheel /Volumes/Preboot/Extra/Extensions
    
    
  6. Create/update extensions cache

    ~: $ sudo kextcache -m /Volumes/Preboot/Extra/Extensions.mkext /Volumes/Preboot/Extra/Extensions


Patch DSDT

DSDT[13],[14] is an ACPI table that is stored in the BIOS. In order to work correctly, some functionality in Mac OS X depends on features of the DSDT that can be found on Macs. The DSDT in your generic PC’s BIOS might be incorrect or buggy when used with Mac OS X. Chameleon supports overriding the DSDT provided by your hardware with a version loaded prior to loading the operating system. Thus you can create a patched DSDT for your hardware based on your original DSDT that is also compatible with Mac OS X and make your Hackintosh behave well without modifying hardware or BIOS.

The plan for DSDT patching is straightforward.

  1. First you need to extract the DSDT binary code in AML format (ACPI Machine Language) wired to your BIOS.

  2. Then you decompile the AML binary to ASL (ACPI Source Language), which is source code to the AML binary in ASCII format.

  3. Edit the AML source code to patch in any desired fixes.

  4. Compile the patched AML source to get an updated DSDT AML binary file.

  5. You need to include the resulting DSDT AML binary file in the Chameleon preboot environment so Chameleon can find and load it and override the built-in DSDT with the patched one on system startup.

For decompilation and compilation of DSDT you need Intel ASL compiler/decompiler[15]. For Debian/Ubuntu, the tool is available in the package iasl[16]. Mac version[17] is also available. The iasl binary is stored in the Tools directory of the linked download.

Actual changes to the DSDT are always dependant on the combination of particular hardware and BIOS version so I’ll go through these steps here in a generic way.

Extracting the DSDT AML binary

In Linux, the DSDT extraction is a breeze as the blob available under the /proc file system[14]. Just run

    ~: $ sudo install -o `whoami` /proc/acpi/dsdt ~/dsdt-original.aml

and you have a copy of your DSDT AML binary in the file ~/dsdt-original.aml.

In Mac OS X you can extract the DSDT AML binary to the file ~/Desktop/Hackintosh/dsdt-original.aml by running the following command:

    ~: $ ioreg -lw0 | perl -pne'$_=pack"c*",map{hex}unpack"(A2)*",($_=~/"DSDT"=<([^>]+)/)[0]' \
            > ~/Desktop/Hackintosh/dsdt-original.aml

Note that if running Mac OS X, be sure that the system doesn’t have a patched currently DSDT applied or you won’t be able to extract the original DSDT in the BIOS!

Decompiling DSDT AML binary to ASL source

Use the following iasl command to decompile the DSDT AML binary ~/Desktop/Hackintosh/dsdt-original.aml and save it as ASL source file ~/Desktop/Hackintosh/dsdt.dsl:

    ~: $ iasl -d ~/Desktop/Hackintosh/dsdt-original.aml && \
            mv ~/Desktop/Hackintosh/dsdt-original.dsl ~/Desktop/Hackintosh/dsdt.dsl

Editing the DSDT ASL source

Now you can edit the file ~/Desktop/Hackintosh/dsdt.dsl and fix any hardware-specific problems with the DSDT. I’ve documented the needed DSDT patches for one of my systems in the posting Technical details of my Hackintosh installation. Many of these patches are quite generic.

Compiling ASL source to DSDT AML binary

After applying the desired set of patches, compile the ASL source back to a DSDT AML binary file~/Desktop/Hackintosh/dsdt.aml with the following command:

    ~: $ iasl ~/Desktop/Hackintosh/dsdt.dsl

Configuring Chameleon preboot image to load the DSDT AML binary

Let’s say you have the modified DSDT AML binary saved as the file ~/Desktop/Hackintosh/dsdt.aml. In order for Chameleon to find and load the patched DSDT, the file needs to be installed as Extra/dsdt.amlunder the preboot image root. So copy it like this:

    ~: $ sudo install -o root -g wheel -m 644 ~/Desktop/Hackintosh/dsdt.aml /Volumes/Preboot/Extra

Customizing SMBIOS

System Management BIOS or SMBIOS stores some details about your hardware[18],[19]. In Mac OS X you can view the current SMBIOS information with System Profiler.app. Chameleon allows customization of the SMBIOS values. You can do this by creating the file Extra/smbios.plist under the preboot image root. You could use this feature to make your Hackintosh mimic some existing Mac model or you could provide your own values. It’s all optional, though. But If you want to do that, then read these articles[20],[21],[22] for more details and save the resulting file as /Volumes/Preboot/Extra/smbios.plist.

Here is a sample smbios.plist which gives the system a custom serial number.

<?xml version="1.0" encoding="UTF-8"?>
<!DOCTYPE plist PUBLIC "-//Apple Computer//DTD PLIST 1.0//EN" "http://www.apple.com/DTDs/PropertyList-1.0.dtd">
<plist version="1.0">
<dict>
    <key>SMserial</key>
    <string>CEIF6JI3XU6</string>
</dict>
</plist>

Configure Chameleon to use the preboot image

By default Chameleon tries to find DSDT and SMBIOS data from the system disk. In order to instruct Chameleon to use the preboot image, the file RAMDisk.plist needs to be added to the root directory of the preboot file system. So save the this as /Volumes/Preboot/RAMDisk.plist.

<?xml version="1.0" encoding="UTF-8"?>
<!DOCTYPE plist PUBLIC "-//Apple Computer//DTD PLIST 1.0//EN" "http://www.apple.com/DTDs/PropertyList-1.0.dtd">
<plist version="1.0">
<dict>
    <key>BTAlias</key>
    <string>Yes</string>
</dict>
</plist>

Finalize preboot image

  1. Cleanup preboot file system

    ~: $ sudo find /Volumes/Preboot -type f -exec chmod 644 {} \;
    ~: $ sudo find /Volumes/Preboot -type d -a ! -name .fseventsd -exec chmod 755 {} \;
    ~: $ sudo chown -R root:wheel /Volumes/Preboot
    ~: $ sudo find /Volumes/Preboot -name .DS_Store -exec rm {} \;
    ~: $ sudo rm -rf /Volumes/Preboot/.Trashes
    
    
  2. Eject the preboot disk

    ~: $ hdiutil eject /dev/disk3


The preboot image ~/Desktop/Hackintosh/Preboot.dmg is now ready to be deployed in the Extra directory of a Chameleon boot disk.


:
Posted by Ritz®™