달력

5

« 2024/5 »

  • 5
  • 6
  • 7
  • 8
  • 9
  • 10
  • 11
  • 12
  • 13
  • 14
  • 15
  • 16
  • 17
  • 18
  • 19
  • 20
  • 21
  • 22
  • 23
  • 24
  • 25
  • 26
  • 27
  • 28
  • 29
  • 30
  • 31

Update : Mac OS X 설치 사용자 모임, http://cafe.naver.com/uefi 


CPU : Intel Core 2 Duo E8400 @ 3.00GHz (Wolfdale Socket 775 LGA / MMX,SSE(1,2,3,3S,4.1), EM64T, VT-x  )

RAM : DDR2 1024 * 2

M/B : ASUSTeK P5KPL-VM MYEDU / intel - P35/G33/G31 / Southbridge : Intel - 82801GB (ICH7/R)

Video : NVIDIA GeForce 8600 GTS

Sound : High Definition Audio Device (onBoard)

LAN : Atheros L1 Gigabit Ethernet 10/100/1000 base-T Controller (onBoard)

HDD : Hitach 300G / HDP 725032GLA360 ATA Device

      (C: 주파티션 100G, Windows  /  D: 주파티션 200G, OS X)


ODD : 삼성 DVD 멀티 / TSSTcorp CDW/DVD TS-H493B ATA device


< 설치 준비물 >


Rebel EFI DVD : http://j.mp/evJhMT

Snow Leopard Retail SingleLayer ( Mac OS X Snow Leopard Retail : Single Layer ) :  http://j.mp/gEBq99, http://j.mp/j6nNIA

http://j.mp/i2nUbZ


<bios setup>

ATA/IDE Config: Enhanced
Enhanced Mode Support On: S-ATA

Onboard PCIE GbE LAN: Disabled
(I disabled the onboard LAN because I use a Netgear Wireless USB anyway.)

Plug and Play O/S: Yes


Suspend Mode: S3 Only
ACPI 2.0 Support: Enabled
Restore on AC Power Loss: Power Off

Boot Device Priority
1st: HDD 
2nd: DVD LG


<설치 과정>

http://j.mp/fNkAsI
http://j.mp/fYMEYp
http://j.mp/i6lezU

환영 동영상까지 보고 설치한 후 다음 과정


<부트로더설치>


부트로더설치가 어려우면 걍 ☛Multibeast로 마무리

<랜카드 드라이버 설치>

 Attansic ATL1E LAN driver aka AR8121 AR8113 (P5Q series), Working Kext available!! ;)


혹은 

  • Installation Method: Hazard's Snow Leopard 10.6.1/10.6.2 (Google it)
  • Choices on install: OSX 10.6.2, Legacy Kernel 10.2, Chameleon2 RC3, Graphics Enabler, NVEnabler, Cmos RST Fix: Legacy AppleRTC
  • Sata Fix: Ahci sata fix and Ioatafamily sata fix.

:
Posted by Ritz®™
2010. 2. 13. 21:33

Install Procedure -2 Hackintosh/Install2010. 2. 13. 21:33

Install Procedure


######################################################################################################
아래의 화면을 보기 위해서는 역시나 다음 글들이 유용할 것입니다.
해킨토시에 관한 다양한 질문들

검색신공 배양하기 구글링 5종 세트

1. 시스템 상황 파악하기
http://j.mp/58hmuA 

2. 추가 조치 방안 및 질문하는 방법
http://j.mp/6Jui2v 

3. 이미지의 종류
http://j.mp/5bKbXc 

4. 드라이버만 골라 설치하기
http://j.mp/7oKbwJ 


5. 관련시스템 설치이력 찾기(제품 모델명이 "GA-EP45" 시리즈인 경우)
http://j.mp/7d8gfp

######################################################################################################


❶ "Continue"를 눌러 설치를 시작한다.


❷ OSX 를 설치할 파티션을 선택한다.

 
❸ 만약 OSX를 설치할 파티션이 보이지 않는다면 Utilities > Disk Utility 를 선택하여 "OSX" 파티션을 만든다.

  
❹ Partition하는 방법 http://j.mp/a6iTKS
❺ 위 글에서 파티션을 만들었다면 다음은 사용자화를 선택하여자기 메인보드의 칩셋에 맞는 드라이버를 선택해야 합니다. 


❻ "Restart" (재부팅)을 클릭하여 재부팅을 한다.
 
❼ 재부팅후 "스페이스바"키를 누르고 "-v" 혹은 "-v -x"등의 부팅옵션을 주어 부팅한다.  메인보드에 따라 부팅옵션이 다양하게 있으므로 자기 보드에 맞는 부팅옵션을 주어야 한다.

다음 단계로 가기. 


'Hackintosh > Install' 카테고리의 다른 글

16GB USB Memory Stick Configuration  (0) 2010.03.13
해킨토시 설치하기  (0) 2010.03.06
Install Procedure -3  (0) 2010.02.13
OS9  (0) 2009.11.25
NEW Intel P55 Mobos & Core i7 860 / i5 750 CPU LGA1156 with Vanilla(10.6.2)  (0) 2009.11.21
:
Posted by Ritz®™


설치 이미지 : iDeneb 10.5.7

1. CMOS SETUP 설정
-  AHCI옵션을 Manual
-  바로 아래 옵션 Enable

설치과정 참고 : Installation Guide

2. 사용자화

커널 : 바닐라 9.7
부트로더 : 카멜레온2, DTDS 패치
칩셋 : iCHx
그래픽 : NVdarwin 512MB
오디오 : Voodoo HDA
패치 : Voodoo PS2
랜, 무선랜 : 선택X

설치 후, 재부팅시, 반드시 CMOS SETUP에서  EDB를 Enable 로 설정하고 부팅

'Hackintosh > NoteBook' 카테고리의 다른 글

Dell Stdio XPS 1640 해킨토시 설치하  (0) 2010.05.06
HP Pavilion dv7  (0) 2010.05.05
후지쯔 P7010  (0) 2010.01.31
OS X Install Guide in HP DV5-1207, DV4도 칩셋 동일  (0) 2009.12.16
Samsung Q210-FS02  (0) 2009.12.15
:
Posted by Ritz®™
ASUS P7P55D 메인보드에 해킨토시 설치하는 방법입니다.

1. 먼저 다음 두가지 cd 이미지를 다운로드 받습니다.

- ❶ http://j.mp/bm0Cer 
- ❷ Snow Leopard Retail DVD, *
- UltraISO로 2배속이나 혹은 4배속으로 설정하여 DVD로 구워줍니다.
- 부팅시에 "-v busratio=20 cpus=1" 옵션을 이용하여 ❶시디로 부팅합니다.
- ❶시디 로딩이 끝난후, ❷시디로 교체하여 줍니다.
- F5키를 누르고 ❷시디 "Install OS X DVD"를 선택하여 줍니다.
- 아래 그림에서 부팅옵션을 "-v busratio=20 cpus=1" 를 입력하여주고 엔터를 칩니다.
설치과정 보기
iboot01

연동장비 결과 비참

ensemble by apogee
s70xs yahama
dp firewire 800 3-port pcle (siig)
one usb by apogee
FXPansion BFD DRUM

- 설치한후에 재부팅후 스노우 레오파드를 인스톨 시킨 하드를 선택하신 후
-v maxmem=4096 으로 부팅하여 기본 설정을 진행합니다.

- Chameleon 과 10.6.2 combo Update룰 설치합니다.
- 부팅시에 “-f -v -s”옵션을 주어 싱글유저 모드로 부팅한 후, 'exit" 커맨드를 입력하여 정상부팅합니다.
* Kext Help7을 이용하여 랜 드라이버 설치하여 주기
* 공유기 DMZ 서버 설정하기


2. Study

http://www.apple.com/support/snowleopard/
#############################################################

검색신공 배양하기 구글링 6종 세트

1. 시스템 스펙/상황 파악하기
http://j.mp/58hmuA

2. 추가 조치 방안 및 질문하는 방법
http://j.mp/6Jui2v

3. 해킨 설치 이미지의 종류
http://j.mp/5bKbXc

4. 특정 패키지 혹은 드라이버만 골라 설치하기
http://j.mp/7oKbwJ


5. 관련시스템 설치이력 찾기(제품 모델명이 “GA-EP45” 시리즈인 경우)
http://j.mp/7d8gfp

6. p55-ud3r i5 750 보드에 4850 일 경우- 밥떠먹여주기 프로젝트팁

http://j.mp/8DfTQv
:
Posted by Ritz®™

Requirement : Chameleon 2.0-RC2~RC4

Symptom:

1. Install Chameleon 2.0.RC2 ~ 4.

2. ati_9442_1002.rom in /Extra/

3. Modify com.apple.boot.plist


com.apple.Boot.Plist(without kernel flags like UUID !) *

<?xml version="1.0" encoding="UTF-8"?>
<!DOCTYPE plist PUBLIC "-//Apple//DTD PLIST 1.0//EN" "http://www.apple.com/DTDs/PropertyList-1.0.dtd">
<plist version="1.0">
<dict>
<key>Graphics Mode</key>
<string>1920x1080x32</string>
<key>Kernel</key>
<string>mach_kernel</string>
<key>Kernel Flags</key>
<string>arch=i386</string>
<key>Timeout</key>
<string>2</string>
<key>GraphicsEnabler</key>
<string>Yes</string>
<key>EthernetEnabler</key>
<string>Yes</string>
</dict>
</plist>


/Extra/Store_Kexts/:

-EvoEnabler.kext in S/L/E or /Extra/Store_Kexts/_For_System
-LegacyATI4800Controller.kext in /Extra/Store_Kexts


10.6.2 Working:

1. Good Luck!


:
Posted by Ritz®™
2009. 12. 8. 08:01

Setup Geforce 8xxx-9xxx GT Hackintosh/Graphic Card2009. 12. 8. 08:01

You can get your 8600GT including 8XXX-9XXX series video card working using one of following methods in Snow Leopard.
➊ - Patch DSDT with the video
➋ - Add device (EFI) string to com.apple.Boot.plist
➌ - Chameleon's current auto injection of video / network works if your hardware is identified on PCIroot0 (you can check this in IORegistryExplorer). If your hardware is on PCIroot1 then you might have to use Netkas' PC EFI v10.n. Add GraphicsEnabler=Yes to your com.apple.Boot.plist for Chameleon 2.0-rc3 to inject the device properties.

➍.- After upgarding to 10.6.2, it sometimes did not work EFI String.

- remove nVidia kexts then install 10.6.1 nVidia kexts.

- or remove EFI String in com.apple.Boot.plist and Add GraphicsEnabler=Yes to your com.apple.Boot.plist then add your device-id in Geforce.kext, NVD*

- 10.6.1 NVDAResman.kext (6.0.6) and NVDANV50Hal.kext (6.0.6) in here. installing them in the /Extra/Extensions folder, with a properly configured boot cache will solve the issue. There is no need to install the kexts in /System/Library/Extensions, as the /Extra/Extensions folder will work.

- several 9800 Gt 1024 MB or 512 MB works just fine in 10.6.2 with ATY_init.kext enabler.


* Leopard 10.5.6 이상인 경우에는 위 과정 생략하고 아래과정부터 진행하세요.


Following is one of them for EFI string to com.apple.Boot.plist


1. Start OSx86 Tools then click Add EFI Strings/Boot Flag

2. Click GFX String


3. Click Choose.

4. Select your Graphic Card


GFX-String

5.


6.


7.


8. Copy and Paste com.boot.Apple.plist file from /Darwin to /Library/Preferences/SystemConfiguration/


:
Posted by Ritz®™


Source : http://www.osx86.es/?p=804

( ES)
Here you leave an application addressed to the holders of CR11Z Sony Vaiocomputers, CR21Z and CR31Z with ATI X2300 using Snow Leopard.

Download : http://j.mp/afwTW0  

Using this application you can have:
Audio, OpenGL accelerated graphics and resolution 1280 × 800,
DSDT corrected for Snow, Speedstep, battery management, trackpad and keyboard.

The application contains context-sensitive help on every button and menu help.

It also comes with "Read me first."

In comments about this article I leave the "Read me first."

Download link following the link to the forum.

21/11/09

Rehubicado battery driver to the folder "Drivers" because of random kernel panics.

Optimized file DSDT.aml (Now supports 4gb of RAM).

22/11/09

Added on Hack "Firewire power conservation" in the DSDT.

(EN)

Versión There is no application for this right now.

Join the forum discussion on this post - (9) Posts

2 Responses to "Vaio EvOBootboX edition."

  1. admin Says:

    EvOVaioBootboX

    Quickstart:

    Choose the RC3 Chameleon bootloader and the system partition where to install.
    Install extra folder.
    Install the drivers for Sony Vaio.
    Reboot.

    Tutorial slow:

    "What is EvOVaioBootboX?
    It is a program that allows you to store / install drivers and bootloaders,
    See it as a toolbox for your hack.

    Before you begin:

    -The application requires to function properly for the following:
    -The user must have administrator permissions (default if the installation is correct).
    "They can have spaces in the name of:
    Bootloaders storage folders / system disks / drivers.

    "The concept is as follows:

    The application focuses on 4 things:

    Storage and installation of bootloaders.
    "" Extra folder.
    "" Of your custom drivers.
    Installing drivers / repair permissions.

    1. Section remove drivers.
    "It's a quick way to delete a driver if you know his name, just select the partition where
    resident / System / Library / Extensions and click "OK" (It will recreate the boot caches after).
    "If the driver lies in the extra of that partition, select the
    extra box. (After deleting the driver file will be recreated within extensions.mkext / Extra).

    2.Sección bootloaders.
    In this section you can add and install bootloaders.

    How to add a bootloader?
    -Click on the bottom of the application on the button "Import bootloader" will open a folder
    contained within the program, there already exist several bootloaders (from team chameleon and
    to Netko). In this folder is where you can put your bootloaders into folders without spaces in the name and
    only with the file "boot" inside. (The application contains the rest of the binaries needed to install
    the boot.)
    "You have to press" refresh "after import / delete.

    How to install a bootloader:
    "First you should locate the disk and partition you want to install the bootloader, click in
    Utilities Osx> "HD info"
    -Located partition and we could say something like:

    SNOW Apple_HFS 200.0 GB disk0s2

    "In this case," disk0s2 "is what we seek:
    disk0 is the disk where you install
    s2 is partition
    "SNOW" is the name of the volume.

    "With that information and we can select disk, partition and volume to install the bootloader.

    EFI TOOL:
    "It's a small tool to format the EFI partition and so it can install drivers and bootloaders
    boot.
    -Note: In Snow Leopard, the EFI partition will be visible (always) after format (on Leopard was
    hidden (always) formatted once.)

    3.Drivers/permisos.

    "This section is devoted to the installation of drivers.
    -First select the target partition and extra if it's installed in / Extra / Extensions.
    -Install the drivers one by one dragging on the square icon.
    -The application caches, repair permissions and recreate the boot.
    "The button" rep permissions "repair the / System / Library / Extensions
    "The button" touch extensions "recreates the boot caches (but not the / Extra / Extensions.mkext)
    "The button" / Extra / Extensions.mkext create "creates the file in the selected partition.
    "The button" Extra / Extensions "open that folder.
    "The button" Extensions "open system / Library / Extensions.

    4.Utilidades OSx.
    -HD info
    Display information on disk utility.
    -EFI tool
    Allows to format the EFI partition

    5.Carpeta extra.
    -Create extra folder with the necessary content in the selected partition.
    "If you want to change the contents of extra (in the application is a selection of content standart)
    only you must click on the button "Import extra" and you can change what you need inside.
    "You have to press" refresh "after import / delete.

    6.Drivers.

    -Install the drivers contained within the program in the selected partition.
    "If you want to change the contents of drivers.
    Contents of drivers:
    Ati drivers for opengl.
    VoodooHDA for Audio.
    only you must click on the button "Import Drivers" and you can add more drivers inside.
    "You have to press" refresh "after import / delete.

    7.Archivos hidden.
    Displays or hides files normally not visible operating system.

    On the Help menu, you can find the help and "about EvOVaioBootboX" where you can update or uninstall.

  2. ritzcarltn Says:

    Good Job!

Leave a Reply

You must be logged in to post a comment.


'Hackintosh > NoteBook' 카테고리의 다른 글

OS X Install Guide in HP DV5-1207, DV4도 칩셋 동일  (0) 2009.12.16
Samsung Q210-FS02  (0) 2009.12.15
DELL M1210 OS X SETUP  (0) 2009.12.06
HP 2133 with OSX?  (0) 2009.11.22
HP CQ40  (0) 2009.11.05
:
Posted by Ritz®™
2009. 11. 22. 09:08

Chameleon-2.0-RC3-r658-bin Hackintosh/Chameleon2009. 11. 22. 09:08

1. download in ✒here.

    download pkg ✒here.  

2. Some guide as followings.

About the new options

SMBIOS
Finally you can specify your smbios.plist location using a device selector prefix like “SMBIOS=rd(0,0)/Extra/smbios.plist”.

VideoROM
You can pass an alternate video ROM image file to the system.

VBIOS
Using this boolean switch, you can control the injection of your video BIOS to device-properties. We got various reports if this switch is really needed to make your graphics device handled correctly by the system.

You can use the same booter partition for both Leopard and the recent Snow Leopard; to do that you can put your OS version specific KEXTs/MKEXT this way:
/Extra/10.(5|6)/Extensions[.mkext]

3.So I make a following folder for switching Windows, Snow and Leopard OSX even Linux.

* 다음 그림과 같이 폴더를 만들어주면 부트로더 하나로 Leopard와 Snow Leopard를  멀티부팅할수 있다.

4. Boot Helper

The boot: prompt waits for you to type advanced startup options.

If you don't type anything, the computer continues starting up normally. It

uses the kernel and configuration files on the startup device, which it also

uses as the root device.


Advanced startup options use the following syntax:


   [device]<kernel> [arguments]


Example arguments include


device: rd=<BSD device name> (e.g. rd=disk0s2)

   rd=*<IODeviceTree path> (e.g. rd=*/PCI0@0/CHN0@0/@0:1)


kernel: kernel name (e.g. "mach_kernel" - must be in "/" )


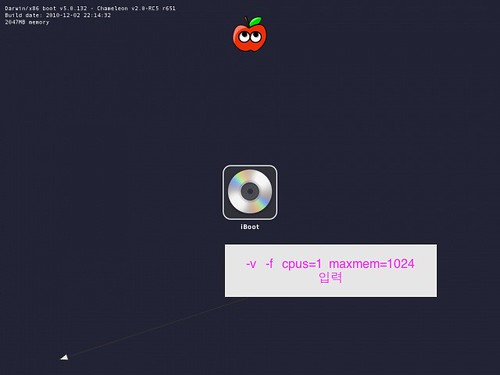
flags: -v (verbose) -s (single user mode),

   -x (safe mode) -F (ignore boot configuration file)


"Graphics Mode"="WIDTHxHEIGHTxDEPTH" (e.g. "1024x768x32")


kernel flags (e.g. debug=0x144)

io=0xffffffff (defined in IOKit/IOKitDebug.h)


Example: mach_kernel rd=disk0s1 -v "Graphics Mode"="1920x1200x32"


If the computer won't start up properly, you may be able to start it up using

safe mode. Type -x to start up in safe mode, which ignores all cached

driver files.


Special booter hotkeys:

F5 Rescans optical drive.

F10 Scans and displays all BIOS accessible drives.

Special booter commands:

?memory Displays information about the computer's memory.

?video Displays VESA video modes supported by the computer's BIOS.

?norescan Leaves optical drive rescan mode.


Additional useful command-line options:

config=<file> Use an alternate Boot.plist file.


Options useful in the com.apple.Boot.plist file:

Wait=Yes|No Prompt for a key press before starting the kernel.

"Quiet Boot"=Yes|No Use quiet boot mode (no messages or prompt).

Timeout=8 Number of seconds to pause at the boot: prompt.

"Instant Menu"=Yes Force displaying the partition selection menu.


"Default Partition" Sets the default boot partition,

   =hd(x,y) where 'x' is the disk number, 'y' the partition number.


GUI=No Disable the GUI (enabled by default).

"Boot Banner"=Yes|No Show boot banner in GUI mode (enabled by default).

"Legacy Logo"=Yes|No Use the legacy grey apple logo (disabled by default).

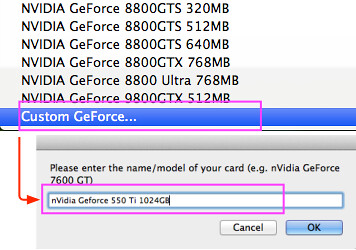
GraphicsEnabler=Yes|No Automatic device-properties generation for graphics cards.

VideoROM=<file> Use an alternate ROM image (default path: /NVIDIA.ROM).

VBIOS=Yes|No Inject VBIOS to device-properties.


EthernetBuiltIn=Yes|No Automatic "built-in"=yes device-properties generation

   for ethernet interfaces.


USBBusFix=Yes Enable the EHCI and UHCI fixes (disabled by default).

EHCIacquire=Yes Enable the EHCI fix (disabled by default).

UHCIreset=Yes Enable the UHCI fix (disabled by default).


Wake=No Disable wake up after hibernation (enbaled by default).

ForceWake=Yes Force using the sleepimage (disabled by default).

WakeImage=<file> Use an alternate sleepimage file

   (default path is /private/var/vm/sleepimage).


DropSSDT=Yes Skip the SSDT tables while relocating the ACPI tables.

DSDT=<file> Use an alternate DSDT.aml file

   (default path: /DSDT.aml /Extra/DSDT.aml)


SMBIOS=<file> Use an alternate smbios.plist file

   (default path: /smbios.plist /Extra/smbios.plist

   bt(0,0)/Extra/smbios.plist).


SMBIOSdefaults=No Don't use the Default values for SMBIOS overriding

   if smbios.plist doesn't exist, factory

   values are kept.


"Scan Single Drive" Scan the drive only where the booter got loaded from.

   =Yes|No Fix rescan issues when using a DVD reader in AHCI mode.

Rescan=Yes Enable CD-ROM rescan mode.

"Rescan Prompt"=Yes Prompts for enable CD-ROM rescan mode.


3. Installation
Open the Terminal and command as Followings

$ sudo dd if=boot1h of=/dev/rdisk0s2

$ sudo cp boot /

$ sudo cp -Rf i386 /usr/standalone/

If you used MBR Partition, you need install boot0 to the MBR, additionally:

$ sudo fdisk -f boot0 -u -y /dev/rdisk0

Followings is com.apple.Boot.plist:

<?xml version="1.0" encoding="UTF-8"?>

<!DOCTYPE plist PUBLIC "-//Apple//DTD PLIST 1.0//EN" "http://www.apple.com/DTDs/PropertyList-1.0.dtd">

<plist version="1.0">

<dict>

<key>Graphics Mode</key>

<string>1280x960x60</string>

<key>GraphicsEnabler</key>

<string>Yes</string>

<key>Kernel</key>

<string>mach_kernel</string>

<key>Kernel Flags</key>

<string></string>

<key>SMBIOS</key>

<string>/Extra/smbios.plist</string>

<key>USBBusFix</key>

<string>Yes</string>

<key>VBIOS</key>

<string>Yes</string>

<key>VideoROM</key>

<string>nVidia8600GTS.rom</string>

</dict>

</plist>


When Chameleon loaded kexts following is the procedure.
➊ - /Extra/Extensions/
➋ - /Extra/0.(5/6)/extensions.mkext.  It depends on OS Version.
➌ - It finally load /System/Library/Extensions.mkext


:
Posted by Ritz®™