달력

1

« 2025/1 »

  • 1
  • 2
  • 3
  • 4
  • 5
  • 6
  • 7
  • 8
  • 9
  • 10
  • 11
  • 12
  • 13
  • 14
  • 15
  • 16
  • 17
  • 18
  • 19
  • 20
  • 21
  • 22
  • 23
  • 24
  • 25
  • 26
  • 27
  • 28
  • 29
  • 30
  • 31
2010. 7. 6. 13:55

Theme Changer Hackintosh/Tool2010. 7. 6. 13:55

'Hackintosh > Tool' 카테고리의 다른 글

Kext Utility.app.v2.5.0b.Lion.ready.zip  (0) 2011.05.02
TheUnarchiver 2.4  (0) 2010.07.09
DSDT simple editor V1.3.6 (Extended tables support)  (0) 2009.11.25
Lizard & BootCDMaker in DARWINx86 software  (0) 2009.11.21
Path Finder  (0) 2009.11.10
:
Posted by Ritz®™


Update : http://cafe.naver.com/uefi/3026

I. 준비물

- 8G 이상의 USB메모리 스틱(Axxen  제품은 100 % 성공이더군요), 16G USB Memory Stick은 다음글에서 : http://x86osx.textcube.com/508


- OSX Retail DVD 혹은 이미지  : 이 Retail 이미지를 USB에 복원하는 것이 주 작업입니다.

즉, 6번 설치단계까지 가기 위하여 이런 작업을 해주는 것입니다.

설치과정까지 제대로 진입이 된다면 40% 정도는 성공한 것입니다.


다음 그림과 같이 파티션을 만들어 주면 다양한 부트로더를 사용할 수 있습니다. (BootCD가 있다면 부트로더 설정 작업은 안해주셔도 됩니다.)

골라먹는 재미가 있습니다. ^ ^

  1. 첫번째 파티션은 7G 정도를 제외한 용량(저는 일단, 100MB) 정도 OSX 확장 파티션으로 Leopard(10.5.?) 용으로 사용할 경우 Fat32, 이 경우는 윈도우즈에서도 삭제/수정이 용이하겠지요, Snow(10.6.?) 설치용으로 사용할 경우는 OSX 확장 파티티션, Windows에서 수정할려면 반드시 TransMac이라는 어플을 설치하여야 합니다.) 줍니다. 용도는 Chameleon/Boot Think/Boot-132 등의 부트로더를 설치하는 영역입니다. * boot-132 CD나 부팅시디를 단순히 리스토어 하는 영역이 아닙니다.  즉, CD/DVD부팅과 USB메모리 스틱 혹은 USB외장형 하드디스크 부팅방식은 다릅니다.  그러므로 반드시 Chameleon이나 Boot Think 패키지를 이용하여 설치해야 합니다.  각 부트로더 설치방법은 우측 카테고리를 참조하세요.
  2. 두번째 파티션에는 그림에서와 같이 OSX 확장 파티션(반드시 7G이상)으로 만들어 줍니다. (BootCD가 있다면 이 파티션은 전체 파티션 하나로 작업해주고 BootCD를 부팅하면 이 파티션이 보이고 선택하여 부팅하는 방법입니다.)


  3. 3. 첫번째 파티션에 부트로더 설치하기
  4. 부트로더의 종류에는 다음과 같이 여러가지가 있지만, 요즈음 대체적으로 Chameleon 이나 PC_EFI 부트로더를 많이 사용합니다.

  5. -  Boot Think 설치법 : MAC OSX 확장 파티션 권고, Snow, Leopard, Windows 등의 멀티부팅을 원하시면 이 방법을 사용하세요.
  6. - BOOT-132  :  FAT32 파티션 권고.
  7. - Chameleon :  osx확장 파티션 권고. 당연히 /Extra 폴더에 시스템 구성및 해킨드라이버를 시스템 스펙에 맞게 설치해주어야 제대로 부팅이 됩니다.
  8. - XPC: 설치시 FAT32 파티션 권고.
  9. - 위 부트로더 설치하는 방법은 우측 카테고리를 참조하시고 각 부트로더 별로 해킨 드라이버와 부팅설정화일 그리고 dsdt.aml 화일의 위치를 유의해서 설치하여 주시면 됩니다.
  10. - 위 부트로더중 하나를 선택하여 설치하였다면 Netbookbootmaker나 EvobootX등의 관련 패키지에서 pacifist를 이용하여 관련 파일들을 부트로더에 맞게 추출하여 설치하여 주거나 kext들을 복사하여 줍니다.

  11. 4. Retail DVD 이미지 심기
  12. 다음과 같이 설치 Retail DVD나 혹은 이미지를 이용하여 다음과 같이 복원하여 줍니다.
* 만약 기존 해킨 배포본으로 설치된 하드디스크가 있다면 만들어진 usb 메모리 스틱을 이용하여 부팅하여 봅니다.
제대로 부팅이 된다면 제대로 만들어진 것입니다.
아 물론, 10.6.X대에서는 10.6.1 설치본과 10.6.2 설치본의 두가지의 해킨 드라이버가 다른점을 유의하셔야 합니다.


6. 설치 과정 : http://j.mp/dAvLHX


:
Posted by Ritz®™
2010. 4. 1. 15:16

Chameleon 2.0-RC4 is out! Hackintosh/Chameleon2010. 4. 1. 15:16

Update!!

Chameleon 2.0-RC4 is out!


About the new options

Hide Partition
Using this option you can enumerate all your partitions what you would like to remove from the boot menu, the syntax is similar to the Default Partition option but here you can specify many volumes in your /Library/Preferences/SystemConfiguration/com.apple.Boot.plist or /Extra/com.apple.Boot.plist:

<key>Hide Partition</key>
<string>hd(0,1) hd(2,5)</string>

In the above example the booter won’t display partition 1 on BIOS drive 0 and partition 5 on disk 2.

PciRoot
This is a similar option what you can find in PC_EFI, but we’re doing this a bit different: The default value is still 0 but you can set to any arbitrary value like:

<key>PciRoot</key>
<string>1</string>

About the patches and fixes applied in RC4-r684

Here is a quick Changelog highlight:

Fixed booting the default partition when using timeout. Added Intel Core i5 detection.
Applied rivig’s patch against all stage 1 loaders. Now linear address mapping uses 12 bit offsets. Added DigitalDJ’s SMBIOS CPU detection patch. Applied IntVar’s system-id patch. Applied hnak’s read_lba register saving patch. Added radekg’s HFS filesystem fix to handle 2GB+ file sizes. Backported ATI device injection EFI64 tables and hibernation fix from netkas’PC_EFI. Thanks and credits goes for them!

Download information

You can get the binaries here: Chameleon-2.0-RC4-r684-bin.tar.gz

Sources: Chameleon-2.0-RC4-r684-src.tar.gz


The boot: prompt waits for you to type advanced startup options.


If you don't type anything, the computer continues starting up normally. It


uses the kernel and configuration files on the startup device, which it also


uses as the root device.


Advanced startup options use the following syntax:


[device]<kernel> [arguments]


Example arguments include


device: rd=<BSD device name> (e.g. rd=disk0s2)


rd=*<IODeviceTree path> (e.g. rd=*/PCI0@0/CHN0@0/@0:1)


kernel: kernel name (e.g. "mach_kernel" - must be in "/" )


flags: -v (verbose) -s (single user mode),


-x (safe mode) -F (ignore boot configuration file)


"Graphics Mode"="WIDTHxHEIGHTxDEPTH" (e.g. "1024x768x32")


kernel flags (e.g. debug=0x144)


io=0xffffffff (defined in IOKit/IOKitDebug.h)


Example: mach_kernel rd=disk0s1 -v "Graphics Mode"="1920x1200x32"


If the computer won't start up properly, you may be able to start it up using


safe mode. Type -x to start up in safe mode, which ignores all cached


driver files.


Special booter hotkeys:


F5 Rescans optical drive.


F10 Scans and displays all BIOS accessible drives.


Special booter commands:


?memory Displays information about the computer's memory.


?video Displays VESA video modes supported by the computer's BIOS.


?norescan Leaves optical drive rescan mode.


Additional useful command-line options:


config=<file> Use an alternate Boot.plist file.


Options useful in the com.apple.Boot.plist file:


Wait=Yes|No Prompt for a key press before starting the kernel.


"Quiet Boot"=Yes|No Use quiet boot mode (no messages or prompt).


Timeout=8 Number of seconds to pause at the boot: prompt.


"Instant Menu"=Yes Force displaying the partition selection menu.


"Default Partition" Sets the default boot partition,


=hd(x,y) where 'x' is the disk number, 'y' the partition number.


"Hide Partition" Remove unwanted partition(s) from the boot menu.


=hd(x,y) [hd(m,n)]


GUI=No Disable the GUI (enabled by default).


"Boot Banner"=Yes|No Show boot banner in GUI mode (enabled by default).


"Legacy Logo"=Yes|No Use the legacy grey apple logo (disabled by default).


PciRoot=<value> Use an alternate value for PciRoot. (default value: 0).


GraphicsEnabler=Yes|No Automatic device-properties generation for graphics cards.


VideoROM=<file> Use an alternate ROM image (default path: /NVIDIA.ROM).


VBIOS=Yes|No Inject VBIOS to device-properties.


EthernetBuiltIn=Yes|No Automatic "built-in"=yes device-properties generation


for ethernet interfaces.


USBBusFix=Yes Enable the EHCI and UHCI fixes (disabled by default).


EHCIacquire=Yes Enable the EHCI fix (disabled by default).


UHCIreset=Yes Enable the UHCI fix (disabled by default).


Wake=No Disable wake up after hibernation (enbaled by default).


ForceWake=Yes Force using the sleepimage (disabled by default).


WakeImage=<file> Use an alternate sleepimage file


(default path is /private/var/vm/sleepimage).


DropSSDT=Yes Skip the SSDT tables while relocating the ACPI tables.


DSDT=<file> Use an alternate DSDT.aml file


(default path: /DSDT.aml /Extra/DSDT.aml)


SMBIOS=<file> Use an alternate smbios.plist file


(default path: /smbios.plist /Extra/smbios.plist


bt(0,0)/Extra/smbios.plist).


SMBIOSdefaults=No Don't use the Default values for SMBIOS overriding


if smbios.plist doesn't exist, factory


values are kept.


"Scan Single Drive" Scan the drive only where the booter got loaded from.


=Yes|No Fix rescan issues when using a DVD reader in AHCI mode.


Rescan=Yes Enable CD-ROM rescan mode.


"Rescan Prompt"=Yes Prompts for enable CD-ROM rescan mode.


Installation Guide

Open the Terminal and command as Followings

$ sudo dd if=boot1h of=/dev/rdisk0s2

$ sudo cp boot /

$ sudo cp -Rf i386 /usr/standalone/

If you used MBR Partition, you need install boot0 to the MBR, additionally:


$ sudo fdisk -f boot0 -u -y /dev/rdisk0


Followings is com.apple.Boot.plist:

<?xml version="1.0" encoding="UTF-8"?>

<!DOCTYPE plist PUBLIC "-//Apple//DTD PLIST 1.0//EN" "http://www.apple.com/DTDs/PropertyList-1.0.dtd">

<plist version="1.0">

<dict>

<key>Graphics Mode</key>

<string>1280x960x60</string>

<key>GraphicsEnabler</key>

<string>Yes</string>

<key>Kernel</key>

<string>mach_kernel</string>

<key>Kernel Flags</key>

<string></string>

<key>SMBIOS</key>

<string>/Extra/smbios.plist</string>

<key>USBBusFix</key>

<string>Yes</string>

<key>VBIOS</key>

<string>Yes</string>

<key>VideoROM</key>

<string>nVidia8600GTS.rom</string>

</dict>

</plist>


'Hackintosh > Chameleon' 카테고리의 다른 글

Chameleon 2 RC5 rev. 747 (Trunk 699)  (0) 2011.02.22
com.apple.Boot.plist 수정하기  (0) 2010.09.08
USB Boot issue with Chameleon 2.0-RC2~RC4  (0) 2009.12.18
Chameleon-2.0-RC3-r658-bin  (0) 2009.11.22
Chameleon 설치 가이드  (0) 2009.10.28
:
Posted by Ritz®™
2009. 12. 18. 13:42

USB Boot issue with Chameleon 2.0-RC2~RC4 Hackintosh/Chameleon2009. 12. 18. 13:42

Chameleon 2.0-RC2~RC4

Symptom:

There were some issue, chameleon installed in USB.


Com.apple.Boot.plist:

Check /Extra/com.apple.Boot.plist and /Library/Preferences/SystemConfigurations/com.apple.Boot.plist


Solution:

1. Instsll Chameleon to H.D.D not USB.

2. Modified com.apple.Boot.plist. Remove " <key>USBBusFix</key>" contents.

3. If your Nvidia Graphic card nor working, you should install nvidia.rom file in /Extra folder.


Boot Log.:

Dec 15 13:40:34 localhost kernel[0]: USBF:       1.181   AppleUSBUHCI[0xffffff8049523000]::start unable to initialize UIM
Dec 15 13:40:34 localhost kernel[0]: USBF:      1.182   AppleUSBUHCI[0xffffff8049526000]::start unable to initialize UIM
Dec 15 13:40:34 localhost kernel[0]: com.apple.AppleFSCompressionTypeZlib load succeeded
Dec 15 13:40:34 localhost kernel[0]: AppleIntelCPUPowerManagementClient: ready
Dec 15 13:40:34 localhost kernel[0]: FireWire runtime power conservation disabled. (2)
Dec 15 13:40:34 localhost kernel[0]: USBF:      1.742   AppleUSBEHCI[0xffffff8009b61000]: unable to get filterInterruptEventSource
Dec 15 13:40:34 localhost kernel[0]: USBF:      1.744   AppleUSBEHCI[0xffffff8009b61000]::UIMInitialize - Error occurred (0xe00002be)
Dec 15 13:40:34 localhost kernel[0]: USBF:      1.750   AppleUSBEHCI[0xffffff8009b61000]::start unable to initialize UIM
Dec 15 13:40:34 localhost kernel[0]: Got boot device = IOService:/AppleACPIPlatformExpert/PCI0@0/AppleACPIPCI/IDE0@1F,2/AppleAHCI/PRT4@4/IOAHCIDevice@0/AppleAHCIDiskDriver/IOAHCIBlockStorageDevice/IOBlockStorageDriver/WDC WD1600BEVS-22RST0 Media/IOGUIDPartitionScheme/Untitled 1@2
Dec 15 13:40:34 localhost kernel[0]: BSD root: disk1s2, major 14, minor 5
Dec 15 13:40:34 localhost kernel[0]: ApplePS2Trackpad: Synaptics TouchPad v7.0
Dec 15 13:40:34 localhost kernel[0]: FireWire (OHCI) VendorID 1180 ID 832 PCI now active, GUID 384fc000297355e1; max speed s400.
Dec 15 13:40:34 localhost kernel[0]: Kernel is LP64
Dec 15 13:40:34 localhost kernel[0]: AppleIntelCPUPowerManagement: initialization complete
Dec 15 13:40:34 localhost kernel[0]: USBF:      6.345   AppleUSBUHCI[0xffffff804951d000]::start unable to initialize UIM
Dec 15 13:40:34 localhost kernel[0]: USBF:      6.418   AppleUSBUHCI[0xffffff8049434000]::start unable to initialize UIM
Dec 15 13:40:35 localhost kernel[0]: systemShutdown false
Dec 15 21:40:00 Ujens-MacBook-Pro kernel[0]: ERROR: FireWire unable to determine security-mode; defaulting to full-secure.
Dec 15 21:40:03 Ujens-MacBook-Pro kernel[0]: Waiting for DSMOS...
Dec 15 21:40:03 Ujens-MacBook-Pro kernel[0]: NVDANV50HAL loaded and registered.
Dec 15 21:40:03 Ujens-MacBook-Pro kernel[0]: Sound assertion "0 != setupHostInterrupt ()" failed in "/SourceCache/AppleHDA/AppleHDA-179.1.4/AppleHDAController/AppleHDAController.cpp" at line 312 goto Exit
com.apple.Boot.plist
<?xml version="1.0" encoding="UTF-8"?>
<!DOCTYPE plist PUBLIC "-//Apple//DTD PLIST 1.0//EN" "http://www.apple.com/DTDs/PropertyList-1.0.dtd">
<plist version="1.0">
<dict>
        <key>Boot Banner</key>
        <string>No</string>
        <key>Default Partition</key>
        <string>hd(1,1)</string>
        <key>Graphics Mode</key>
        <string>1920x1200x32</string>
        <key>GraphicsEnabler</key>
        <string>Yes</string>
        <key>Kernel</key>
        <string>mach_kernel</string>
        <key>Kernel Flags</key>
        <string></string>
        <key>PciRoot</key>
        <string>0</string>
        <key>Timeout</key>
        <string>3</string>
        <key>USBBusFix</key>
        <string>Yes</string>
        <key>VBIOS</key>
        <string>No</string>
</dict>
</plist>
Modified com.apple.Boot.plist 
<?xml version="1.0" encoding="UTF-8"?>
<!DOCTYPE plist PUBLIC "-//Apple//DTD PLIST 1.0//EN" "http://www.apple.com/DTDs/PropertyList-1.0.dtd">
<plist version="1.0">
<dict>
        <key>Kernel</key>
        <string>mach_kernel</string>
        <key>Kernel Flags</key>
        <string>-pci0</string>
        <key>Timeout</key>
        <string>8</string>
        <key>GraphicsEnabler</key>
        <string>y</string> 
</dict>
</plist>

<?xml version="1.0" encoding="UTF-8"?>

<!DOCTYPE plist PUBLIC "-//Apple//DTD PLIST 1.0//EN" "http://www.apple.com/DTDs/PropertyList-1.0.dtd">

<plist version="1.0">

<dict>

<key>DSDT</key>

<string>/Extra/DSDT.aml</string>

<key>Default Partition</key>

<string>hd(1,2)</string>

<key>Graphics Mode</key>

<string>1280x960x32@60Hz</string>

<key>GraphicsEnabler</key>

<string>y</string>

<key>Kernel</key>

<string>mach_kernel</string>

<key>Kernel Flags</key>

<string>-x32</string>

<key>Legacy Logo</key>

<string>yes</string>

<key>SMBIOS</key>

<string>/Extra/smbios.plist</string>

<key>Timeout</key>

<string>5</string>

<key>VideoROM</key>

<string>nVidia.rom</string>

</dict>

</plist>

기타 도움이 될 만한 글들 :


:
Posted by Ritz®™
2009. 11. 22. 09:08

Chameleon-2.0-RC3-r658-bin Hackintosh/Chameleon2009. 11. 22. 09:08

1. download in ✒here.

    download pkg ✒here.  

2. Some guide as followings.

About the new options

SMBIOS
Finally you can specify your smbios.plist location using a device selector prefix like “SMBIOS=rd(0,0)/Extra/smbios.plist”.

VideoROM
You can pass an alternate video ROM image file to the system.

VBIOS
Using this boolean switch, you can control the injection of your video BIOS to device-properties. We got various reports if this switch is really needed to make your graphics device handled correctly by the system.

You can use the same booter partition for both Leopard and the recent Snow Leopard; to do that you can put your OS version specific KEXTs/MKEXT this way:
/Extra/10.(5|6)/Extensions[.mkext]

3.So I make a following folder for switching Windows, Snow and Leopard OSX even Linux.

* 다음 그림과 같이 폴더를 만들어주면 부트로더 하나로 Leopard와 Snow Leopard를  멀티부팅할수 있다.

4. Boot Helper

The boot: prompt waits for you to type advanced startup options.

If you don't type anything, the computer continues starting up normally. It

uses the kernel and configuration files on the startup device, which it also

uses as the root device.


Advanced startup options use the following syntax:


   [device]<kernel> [arguments]


Example arguments include


device: rd=<BSD device name> (e.g. rd=disk0s2)

   rd=*<IODeviceTree path> (e.g. rd=*/PCI0@0/CHN0@0/@0:1)


kernel: kernel name (e.g. "mach_kernel" - must be in "/" )


flags: -v (verbose) -s (single user mode),

   -x (safe mode) -F (ignore boot configuration file)


"Graphics Mode"="WIDTHxHEIGHTxDEPTH" (e.g. "1024x768x32")


kernel flags (e.g. debug=0x144)

io=0xffffffff (defined in IOKit/IOKitDebug.h)


Example: mach_kernel rd=disk0s1 -v "Graphics Mode"="1920x1200x32"


If the computer won't start up properly, you may be able to start it up using

safe mode. Type -x to start up in safe mode, which ignores all cached

driver files.


Special booter hotkeys:

F5 Rescans optical drive.

F10 Scans and displays all BIOS accessible drives.

Special booter commands:

?memory Displays information about the computer's memory.

?video Displays VESA video modes supported by the computer's BIOS.

?norescan Leaves optical drive rescan mode.


Additional useful command-line options:

config=<file> Use an alternate Boot.plist file.


Options useful in the com.apple.Boot.plist file:

Wait=Yes|No Prompt for a key press before starting the kernel.

"Quiet Boot"=Yes|No Use quiet boot mode (no messages or prompt).

Timeout=8 Number of seconds to pause at the boot: prompt.

"Instant Menu"=Yes Force displaying the partition selection menu.


"Default Partition" Sets the default boot partition,

   =hd(x,y) where 'x' is the disk number, 'y' the partition number.


GUI=No Disable the GUI (enabled by default).

"Boot Banner"=Yes|No Show boot banner in GUI mode (enabled by default).

"Legacy Logo"=Yes|No Use the legacy grey apple logo (disabled by default).

GraphicsEnabler=Yes|No Automatic device-properties generation for graphics cards.

VideoROM=<file> Use an alternate ROM image (default path: /NVIDIA.ROM).

VBIOS=Yes|No Inject VBIOS to device-properties.


EthernetBuiltIn=Yes|No Automatic "built-in"=yes device-properties generation

   for ethernet interfaces.


USBBusFix=Yes Enable the EHCI and UHCI fixes (disabled by default).

EHCIacquire=Yes Enable the EHCI fix (disabled by default).

UHCIreset=Yes Enable the UHCI fix (disabled by default).


Wake=No Disable wake up after hibernation (enbaled by default).

ForceWake=Yes Force using the sleepimage (disabled by default).

WakeImage=<file> Use an alternate sleepimage file

   (default path is /private/var/vm/sleepimage).


DropSSDT=Yes Skip the SSDT tables while relocating the ACPI tables.

DSDT=<file> Use an alternate DSDT.aml file

   (default path: /DSDT.aml /Extra/DSDT.aml)


SMBIOS=<file> Use an alternate smbios.plist file

   (default path: /smbios.plist /Extra/smbios.plist

   bt(0,0)/Extra/smbios.plist).


SMBIOSdefaults=No Don't use the Default values for SMBIOS overriding

   if smbios.plist doesn't exist, factory

   values are kept.


"Scan Single Drive" Scan the drive only where the booter got loaded from.

   =Yes|No Fix rescan issues when using a DVD reader in AHCI mode.

Rescan=Yes Enable CD-ROM rescan mode.

"Rescan Prompt"=Yes Prompts for enable CD-ROM rescan mode.


3. Installation
Open the Terminal and command as Followings

$ sudo dd if=boot1h of=/dev/rdisk0s2

$ sudo cp boot /

$ sudo cp -Rf i386 /usr/standalone/

If you used MBR Partition, you need install boot0 to the MBR, additionally:

$ sudo fdisk -f boot0 -u -y /dev/rdisk0

Followings is com.apple.Boot.plist:

<?xml version="1.0" encoding="UTF-8"?>

<!DOCTYPE plist PUBLIC "-//Apple//DTD PLIST 1.0//EN" "http://www.apple.com/DTDs/PropertyList-1.0.dtd">

<plist version="1.0">

<dict>

<key>Graphics Mode</key>

<string>1280x960x60</string>

<key>GraphicsEnabler</key>

<string>Yes</string>

<key>Kernel</key>

<string>mach_kernel</string>

<key>Kernel Flags</key>

<string></string>

<key>SMBIOS</key>

<string>/Extra/smbios.plist</string>

<key>USBBusFix</key>

<string>Yes</string>

<key>VBIOS</key>

<string>Yes</string>

<key>VideoROM</key>

<string>nVidia8600GTS.rom</string>

</dict>

</plist>


When Chameleon loaded kexts following is the procedure.
➊ - /Extra/Extensions/
➋ - /Extra/0.(5/6)/extensions.mkext.  It depends on OS Version.
➌ - It finally load /System/Library/Extensions.mkext


:
Posted by Ritz®™
2009. 11. 4. 18:27

Gigabyte GA-EX58-UD5 (core i7) USB v3.0 Hackintosh/Mainboard2009. 11. 4. 18:27

출처 : http://www.kexts.com/

Gigabyte GA-EX58-UD5 (core i7) USB v3.0

이 드라이버는 Boot ThinkChameleon을 USB메모리 스틱에 설치한 다음, 다운받은 드라이버를 USB메모리 스틱에 넣어주고, USB메모리 스틱으로 부팅하여 Retail Snow DVD를 로딩하여 설치하면 된다.
기가바이트 메인보드 시리즈중에서도 Mac OS X 의 호환성과 안정성이 탁월하고 제대로 설치하여 주면 매킨토시 이상의 성능을 자랑하는 메인보드 중의 하나이다. 
최신버전인 Snow Leopard(10.7.2) 까지 소프트웨어 업데이트를 할 수 있다. 

Information
Title: Gigabyte GA-EX58-UD5 (core i7) USB v3.0
Version: 3.0
Homepage: http://www.muzzle.nl
Description/instructions: For Mac OS X Snow Leopard 10.6 (tested on 10.6.1)

Works with ATI Radeon HD 4870, if you've got another card you need to install drivers / enablers.

Features:
- Completely 64-bit!
- Lan works in 64-bit (Credits: Bit Shoveler)
- Sound works via DSDT (Credits: Aschar)
- CPU temp sensor works (Credits: oldnapalm)
- Firewire
- Slow sata fix (Credits: THe KiNG)

Sleep doesn't work :(
Download

'Hackintosh > Mainboard' 카테고리의 다른 글

i7 + 10.5.7 Working Great!!  (0) 2009.11.12
Intel D945G Series  (0) 2009.11.07
10.5.7 on an Asus P5QL/EPU  (0) 2009.10.25
MSI P43 Neo3-F  (0) 2009.10.22
GA-EP45-UD3L  (0) 2009.10.21
:
Posted by Ritz®™
2009. 10. 28. 03:07

Chameleon 설치 가이드 Hackintosh/Chameleon2009. 10. 28. 03:07


Update : http://cafe.naver.com/uefi/6

- 리얼맥 시스템에 조금 더 가깝게 만들어주는 부트로더로 요즈음 더 인기가 많은 부트로더를 소개합니다.

Chameleon 설치 가이드

Chameleon은 오픈소스코드를 충실하게 준수하는 GUI환경의 부트로더입니다.
Leopard는 물론, Snow Leopard, Lion, Mountain Lion(10.8.?) 까지 지원을 하여 주고 조금은 복잡하지만, Mac OS X 사용자들에게 많은 사랑을 받아오는 부트로더입니다.
물론, 2012년 Chimera 라는 이름으로 바뀌긴 했지만 어쨌든 혼용하여 여전히 사용되고 있습니다.
Windows 하드디스크가 있다면 일단 사타케이블을 떼어놓고 설치작업 합니다.  물론, mbr이든 guid 파티션이든 상관없이 설치할 수 있습니다.
I. Chameleon을 다운로드 받습니다.
II. 압축을 풀면 다음과 같은 화일이 생성됩니다.


III. 패키지를 더블클릭하면 설치과정이 진행됩니다. 계속을 누릅니다.

IV. 계속을 누릅니다.


V. 계속을 누르고 사용권 계약에서 동의를 클릭합니다.


VI. 설치할 대상 디스크를 선택하고 계속을 누릅니다.


VII. 사용자화를 클릭하면 다음과 같은 화면이 나옵니다.


VIII. 여러가지 선택사항들이 있지만, 처음 설치하시는 분들은 그대로 설치에 들어갑니다.
특히,  EFI 선택은 시스템 안정화를 시키고 난 후 설치해주어도 늦지 않습니다.  안정화도 안된 상황에서  EFI 문제로 질문을 하시는 분들을 보면 답답합니다.하드디스크 부팅으로 안정화 시킨다음 EFI로 설정해 주시는 것이 여러사람 피곤하게 하지 않고 스스로의 정신건강에도 좋습니다.


VIIII. 자 이제 설치를 마쳤습니다. 역시나 dsdt.aml, com.apple.Boot.plist, 그리고 Extra 폴더내의 해킨 드라이버 설치 작업이 남았습니다.
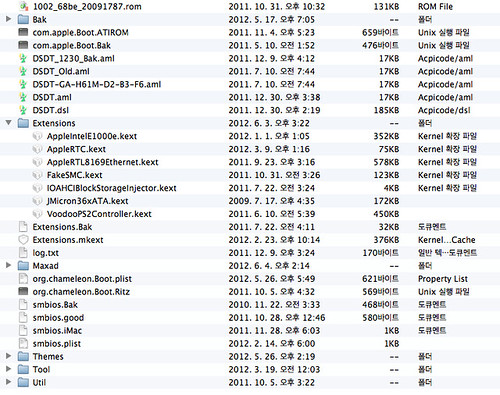
X. Chameleon을 설치하고 난 후, 중요한 파일들의 목록입니다. /Extra/Extensions 폴더에 자신의 시스템에 맞는 해킨 드라이버를 설치하여 줍니다.
Kext 종류

- 위 그림에서 AHCIPortInjector.kext 혹은 IOAHCIBlockStorageInjector.kext 와 fakesmc.kext화일은 기본적으로 들어가야 합니다.
- 또한 메인보드에서 추출한 dsdt 패치화일(dsdt.aml) 과 시스템 설정에 필요한 smbios.plist 화일이 반드시 필요하겠지요.
- 네 아래 그림과 같이 핵심점일 화일들은 다 들어가 있습니다.
- com.apple.Boot.plist 화일은 Chimera로 변경된 이후 요즈음은 org.chameleon.Boot.plist 화일명으로 변경되었습니다.

- Bak 화일들은 신경쓰지 마세요.  백업 화일들입니다.

Chameleon

부트로드를 설치하는 방법에는 여러가지 방법이 있는데 Multibeast를 이용하여 설치할 수도 있습니다.

http://osx86.tistory.com/1334


:
Posted by Ritz®™

First of all, I really appreciate Hagar,

If you have any question, visit his original posting and leave your question.

Source : http://www.projectosx.com/forum/index.php?showtopic=314&st=0&#entry1000

This posting is just for Korean who don't read English.

준비물:

  • Ubuntu (live CD) 9.04 가 좋을 것 같군요.
  • usb stick
  • 그리고 인터넷 연결이 되어 있어야 합니다.
First:먼저 hfsplus 와 hfsprogs 패키지를 apt-get 혹은 synaptic 를 이용하여 설치합니다.

usb 를 먼저 꽂고
터미널에서, "sudo -s" 명령어를 입력하고 "pwd" 커맨드를 입력하여 마운트 경로와 현재 경로등을 확인합니다.

(보통 /dev/sdb 디바이스가 USB입니다만, 자신의 환경에 따라 다르고 USB 가 사용할 마운트 포인트는 LinOSX 라는 볼륨명을 이용할 것입니다.)

터미널에서 다음 명령어를 입력하세요.
CODE
fdisk /dev/sdb

기존 파티션을 제거하기 위해 새로운 주 파티션으로 생성을 하는데 타입은 "AF" 타입으로 해주시고, active 시킵니다.

다음과같이 mkfs.hfsplus 커맨드를 이용하여 새로운 hfs+ 파일시스템을 새로이 만듭니다.
CODE
mkfs.hfsplus -v LinOSX -U 0 -G 0 /dev/sdb1

보시다시피 LinOSX 볼륨명으로 권한은 사용자와 그룹이 "0:0" 으로 되어 있습니다.

다음은 chameleon bootloader를 설치하는 과정입니다.:
최신 chameleon 패키지를 다운로드하여 압축을 풉니다. 여기에서 Chameleon2.0RC1-r431
cd 커맨드를 이용하여 i386 들어가서 /dev/sdb1 디바이스가 언마운트되어 있음을 확인합니다. 그리고 다음 명령어를 입력합니다:
CODE
dd if=boot0 of=/dev/sdb bs=440 count=1
dd if=boot1h of=/dev/sdb1


다음은 usb를 다음명령을 주어 마운트합니다.:
CODE
mkdir /media/LinOSX
mount -t hfsplus -w /dev/sdb1 /media/LinOSX

그리고 다음과 같이 명령어를 줍니다. 아주 전형적인 방식이죠. ^ ^:
CODE
touch /media/LinOSX/arse

물론, 쓰기가능여부를 점검해야 하는 사항도 있습니다.

모두 처리가 잘 진행이 되었다면 이제 드라이버에 root 권한으로 쓸 수 있는 권한이 있습니다. 따라서,

'Hackintosh > BOOT-132' 카테고리의 다른 글

Snow Leopard용 Boot -132  (0) 2009.10.29
BOOT-132 용 USB 메모리 스틱 만들기-Leopard(10.5.X) Only  (0) 2009.04.05
Boot-132, Adobe After Effects  (0) 2009.03.28
:
Posted by Ritz®™