달력

1

« 2025/1 »

  • 1
  • 2
  • 3
  • 4
  • 5
  • 6
  • 7
  • 8
  • 9
  • 10
  • 11
  • 12
  • 13
  • 14
  • 15
  • 16
  • 17
  • 18
  • 19
  • 20
  • 21
  • 22
  • 23
  • 24
  • 25
  • 26
  • 27
  • 28
  • 29
  • 30
  • 31


Update : http://cafe.naver.com/uefi/7136

클로버 부트로더를 사용하면 간단하게 설정가능하다. http://cafe.naver.com/uefi/6


다음 방법은 그래픽 카드를 새로이 설정하거나 그래픽 카드 교체시 활용할 수 있다. 

MAC OS X를 PC에 설치하였지만, 그래픽 카드 설정이 안되면(QE/CI, OpenGL등의 그래픽 가속 기능을 사용하지 못하면) OS X를 제대로 활용할 수 없다 .

이런 경우 그래픽 카드를 설정하여 주는 방법이다. GFX-String방법이외에도 다음 아래 방법중의 하나로 설정할 수 있다.  또 이 방법은 부트로더에 따라 사용할 수 있는 방법과 사용하지 못하는 방법이 있으니 유의하여 적용하여야 한다.

일단, 이미 부트로더를 하드디스크에 설치한 다음 다음 방식중 하나를 하나하나 적용해 보아야 한다.

즉, 아래글들을 전부 훓어본다음 자신이 설치한 부트로더에 적합한 방식으로 활용해야 한다.

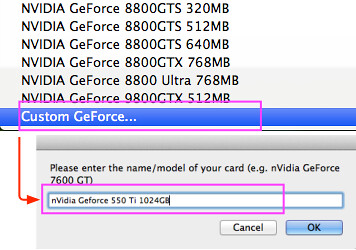
특히, Geforce 계열 그래픽 카드는 "Graphic Enabler=Yes" 혹은 "Graphic Enabler=No"로 거의 대부분 설정가능하다.

설정 방법은 /System/Library/Extensions/ 폴더 밑의 Geforce 계열 그래픽 카드 드라이버를 백업 받아 둔 다음 위 옵션을 활용한다. * 제발 그래픽 드라이버 설정한다고 Mac OS X 재설치 몇번했다는 등의 불필요한 시간낭비를 하지 말았으면 한다.

또한 Clover BootLoader인 경우에는 대부분 지포스 계열은 다음과 같은 방법으로 설정가능하다.

config.plist

<key>Graphics</key>

<dict>

<key>DualLink</key>

<false/>

<key>GraphicsInjector</key>

<true/>

<key>InjectEDID</key>

<true/>

<key>LoadVBios</key>

<false/>

<key>PatchVBiosBytes</key>

<dict>

<key>Find</key>

<string>gAeoAqAF</string>

<key>Replace</key>

<string>gAeoAjgE</string>

</dict>

<key>VRAM</key>

<integer>536870912</integer>

<key>VideoPorts</key>

<integer>0</integer>

<key>display-cfg</key>

<string>0000000000000000</string>

<key>ig-platform-id</key>

<string>0x0</string>

</dict>


아래 그림은 두개의 DVI 포터를 가진 그래픽 카드에서 터미네이터로 활용되는 젠더이다.


그래픽 카드는 2dvi가 좋으며 아래 그림과같은 그래픽 카드는 피하는 것이 좋다.  아래 그림의 그래픽 카드는 nvcap을 따로이 구해서 적용해야 하는 번거러움이 있다.  녹록치않은 작업이다.  


❍ NVidia & ATI 계열 그래픽 카드 설정하는 방법
-* 가능한 "GraphicsEnabler" 방식을 이용하는 것이 여러모로 깔끔하다. 특히, 8600, 8800, 9600, 9800, 250, 260 시리즈는 이 방법으로 간단히 잡을 수 있다.
- ① dsdt.aml방식,  pc_efi 1.0, Chameleon 2.0 rc-2 이하등의 하위버전 부트로더 또는 Boot Think사용시 
- ② GraphicsEnabler 방식, Chameleon 2.0-rc3이상 버전 사용시 
- ③ 그래픽 카드의 Video ROM을 추출하여 활용하는 방법, Chameleon 2.0-rc3이상 버전 사용시
- ④ GFX-String방법
- ⑤ "nvenabler.kext" 등의 드라이버를 설치하는 방법, pc_efi 1.0등의 하위버전 부트로더도 가능, Boot Think, Chameleon 사용가능


1. DSDT.aml로 설정하는 방법(8600 GT /GTS 그래픽 카드인 경우) 이 코드는 다음 글 참조.
다음과 같이 IORegistryExplorer를 이용하여 그래픽 카드의 디바이스 설정을 확인한다.


         Device (P0P1) <<  자기 메인보드에 맞게 바꾸어 주어야 한다. (대부분 P0P0)
            {
                Device (GFX0)
                {
                    Name (_ADR, Zero)
                    Name (_SUN, One)
                    Method (_DSM, 4, NotSerialized)
                    {
                        Store (Package (0x16)
                            {
                                "@0,compatible",
                                Buffer (0x0B)
                                {
                                    "NVDA,NVMac"
                                },

                                "@0,device_type",
                                Buffer (0x08)
                                {
                                    "display"
                                },

                                "@0,name",
                                Buffer (0x0F)
                                {
                                    "NVDA,Display-A"
                                },

                                "@1,compatible",
                                Buffer (0x0B)
                                {
                                    "NVDA,NVMac"
                                },

                                "@1,device_type",
                                Buffer (0x08)
                                {
                                    "display"
                                },

                                "@1,name",
                                Buffer (0x0F)
                                {
                                    "NVDA,Display-B"
                                },

                                "NVCAP",
                                Buffer (0x18)
                                {
                                    /* 0000 */    0x04, 0x00, 0x00, 0x00, 0x00, 0x00, 0x03, 0x00,
                                    /* 0008 */    0x0C, 0x00, 0x00, 0x00, 0x00, 0x00, 0x00, 0x07,
                                    /* 0010 */    0x00, 0x00, 0x00, 0x00
                                },

                                "VRAM,totalsize",
                                Buffer (0x02)  <<< 256MB는 02, 512MB는 04
                                {
                                    0x00, 0x00, 0x00, 0x28
                                },

                                "device_type",
                                Buffer (0x0D)
                                {
                                    "NVDA,GeForce"
                                },

                                "model",
                                Buffer (0x18)
                                {
                                    "nVidia GeForce 8600 GTS"
                                },

                                "rom-revision",
                                Buffer (0x26)
                                {
                                    "nVidia GeForce 8600 GTS OpenGL Engine"
                                }
                            }, Local0)
                        DTGP (Arg0, Arg1, Arg2, Arg3, RefOf (Local0))
                        Return (Local0)
                    }
                }

                Name (_ADR, 0x00010000)
                Method (_PRW, 0, NotSerialized)
                {
                    Return (GPRW (0x09, 0x04))
                }

                Method (_PRT, 0, NotSerialized)
                {
                    If (PICM)
                    {
                        Return (AR01)
                    }

                    Return (PR01)
                }

. 위 코드를 DSDT에 적용하는 방법은 다음글을 참조 : http://osx86.tistory.com/category/Hackintosh/DSDT


2. "GraphicsEnabler" 를 이용한 방식

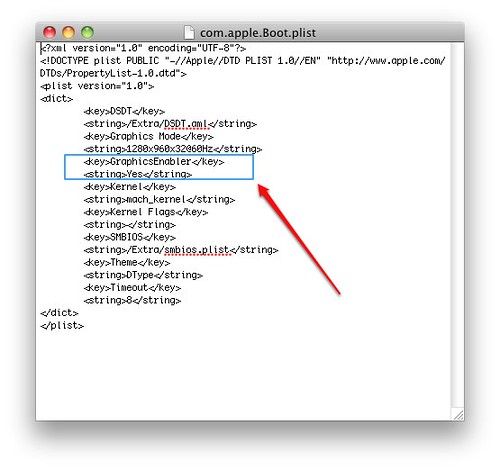
- /Extra/org.chameleon.Boot.plist(구 com.apple.Boot.plist) 파일 혹은 /Library/Preferences/SystemConfigurations/com.apple.Boot.plist 파일에 다음과 같이 첨가하여 준다.
- Chameleon 2.0 RC3부터 적용가능하니 부트로더를 카멜레온으로 설치하여 주면 된다.

<key>GraphicsEnabler</key>
<string>Yes</string>
Graphic


3. Video ROM을 추출하여 활용하는 방법


- /Extra 폴더 혹은 /Library/Preferences/SystemConfigurations/ 의 com.apple.Boot.plist 화일에 다음과 같이 첨가하여 준다.
- Chameleon 2.0 RC3부터 적용가능하니 부트로더를 카멜레온으로 설치하여 준다.

<key>VideoROM</key>
 

<string>nVidia8600GTS.rom</string>
* 간혹 그래픽 카드 설정이 제대로 되어 있지 않는 것 처럼 보이는 경우가 있는데, 이런 경우 Chess 게임 같은 걸 돌려보면 QE/CI가 제대로 잡혀 체스 게임이 돌아가는 경우가 있다.만약 그래픽 카드 설정이 되지 않았다면 체스 케임을 아예 할 수 없다. 물론, OpenGL 도 테스트 해보면 문제 없을 것이다.다만, 해상도 설정을 자유롭게 할 수 없다는 문제가 있긴 하지만 이러한 경우 매뉴얼로 수동으로 할 수 밖에 없다.아니면 간단하게 그래픽 카드 교체를 하는 것이 적절하다.


4. 드라이버를 설치하여 설정하는 방법

- http://www.mediafire.com/file/lky3emjhd2d/NVEnabler 64.kext.zip                                                               - http://www.osx86.nl/dload/video/index.html
압축 풀어서 kext helper 로 설치하기
http://osx86.tistory.com/7
- 모든 부트로더에 적용가능하다.
                                                                                                          

- 9200m 이나 기타 Geforce계열 그래픽 드라이버의 경우에는다음글을 참조하면 된다.


5. 마지막으로 확인


#############################################################


6. 그래픽 카드 교체
 만약 그래픽 카드를 교체하였다면 위의 방법들을 원상태로 돌려두고 새로운 그래픽 카드에 맞게 설정하면 된다.

6-1. 만약, 8600GT 에서 ATI 4870 그래픽 카드로 교체할 경우, 다음과 같은 과정을 따른다.
우선 8600GT 는 대부분 "Graphic Enabler"를 이용하여 설정하거나 DSDT.aml 혹은 GFX-String 방식을 이용한다.  
그리고 ATI 4870 같은 경우에는 간단하게 "Graphic Enabler"를 이용하여 설정한다.
① 이런 경우에는 /Extra/com.apple.Boot.plist 화일이나 혹은 /Library/Preference/SystemConfiguration/com.apple.Boot.plist화일에서 GFX-String을 제거하여 준다.
혹은 DSDT.aml 인 경우에는 /Extra/DSDT.aml이나 /DSDT.aml 화일을 재 컴파일 하여 DSDT.dst 화일로 만들어 준 다음 그래픽 카드 부분을 제거하여 준다.

② 마지막으로 /Extra/com.apple.Boot.plist 화일이나 혹은 /Library/Preference/SystemConfiguration/com.apple.Boot.plist 에 "Graphic Enabler" 만 입력하여 준다.   

③ 확인은 위의 5 단계를 다시 실행하여 확인하여 본다.

검색신공 배양하기 구글링 6종 세트

1. 시스템 스펙/상황 파악하기


http://j.mp/58hmuA

2. 추가 조치 방안 및 질문하는 방법


http://j.mp/6Jui2v

3. 해킨 설치 이미지의 종류

https://bfy.tw/PJbH
http://j.mp/5bKbXc

4. 특정 패키지 혹은 드라이버만 골라 설치하기

https://bfy.tw/PJbJ
http://j.mp/7oKbwJ


5. 관련시스템 설치이력 찾기(제품 모델명이 “GA-EP45” 시리즈인 경우)

http://j.mp/7d8gfp

6. p55-ud3r i5 750 보드에 4850 일 경우- 밥떠먹여주기 프로젝트팁

https://bfy.tw/PJbY
http://j.mp/8DfTQv
#############################################################


'Hackintosh > Graphic Card' 카테고리의 다른 글

4870x2  (0) 2012.02.09
해킨토시 - GTX 550 Ti  (0) 2012.02.03
ati mobility HD5400시리즈  (0) 2012.01.02
Graphics Card Hierarchy Chart  (0) 2011.12.04
PC 조립 및 Graphic Card 설치  (0) 2011.11.14
:
Posted by Ritz®™
2009. 12. 8. 08:01

Setup Geforce 8xxx-9xxx GT Hackintosh/Graphic Card2009. 12. 8. 08:01

You can get your 8600GT including 8XXX-9XXX series video card working using one of following methods in Snow Leopard.
➊ - Patch DSDT with the video
➋ - Add device (EFI) string to com.apple.Boot.plist
➌ - Chameleon's current auto injection of video / network works if your hardware is identified on PCIroot0 (you can check this in IORegistryExplorer). If your hardware is on PCIroot1 then you might have to use Netkas' PC EFI v10.n. Add GraphicsEnabler=Yes to your com.apple.Boot.plist for Chameleon 2.0-rc3 to inject the device properties.

➍.- After upgarding to 10.6.2, it sometimes did not work EFI String.

- remove nVidia kexts then install 10.6.1 nVidia kexts.

- or remove EFI String in com.apple.Boot.plist and Add GraphicsEnabler=Yes to your com.apple.Boot.plist then add your device-id in Geforce.kext, NVD*

- 10.6.1 NVDAResman.kext (6.0.6) and NVDANV50Hal.kext (6.0.6) in here. installing them in the /Extra/Extensions folder, with a properly configured boot cache will solve the issue. There is no need to install the kexts in /System/Library/Extensions, as the /Extra/Extensions folder will work.

- several 9800 Gt 1024 MB or 512 MB works just fine in 10.6.2 with ATY_init.kext enabler.


* Leopard 10.5.6 이상인 경우에는 위 과정 생략하고 아래과정부터 진행하세요.


Following is one of them for EFI string to com.apple.Boot.plist


1. Start OSx86 Tools then click Add EFI Strings/Boot Flag

2. Click GFX String


3. Click Choose.

4. Select your Graphic Card


GFX-String

5.


6.


7.


8. Copy and Paste com.boot.Apple.plist file from /Darwin to /Library/Preferences/SystemConfiguration/


:
Posted by Ritz®™
2009. 11. 2. 09:08

EvOToolsX V1.1.0 EvOToolsX for Snow Leopard Hackintosh/Tool2009. 11. 2. 09:08

EvOToolsX V1.1.0 이 공개되었습니다.

Snow Leopard에서만 사용가능합니다.

v 1.1.0 에서 lspci 설치버그가 해결되었습니다.

##########################################################################

Here we bring you a small app that will provide the following information:
CPU info.
SMBIOS info.
SMC keys info.
Lspci info.
DEEP info.
Only for Snow Leopard
(EN)
Here we bring you a little app to gather this information:
CPU info.
SMBIOS info.
SMC keys info.
Lspci info.
DEEP info.
Only for Snow Leopard.
EvOToolsX V1.0.0 (EN)
EvOToolsX V1.1.0 (EN)
.
EvOToolsX Changelog V1.1.0
Solved a bug on lspci install.


'Hackintosh > Tool' 카테고리의 다른 글

Lizard & BootCDMaker in DARWINx86 software  (0) 2009.11.21
Path Finder  (0) 2009.11.10
DARWINx86 software  (0) 2009.10.30
패키지 분석하는 방법  (0) 2009.07.16
Path Finder 사용법  (0) 2009.07.07
:
Posted by Ritz®™
2009. 10. 29. 23:58

Snow Leopard용 Boot -132 Hackintosh/BOOT-1322009. 10. 29. 23:58

UNFORTUNATELY THIS IS INTEL SSE3 ONLY AND WORKS ONLY ON A COMPLETE VANILLA CAPABLE PC

First of all, Thanks kdetech,

안타깝게도 Intel sse3 CPU와 VANILLA 커널이 적용되는 PC에만 사용할 수 있습니다.

준비물 :

- Snow용 Boot-132 CD다운로드

- 4G Retail Snow Leopard 다운로드

다음 그림을 보시면 Leopard용 Boot-132를 사용하셨었던 분들은 아실 수 있을 것입니다.


initrd.img 화일을 열어보면 다음과 같이 드라이버(kexts)들을 설치할 수 있습니다.

윈도우즈에서는 Transmac 소프트웨어를 이용하여 수정할 수 있습니다.

다운로드 받은 CD로 부팅을 하면 Snow Leopard 파티션이 보이실 것입니다.

혹은 USB설치 이미지가 있다면 선택하시면 설치 과정으로 진입하게 됩니다.


:
Posted by Ritz®™
2009. 10. 28. 03:07

Chameleon 설치 가이드 Hackintosh/Chameleon2009. 10. 28. 03:07


Update : http://cafe.naver.com/uefi/6

- 리얼맥 시스템에 조금 더 가깝게 만들어주는 부트로더로 요즈음 더 인기가 많은 부트로더를 소개합니다.

Chameleon 설치 가이드

Chameleon은 오픈소스코드를 충실하게 준수하는 GUI환경의 부트로더입니다.
Leopard는 물론, Snow Leopard, Lion, Mountain Lion(10.8.?) 까지 지원을 하여 주고 조금은 복잡하지만, Mac OS X 사용자들에게 많은 사랑을 받아오는 부트로더입니다.
물론, 2012년 Chimera 라는 이름으로 바뀌긴 했지만 어쨌든 혼용하여 여전히 사용되고 있습니다.
Windows 하드디스크가 있다면 일단 사타케이블을 떼어놓고 설치작업 합니다.  물론, mbr이든 guid 파티션이든 상관없이 설치할 수 있습니다.
I. Chameleon을 다운로드 받습니다.
II. 압축을 풀면 다음과 같은 화일이 생성됩니다.


III. 패키지를 더블클릭하면 설치과정이 진행됩니다. 계속을 누릅니다.

IV. 계속을 누릅니다.


V. 계속을 누르고 사용권 계약에서 동의를 클릭합니다.


VI. 설치할 대상 디스크를 선택하고 계속을 누릅니다.


VII. 사용자화를 클릭하면 다음과 같은 화면이 나옵니다.


VIII. 여러가지 선택사항들이 있지만, 처음 설치하시는 분들은 그대로 설치에 들어갑니다.
특히,  EFI 선택은 시스템 안정화를 시키고 난 후 설치해주어도 늦지 않습니다.  안정화도 안된 상황에서  EFI 문제로 질문을 하시는 분들을 보면 답답합니다.하드디스크 부팅으로 안정화 시킨다음 EFI로 설정해 주시는 것이 여러사람 피곤하게 하지 않고 스스로의 정신건강에도 좋습니다.


VIIII. 자 이제 설치를 마쳤습니다. 역시나 dsdt.aml, com.apple.Boot.plist, 그리고 Extra 폴더내의 해킨 드라이버 설치 작업이 남았습니다.
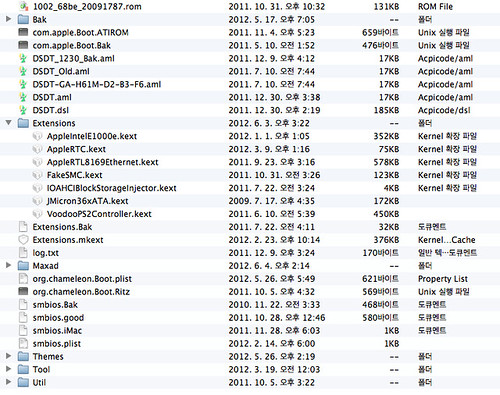
X. Chameleon을 설치하고 난 후, 중요한 파일들의 목록입니다. /Extra/Extensions 폴더에 자신의 시스템에 맞는 해킨 드라이버를 설치하여 줍니다.
Kext 종류

- 위 그림에서 AHCIPortInjector.kext 혹은 IOAHCIBlockStorageInjector.kext 와 fakesmc.kext화일은 기본적으로 들어가야 합니다.
- 또한 메인보드에서 추출한 dsdt 패치화일(dsdt.aml) 과 시스템 설정에 필요한 smbios.plist 화일이 반드시 필요하겠지요.
- 네 아래 그림과 같이 핵심점일 화일들은 다 들어가 있습니다.
- com.apple.Boot.plist 화일은 Chimera로 변경된 이후 요즈음은 org.chameleon.Boot.plist 화일명으로 변경되었습니다.

- Bak 화일들은 신경쓰지 마세요.  백업 화일들입니다.

Chameleon

부트로드를 설치하는 방법에는 여러가지 방법이 있는데 Multibeast를 이용하여 설치할 수도 있습니다.

http://osx86.tistory.com/1334


:
Posted by Ritz®™
2009. 10. 27. 21:51

HP Compaq nx7400 laptop Hackintosh/NoteBook2009. 10. 27. 21:51

I. 첫번째 설치

설치 이미지 : iDeneb 1.3 (10.5.5)

시스템 : HP Compaq nx7400 laptop.


II. 재시도

specs:

HP Compaq nx7400
Intel C2D T7200 @2GHz
3GB 667MHz RAM
HDD WD 320GB SATA
Intel GMA950 & WSXGA+ screen
Intel 3945ABG WiFi
Broadcom 440x Ethernet
ADI1981 audio
Wireless USB Linksys WUSB54GC (Ralink)
설치이미지 : iDeneb v1.3 10.5.5.

Hardware issues:
  1. cpus=1:
    항상 부팅 플래그를 "cpus=1" 을 주어서 부팅해야 합니다.
    Chameleon with DSDT overrideDSDT patcher 1.0.1d 또한, vanilla 커널과 voodoo_beta2c 9.5.0 커널을 적용하여 보았지만 불안정하게 운용이 됩니다..
    잠자기는 잘 되고 있습니다.
    참고: http://forum.insanelymac.com/index.php?s=&...st&p=962566
  2. Broadcom 440x ethernet:
    불안정하여 한시간마다 재부팅하여 주면 작동이 됩니다. 인터넷에서 다운로드 도중에 멈추어서 USB wifi 카드를 이용합니다.
  3. Intel 3945ABG:
    동작하지 않는 군요.
  4. Audio:
    Headphones/mic 동작하지 않고, 스피커는 adi1981 드라이버를 이용하여 작동이 됩니다.
  5. Shutdown:
    하드드라이버는 멈추었다 깨어나기를 반복하는 듯 보입니다.
  6. 터치패드는 ACPIPS2Nub.kext 와 수정된 ApplePS2Controller.kext 를 이용하여 동작이 됩니다.


:
Posted by Ritz®™
2009. 10. 25. 16:29

Enabling ACPI, EIST, etc for ASUS P5W DH DELUXE Hackintosh/DSDT2009. 10. 25. 16:29

I am also experiencing this with latest Ubuntu 9.04 amd64.

My motherboard is P5W DH Deluxe, and I've tried various bios (enabling ACPI, EIST, CIE, etc...) and also factory defaults but the gnome applet frequency monitor will keep warning that the "frequency scaling is not supported for this processor".

I have a modern Intel Quad Core Q6700, which should support this feature.

Kernel in use is : 2.6.28-11-generic

The various modules discussed here are all missing from my configuration, even with cpufreq and powernowd installed.

Some outputs :
find: "/sys/devices/system/cpu/cpu*/cpufreq": Aucun fichier ou dossier de ce type
cat: /sys/devices/system/cpu/cpu0/cpufreq/scaling_governor: Aucun fichier ou dossier de ce type
cat /sys/devices/system/cpu/cpu0/cpufreq/scaling_drivercat: /sys/devices/system/cpu/cpu0/cpufreq/scaling_driver:
cat /sys/devices/system/cpu/cpu0/cpufreq/scaling_available_governors
cat: /sys/devices/system/cpu/cpu0/cpufreq/scaling_available_governors: Aucun fichier ou dossier de ce type
cat /sys/devices/system/cpu/cpu0/cpufreq/scaling_available_frequencies
cat: /sys/devices/system/cpu/cpu0/cpufreq/scaling_available_frequencies: Aucun fichier ou dossier de ce type

Tt says (in french) that I have none of these files or folders on my machine.

Solution

reverting to an older bios, v. 2504, ASUS bios team : stop making cheezy bios, please.

http://dlsvr04.asus.com/pub/ASUS/mb/socket775/P5W%20DH%20Deluxe/P5WDH2504.zip

v.2503 Working Great? I'm not sure, I'll try to find out 2504.

v. 2602, v. 2704, v. 2801 did not support

:
Posted by Ritz®™
2009. 10. 25. 05:33

efi driver Hackintosh/XPC2009. 10. 25. 05:33

1. I'm not sure I can use following efi driver from rEFIt.

2. xpc support Snow Leopard, becaus of my SnowLeopard partition is not appeard in XPC.

3. Is there any ATI Grphic Card driver for ATI HD 3650 and may I have url for downloading?

'Hackintosh > XPC' 카테고리의 다른 글

UEFI-Boot  (0) 2010.04.02
XPC bootloader Update  (0) 2009.10.27
XPC Gui v0.50a  (0) 2009.10.21
XPC Menu  (0) 2009.06.15
XPC 설치  (0) 2009.05.18
:
Posted by Ritz®™