달력

4

« 2024/4 »

  • 28
  • 29
  • 30

'Hackintosh/DSDT'에 해당되는 글 12

  1. 2012.03.01 자신만의 DSDT생성하기
  2. 2011.01.31 iaslMe 9
  3. 2010.07.12 Fix DSDT: sleep, shutdown, SATA, No restart
  4. 2010.07.09 Aslock P55 FireWire DSDT 설정하기
  5. 2010.07.05 Asus Mainboard Firewire DSDT
  6. 2010.06.19 DSDT 생성 4
  7. 2010.02.18 8600 GTS 256 MB DSDT
  8. 2009.12.06 Code injection via DSDT for NVIDIA graphics
2012. 3. 1. 10:12

자신만의 DSDT생성하기 Hackintosh/DSDT2012. 3. 1. 10:12

Update : 이것저것 귀차니즘이라면 Clover 혹은 OpenCore부트로더

https://cafe.naver.com/uefi/12247

- 초큼 충격적인 애기지만 ASUS,MSI, Aslock사의 제조사들이 어떤 시각에서는 저가형보드 생산업체(?)
- 특히 이상하게도 한국내에서는 ASUS 메인보드가 고급 보드로 통한다.
- 왜냐하면 macOS, Linux, Unix, RTOS 등의 분야에서는 그닥 고급보드로 생각하지 않지만
- 심지어 인텔사의 레퍼런스 설계도에 의한 일부 부품은 저가형 칩셋을 사용하고 있음에도 
http://cafe.naver.com/uefi/1158
 
만약 메인보드의 DSDT 에 익숙하지 않거나 구글링하여 찾을 수 없다면 다음 방법이 도움이 된다.
Maldon 이 만든 DSDT Editor를 이용하여 간단하게 맥에서 마더보드에 대한 패치를 실행하여 만드는 방법이다


이 방법은 모든 메인보드에 적용되는 것은 아니지만, 많은 메인보드를 패치할 수 있다.
일단 먼저 Patch List 를 확인한다.

이 방법은 반드시 패치할려는 메인보드를 사용해야 한다.
이 방법은 OSX, Linux 혹은 Windows 에서 실행가능하다.

Step

1. Maldon'의 포럼에 가입한다. http://olarila.com/forum/ucp.php?mode=register. 가입하였으면 로긴한다. 

2. Download
- DSDT Editor for Mac http://olarila.com/dsdt/DSDTEditor_Mac.zip,
- DSDT Editor for Windows/Linux http://olarila.com/dsdt/DSDTEditor_Linux_Windows.zip
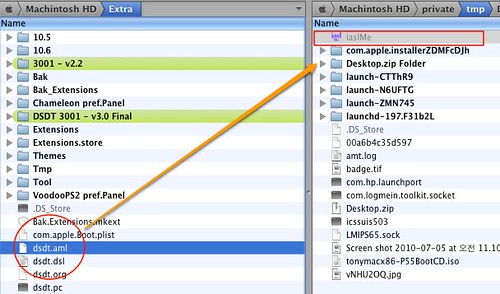
데스크 탑에 압축을 푼다.

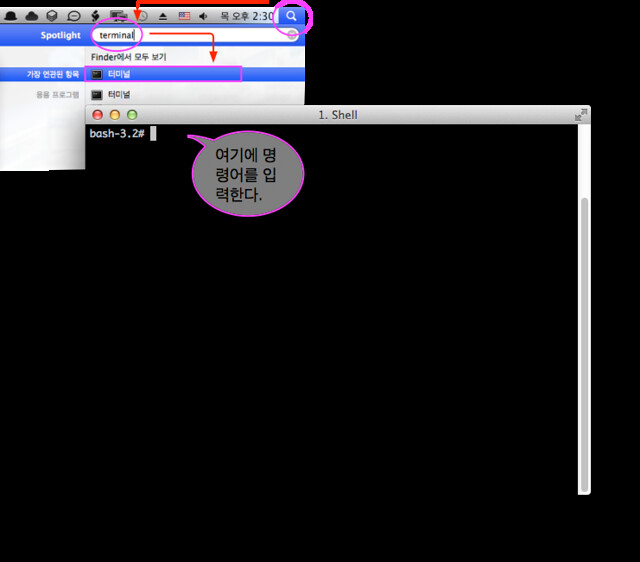
만약 Windows를 사용하고 있다면, Java가 설치되어 있는지 확인해야 한다.

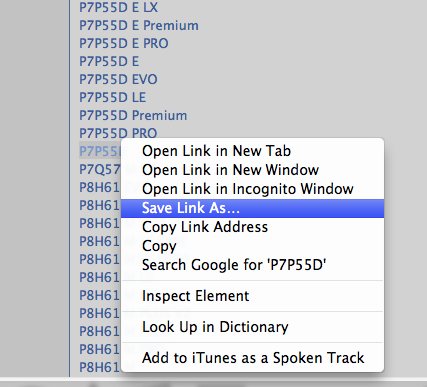
3. 다음단계는 메인보드의 모델패치를 찾는다. http://olarila.com/forum/packs.php 
메인보드 모델을 클릭하여 데스크탑에 간단패치를 저장한다.
- 보너스로 Aslock메인보드 패치 모음 : http://www.mediafire.com/?uh6qiquf34w8pf4

Image


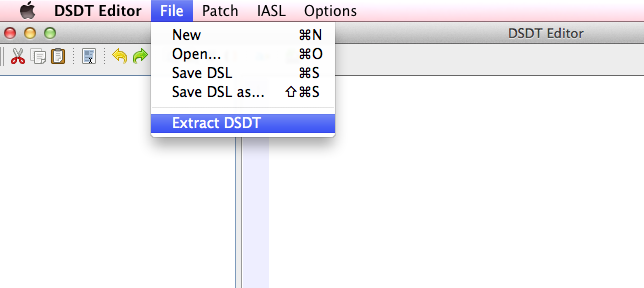
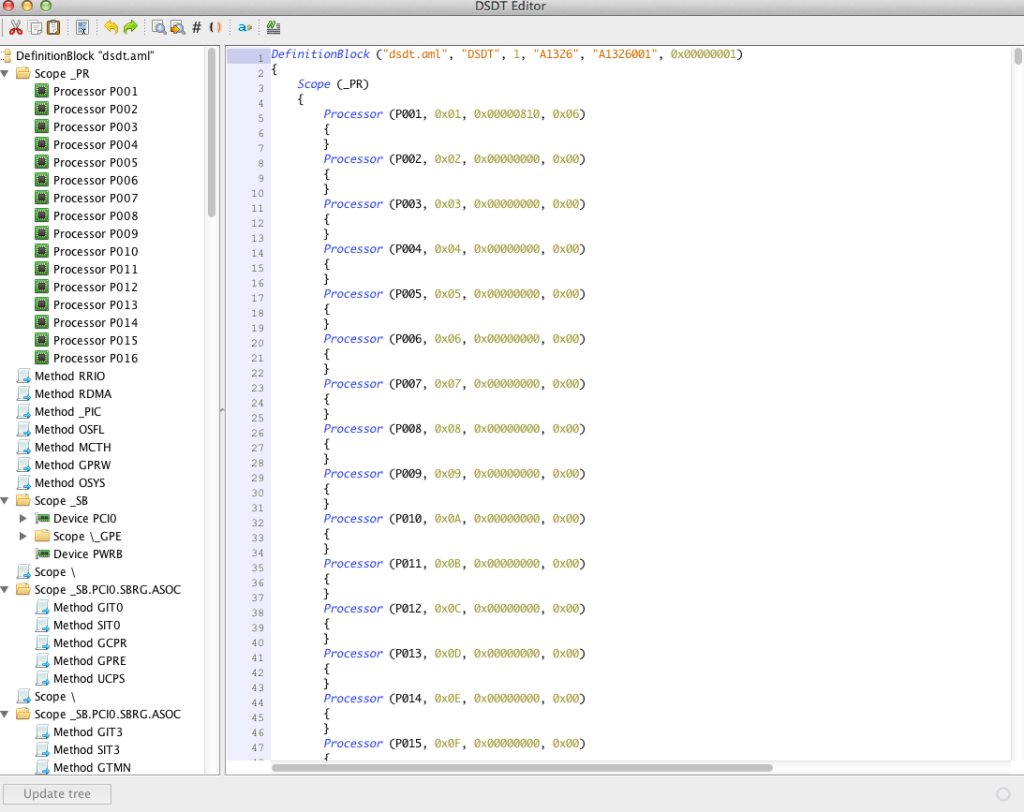
4. DSDT editor 를 실행하여 'File' 에서'Extract DSDT'를 실행하여 자신의 메인보드의 원본 DSDT를 추출한다. editor에서 다음과 같이 어셈블리어 수준의 텍스트들을 볼 수 있을 것이다.


Image

Image


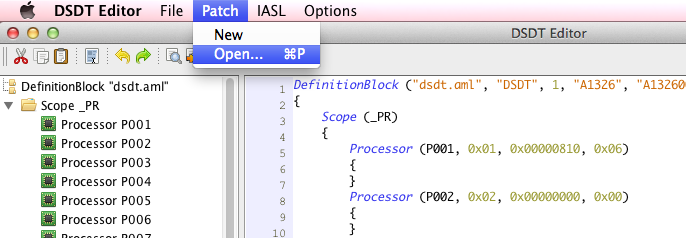
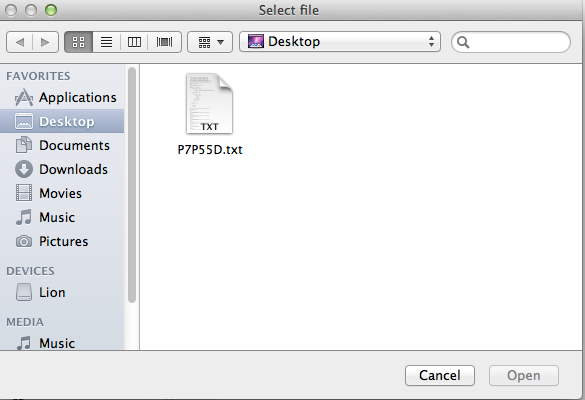
5. 메뉴바에서 'Patch'를 누르고 'Open'을 누른다. 윈도우즈에서 브라우징하여 파일을 open한다. 데스크탑에서  3번에서 다운로드 받은 메인보드 패치를 연다.

Image

Image

ALC8xx AUDIO:
ALC chipset 관련 모델을 메인보드 스펙에서 확인하여 여기에서  http://olarila.com/forum/patches.php 찾아서 동일한 방법으로 메인보드 패치를 적용하여 준다.
eg. 만약 메인보드가 ALC889를 사용한다면, ALC889 패치를 적용한다. 
audio kext(s)는 여전히 필요하지만, HDAEnabler는 불필요하다.

물론, ALC audio 를 사용하지 않는다면 불필요하다.


6. 작은 윈도우가 열릴것이다.  'Apply'를 눌러 적용한다. 수초이내에 완료될 것이고 끝나면 'Close'를 눌러준다.


Image


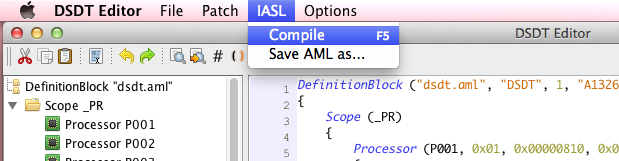
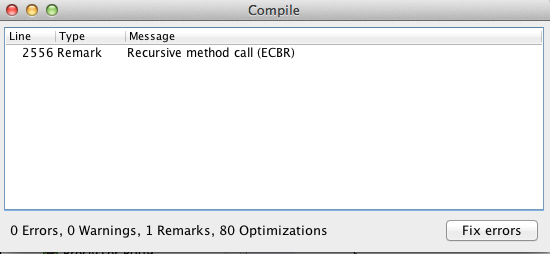
7. 메뉴바에서 'IASL'를 눌러주고 'Compile'을 실행한다. 박스가 열릴것이고 내부에 몇가지 에러가 있을 가능성이 있다. 'Fix Errors'를 누른다. 수초이내에 0 errors 가 나타날 것이고 박스를 닫는다.


Image

Image


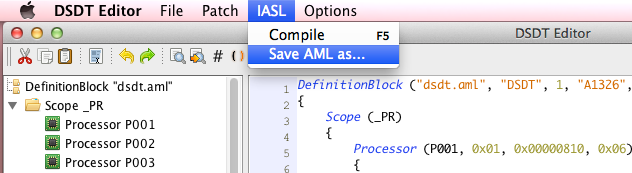
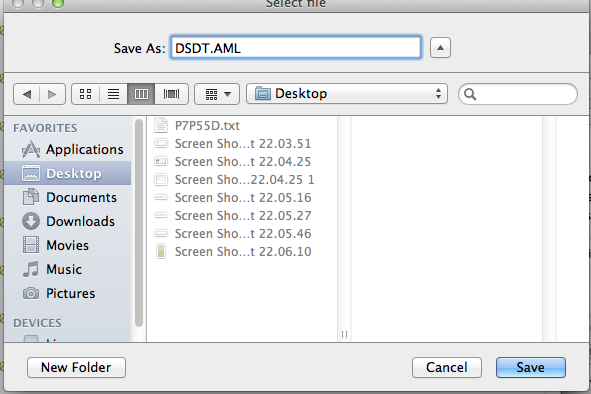
8. 메뉴바에서 'IASL'를 누르고, 'Save AML As'를 눌러서 aml파일을 저장하는데, 조그만 box 가 열릴 것이고 Desktop을 찾아내어, 'Save As' 바에서, ''DSDT.AML''을 입력하고 'Save'를 눌러서 저장한다.


Image


Image


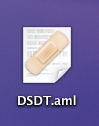
9. 데스크탑에서 dsdt.aml이 보이면 이제 패치된 DSDT 파일을 사용할 수 있다.

Image


NOTES:

만약 메인보드가 패치리스트가 없다면 다음글타래에서 요청할 수 있다. http://olarila.com/forum/viewforum.php?f=19

만약 컴파일 에러가 발생하였다면, iboot 이나 rboot cd를 사용하여 부팅한다.


Thanks to Maldon for the patches, and 'el coniglio' for the editor.

If you wish to donate to Maldon for his immense work on the patches, go to
http://olarila.com/donate/


'Hackintosh > DSDT' 카테고리의 다른 글

iaslMe  (9) 2011.01.31
Fix DSDT: sleep, shutdown, SATA, No restart  (0) 2010.07.12
Aslock P55 FireWire DSDT 설정하기  (0) 2010.07.09
Asus Mainboard Firewire DSDT  (0) 2010.07.05
DSDT 생성  (4) 2010.06.19
:
Posted by uno-ani
2011. 1. 31. 14:35

iaslMe Hackintosh/DSDT2011. 1. 31. 14:35

준비물: iaslMe

당근 어플리케이션>> 유틸리티에서 Terminal 을 실행하여 관리자 권한을 획득한 다음 아래 커맨드를 입력한다.
 

Terminal

perl -e 'open(CMD, "ioreg -lw0 \| grep DSDT|") or die; while(<CMD>) { chomp; if($_ =~ /\"DSDT\.?\d?\"=<([^>]*)>/) { $buff = $1; open(PIP, "|xxd -r -p > ~/Desktop/dsdt.aml") or die; print PIP "$1"; } }'


당근 이 dsdt.aml화일은 윈도우즈에서 추출한 값과 비교를 해보는 것이 좋다. 
바탕화면에 dsdt.aml 화일이 생겼다면 아래 그림과 같이 끌어다 당겨놓으면 iaslMe 어플리케이션이 compile 혹은 decompile하여 준다. 

즉, aml은 dsl로 dsl은 aml로 바꾸어(컴파일하여) 준다. 

dsl화일은 TextEdit등을 이용하여 추가 혹은 수정이 가능하지만, 컴파일된 aml화일은 기계어 코드 형식이므로 Text Edit등으로 열리지 않는다.

iaslMe]


'Hackintosh > DSDT' 카테고리의 다른 글

자신만의 DSDT생성하기  (0) 2012.03.01
Fix DSDT: sleep, shutdown, SATA, No restart  (0) 2010.07.12
Aslock P55 FireWire DSDT 설정하기  (0) 2010.07.09
Asus Mainboard Firewire DSDT  (0) 2010.07.05
DSDT 생성  (4) 2010.06.19
:
Posted by Ritz®™
2010. 7. 12. 08:05

Fix DSDT: sleep, shutdown, SATA, No restart Hackintosh/DSDT2010. 7. 12. 08:05

Hi all, I want to share this tip is really great! it eliminates the need to:

- SleepEnabler.kext -> runs the day I await your return to EDIT this because I changed my mobo jumpers S3 also in
- IOAHCIBlockStorageInjector.kext -> enables the internal hard drive (orange icon)
- OSXRestart.kext -> runs the shutdown after a wake-


They are kept because I did not solve the problem of Restart (yet!) It is that the shutdown is functional:
- EvoReboot.kext,
- OpenHaltRestart.kext,


While these tips will work for P5Q series and P5K series, matoss used for these six is a P5Q SE2.

# 1
So we start with the shutdown fix:

In "Device (SBRG)" insert between "Name (_ADR, 0x001F0000)" and "Device (IELK)" the written part below:

Device (SBRG)
(
    Name (_ADR, 0x001F0000)
           OperationRegion (LPC0, PCI_Config, 0xA0, 0x54) / * start
           Field (LPC0, AnyAcc, nolock, Preserve)
           (
                     ,   10,  
                XPME,   1,  
                         Offset (0x04)  
                AG3E,   1,  
                         Offset (0x50)  
                CABIN,   32 
            ) / * End
 
    Device (IELK)


Then look Method "(_PTS, 1, NotSerialized)" and made the same:

Method (_PTS, 1, NotSerialized)
    ( 
               If (LEqual (arg0, 0x05)) / * Debut
               (
                    Store (One, \ _SB.PCI0.SBRG.AG3E)
               )
               Else
               (                                                                
            Store (arg0, DBG8)
            PTS (arg0)
            Store (Zero, Index (WAKP, Zero))
            Store (Zero, Index (WAKP, One))
            If (Land (LEqual (arg0, 0x04), LEqual (OSFL (), 0x02)))
            ( 
                Sleep (0x0BB8)
            ) 
 
            Store (ASSB, WSSB)
            Store (AOTB, WOTB)
            Store (AAXB, WAXB)
            Store (arg0, ASSB)
            Store (OSFL (), AOTB)
            Store (Zero, AAXB)
            ) / * End
    )


This is the shutdown is functional!


# 2
Then the fix for the day:

Replace this:

Return (WAKP)
    ) 
 
    OperationRegion (IORK, SystemIO, 0xB3, One)
    Field (IORK, ByteAcc, nolock, Preserve)
    ( 
        IOWK,   8 
    ) 


by this:

 Return (WAKP)
    ) 
 
Return (Package (0x02)
    ( 
        Zero  
        Zero
    ))
    OperationRegion (IORK, SystemIO, 0xB3, One)
    Field (IORK, ByteAcc, nolock, Preserve)
    ( 
        IOWK,   8 
    )


This is done for the day!

# 3
Let us fix SATA (recognized as after 631xESB/632xESB SATA AHCI Controller) but does not interfere in any way the functioning of the beast!

This is the method:
In the search for DSDT "Device" SATA  and after "Name (_ADR, 0x001F0002) said:

Name (_ADR, 0x001F0002) Method (_DSM, 4, NotSerialized)                    
                ( 
                    Store (Package (0x08)
                        ( 
                            "AAPL, slot-name",  
                            Buffer (0x09)
                            ( 
                                "Built in" 
                            ) 
 
                            "Model",  
                            Buffer (0x1B)
                            ( 
                                "ICH10 SATA / AHCI Controller" -> Name of the controller (your choice cis aesthetic, n 'not forget to change the buffer!
                            ) 
 
                            "Device-id",  
                            Buffer (0x04)
                            ( 
                                0x81, 0x26, 0x00, 0x00 -> Device-id ESB2 to spend IOAHCIBlockStorageInjection.kext
                            ) 
 
                            Built-in ",  
                            Buffer (One)
                            ( 
                                0x00
                            ) 
                        ) LOCAL0)
                    DTGP (arg0, Arg1, Arg2, Arg3, RefOf (LOCAL0))
                    Return (LOCAL0)                                            
                )


Well that's good old IOAHCIBlockStorageInjection.kext finished!


# 4
Time to switch to USB internally and solves the day (sleep):

First IORegistryExplorer open and search for "USB"
There should be a list with usb0 USB1 USB2 EUSB USBE ...
Click on a USB input (eg usb0 @ 1D) and in the column property search "compatible" like "pcixxxx, xxxx", "pci8086, 3A34" is the second PCI interests us! and so on ...


All USB have a specific number approaching (3A34, 3A35 ...)
Now we have entered this snippet at the end before the last ")" of each device (xUSBx) with two parts of figure reversed complicated?!Explanation:


 Method (_DSM, 4, NotSerialized)
                ( 
                    Store (Package (0x02)
                        ( 
                            "Device-id",  
                            Buffer (0x04)
                            ( 
                                0x34, 0x3A, 0x00, 0x00
                            ) 
                        ) LOCAL0)
                    DTGP (arg0, Arg1, Arg2, Arg3, RefOf (LOCAL0))
                    Return (LOCAL0)
                )


We should get this:

Device (usb0)
            ( 
                Name (_ADR, 0x001D0000)
[........]
                Method (_DSM, 4, NotSerialized)
                ( 
                    Store (Package (0x02)
                        ( 
                            "Device-id",  
                            Buffer (0x04)
                            ( 
                                0x34, 0x3A, 0x00, 0x00
                            ) 
                        ) LOCAL0)
                    DTGP (arg0, Arg1, Arg2, Arg3, RefOf (LOCAL0))
                    Return (LOCAL0)
                ) 
            ) 
 
            Device (USB1)
            ( 
                Name (_ADR, 0x001D0001)
[........]
 
                Method (_DSM, 4, NotSerialized)
                ( 
                    Store (Package (0x02)
                        ( 
                            "Device-id",  
                            Buffer (0x04)
                            ( 
                                0x35, 0x3A, 0x00, 0x00
                            ) 
                        ) LOCAL0)
                    DTGP (arg0, Arg1, Arg2, Arg3, RefOf (LOCAL0))
                    Return (LOCAL0)
                ) 
            ) 
 
            Device (USB2)
[.............]
            (


That is to see if everything is operational and IORegistryExplorer after typing "USB" look into every USB (0,1,2, E. ..) AppleUSBEHCI property and there should be "Errata" value should not be 0x00 ( not recognized) but for me EUSB / USB: 0x4800 and USB12456: 0x20e800.


Edit: Stay preferably on SMBIOS macPro3, he would have a problem with MacPro4, 1 (well for me and some person on the net!

EDIT: For the restart with the option Chameleon RC5 RestartFix = Yes works

'Hackintosh > DSDT' 카테고리의 다른 글

자신만의 DSDT생성하기  (0) 2012.03.01
iaslMe  (9) 2011.01.31
Aslock P55 FireWire DSDT 설정하기  (0) 2010.07.09
Asus Mainboard Firewire DSDT  (0) 2010.07.05
DSDT 생성  (4) 2010.06.19
:
Posted by Ritz®™
2010. 7. 9. 10:15

Aslock P55 FireWire DSDT 설정하기 Hackintosh/DSDT2010. 7. 9. 10:15

            Device (P0P5)
            {
                Name (_ADR, 0x00050000)
                Method (_PRW, 0, NotSerialized)
                {
                    Return (GPRW (0x09, 0x04))
                }
            }

            Device (P0P6)
            {
                Name (_ADR, 0x00060000)
                Method (_PRW, 0, NotSerialized)
                {
                    Return (GPRW (0x09, 0x04))
                }
            }

            Device (FRWR)                << IORegistry Explorer를 이용하여 확인해야할 필요성(P0P7예상)
            {
                    Name (_ADR, 0x001E0000)
                    Name (_GPE, 0x1A)
                    Method (_DSM, 4, NotSerialized)
                    {
                        Store (Package (0x02)
                            {
                                "fwhub",
                                Buffer (0x04)
                                {
                                    0x00, 0x00, 0x00, 0x00
                                }
                            }, Local0)
                        DTGP (Arg0, Arg1, Arg2, Arg3, RefOf (Local0))
                        Return (Local0)
                    }    
                }

'Hackintosh > DSDT' 카테고리의 다른 글

iaslMe  (9) 2011.01.31
Fix DSDT: sleep, shutdown, SATA, No restart  (0) 2010.07.12
Asus Mainboard Firewire DSDT  (0) 2010.07.05
DSDT 생성  (4) 2010.06.19
8600 GTS 256 MB DSDT  (0) 2010.02.18
:
Posted by Ritz®™
2010. 7. 5. 11:13

Asus Mainboard Firewire DSDT Hackintosh/DSDT2010. 7. 5. 11:13

다음 적용방법은 Mac Pro 3,1에서 적용가능합니다.
/Extra/smbios.plist 에서 항목을 바꾸어 주면 되는
오른쪽의 분류보기중 BootLoad 항목에서 pc_efi나 Chameleon 부트로더중 아무거나 설치해주면 smbios.plist를 얻을 수 있을 것입니다.


1. 다음과 같이 IORegistryExplorer를 이용하여 그래픽 카드의 디바이스 설정을 확인한다.
다음 그림에서는 P0P3가 FireWire Device이다.


2. 다음과 같이 코드를 변경하여 적용하여 준다.
            
            Device (P0P3)                                         <<<메인보드에 따라 위에서 확인한 값 적용
            {
                Name (_ADR, 0x001E0000)
                Method (_PRW, 0, NotSerialized)
                {
                    Return (GPRW (0x0B, 0x04))
                }

                Method (_PRT, 0, NotSerialized)
                {
                    If (PICM)
                    {
                        Return (AR03)
                    }

                    Return (PR03)
                }
            }


3. 재부팅하여 확인한다.

'Hackintosh > DSDT' 카테고리의 다른 글

Fix DSDT: sleep, shutdown, SATA, No restart  (0) 2010.07.12
Aslock P55 FireWire DSDT 설정하기  (0) 2010.07.09
DSDT 생성  (4) 2010.06.19
8600 GTS 256 MB DSDT  (0) 2010.02.18
Code injection via DSDT for NVIDIA graphics  (0) 2009.12.06
:
Posted by Ritz®™
2010. 6. 19. 15:49

DSDT 생성 Hackintosh/DSDT2010. 6. 19. 15:49

Update : http://osx86.tistory.com/1217

DSDT 생성하기


❶ 압축화일을 다운로드받아 압축을 푼다.


❷/Application/Utility 에서 Terminal 을 실행한다.

❸ #cd /Users/???/Download/                                 <<<압축푼 경로로 이동하는 명령어
#sudo -s
                                                                             <<< 암호를 입력하여 준다.
#
#./MakeDSDT   /Volumes/Mac/                        

❹/ 폴더에 dsdt.aml화일이 생성되어 있는지 확인한다.
#ls -al /*.aml


❺ 참고 dsdt.aml 데이타베이스

*만들기 힘드시면 다음 url등에서 자신의 메인보드에 맞는 dsdt.aml을 다운로드 받아서 사용한다.

:
Posted by Ritz®™
2010. 2. 18. 02:03

8600 GTS 256 MB DSDT Hackintosh/DSDT2010. 2. 18. 02:03

            Device (P0P1)
            {
                Device (GFX0)
                {
                    Name (_ADR, Zero)
                    Name (_SUN, One)
                    Method (_DSM, 4, NotSerialized)
                    {
                        Store (Package (0x16)
                            {
                                "@0,compatible",
                                Buffer (0x0B)
                                {
                                    "NVDA,NVMac"
                                },

                                "@0,device_type",
                                Buffer (0x08)
                                {
                                    "display"
                                },

                                "@0,name",
                                Buffer (0x0F)
                                {
                                    "NVDA,Display-A"
                                },

                                "@1,compatible",
                                Buffer (0x0B)
                                {
                                    "NVDA,NVMac"
                                },

                                "@1,device_type",
                                Buffer (0x08)
                                {
                                    "display"
                                },

                                "@1,name",
                                Buffer (0x0F)
                                {
                                    "NVDA,Display-B"
                                },

                                "NVCAP",
                                Buffer (0x18)
                                {
                                    /* 0000 */    0x04, 0x00, 0x00, 0x00, 0x00, 0x00, 0x03, 0x00,
                                    /* 0008 */    0x0C, 0x00, 0x00, 0x00, 0x00, 0x00, 0x00, 0x07,
                                    /* 0010 */    0x00, 0x00, 0x00, 0x00
                                },

                                "VRAM,totalsize",
                                Buffer (0x02)
                                {
                                    0x00, 0x00, 0x00, 0x28
                                },

                                "device_type",
                                Buffer (0x0D)
                                {
                                    "NVDA,GeForce"
                                },

                                "model",
                                Buffer (0x18)
                                {
                                    "nVidia GeForce 8600 GTS"
                                },

                                "rom-revision",
                                Buffer (0x26)
                                {
                                    "nVidia GeForce 8600 GTS OpenGL Engine"
                                }
                            }, Local0)
                        DTGP (Arg0, Arg1, Arg2, Arg3, RefOf (Local0))
                        Return (Local0)
                    }
                }

                Name (_ADR, 0x00010000)
                Method (_PRW, 0, NotSerialized)
                {
                    Return (GPRW (0x09, 0x04))
                }

                Method (_PRT, 0, NotSerialized)
                {
                    If (PICM)
                    {
                        Return (AR01)
                    }

                    Return (PR01)
                }

'Hackintosh > DSDT' 카테고리의 다른 글

Asus Mainboard Firewire DSDT  (0) 2010.07.05
DSDT 생성  (4) 2010.06.19
Code injection via DSDT for NVIDIA graphics  (0) 2009.12.06
Fix'y DSDT for ASUS P5W DH Deluxe and Snow & Leopard  (0) 2009.11.06
Windows용 DSDT 추출 및 Patcher  (0) 2009.10.30
:
Posted by Ritz®™
2009. 12. 6. 19:24

Code injection via DSDT for NVIDIA graphics Hackintosh/DSDT2009. 12. 6. 19:24

Created by Team EvOSX86
In this third guide, board and add to our DSDT code, graphics injection that will enable us to stop using Efi strings or injectors
Nvidia video card.
* Note: We've had success with this technique for some GMA950, ATI X3100 and some of the series X1xxx but not yet in HD.
Tools needed:
Ioregistry explorer
Nvidia graphics card working 100% including video outputs needed (QE and Hardware CI).
Having previously read chapter one and two of the guide
Content:
1. How to recognize where our video card in the registry and its associated devices.
2. Decompilation file and added COFIG DSDT.aml chart.
2a. The loader code.
3. Comparison of our code with Ioreg added Nvcaps, reg and renamed.
4. Basic structure of video devices and the DSDT added to our code.
4a. Example portable.
4b. Example computer tower.
5. Compiling and testing.
APPENDIX: How to clean our DSDT video inputs nonfunctional
1. How to recognize where our video card and registration devices
partners.
After downloading the program Ioregistry explorer, executive, we walk the tree of entries until we find the reference for our
video card, usually tends to be quite clear:
This example is from a laptop with a 256MB Nvidia 8600GT using the latest patches as Nvinject video and injector.
Pic1

As you will see, is not marked in green line corresponds to the card, but the upper, and has an explanation: in the DSDT code does not find his name, but with
the device that houses it.
Let me explain a bit these devices:
Marked in red is the AGP device @ 1, which depends on PCI @ 0, this device houses a device called a sub-VID @ 0, which is our video card.
In turn, the device VID @ 0 contains other devices that do not see, such as LCD, VGA, etc.
2. Decompilation of the code and added dsdt.aml chart.

Assuming that prior to this guide you have got to have a fixed DSDT and operational (HPET and RTC patched etc ...) you make a backup file and DSDT.aml
We have to work on.
In previous guides we have spoken of the binary called "iasl" found inside the folder "tools" created by the patcher Fassler. I repeat the recommendation that
copieis this file in / usr / bin with this I will always be available when you open the terminal and not have to be Recordade where we have given, or drag it to the terminal
every time we change our archive dst.dsl
That said, having copied the binary to start with where we mentioned decompilation of DSDT.aml:
Open terminal as root logueamos us and agree to the folder where we alamacenado the DSDT (cd "path to the folder")
once inside type in "-d iasl dsdt.aml"
This will create DSDT.dsl, we make a copy for backup and have it move away from the tools folder to avoid overcrowding of.
Now prodeas DSDT.dsl edit using a text editor of our choice (suggested textmate)
For this example we will use a DSDT from a laptop.
Note: The code marked in red is not used.
   
The blue outlines the part that we must adapt to our video card.


CODE

Device (PEGP)  

  {

  Name (_ADR, 0x00010000)

  Device (GFX0)

  {

  Name (_ADR, Zero)

  Name (_SUN, One)

  Method (_DSM, 4, NotSerialized)

  {

  Store (Package (0x1A)

  {

  "@0,compatible",

  Buffer (0x0B)

  {

  "NVDA,NVMac"

  },

  "@0,device_type",

  Buffer (0x08)

  {

  "display"

  },

  "@0,name",

  Buffer (0x0F)

  {

  "NVDA,Display-A"

  },

  "@1,compatible",

  Buffer (0x0B)

  {

  "NVDA,NVMac"

  },

  "@1,device_type",

  Buffer (0x08)

  {

  "display"

  },

  "@1,name",

  Buffer (0x0F)

  {

  "NVDA,Display-B"

  },

  "NVCAP",   <----------------   Nuestro NVCAP para salidas múltiples extraído de IOREG.

  Buffer (0x18)

  {

  /* 0000 */   0x04, 0x00, 0x00, 0x00, 0x00, 0x00, 0x01, 0x00,

  /* 0008 */   0x06, 0x00, 0x00, 0x00, 0x00, 0x00, 0x00, 0x00,

  /* 0010 */   0x00, 0x00, 0x00, 0x00

  },

  "NVPM",   <----------------   Nuestro NVPM (gestión de energía), normalmente no hay que cambiarlo, pero es bueno compararlo en IOREG.

  Buffer (0x20)

  {

  /* 0000 */   0x01, 0x00, 0x00, 0x00, 0x00, 0x00, 0x00, 0x00,

  /* 0008 */   0x00, 0x00, 0x00, 0x00, 0x00, 0x00, 0x00, 0x00,

  /* 0010 */   0x00, 0x00, 0x00, 0x00, 0x00, 0x00, 0x00, 0x00,

  /* 0018 */   0x00, 0x00, 0x00, 0x00

  },

  "VRAM,totalsize",

  Buffer (0x04)

  {

     0x00, 0x00, 0x00, 0x20

  },

   "device_type",

  Buffer (0x0D)

  {

  "NVDA,GeForce"

  },

  "model",

     Buffer (0x1F)   <----------------   Dependerá de la longitud del nombre + los espacios + 1.

     {

  "Nvidia GeForce 8600M GS 256 MB"   <----------------   El nombre de nuestra tarjeta y su memoria (a vuestra elección).

  },

   "rom-revision",

  Buffer (0x20)

     {

  "DSDT ROM v.1a #irc.osx86.es (c)"

  },

  "reg",   <----------------   Nuestro REG extraído de IOREG.

   Buffer (0x78)

   {

  /* 0000 */   0x00, 0x00, 0x01, 0x00, 0x00, 0x00, 0x00, 0x00,

/* 0008 */   0x00, 0x00, 0x00, 0x00, 0x00, 0x00, 0x00, 0x00,

/* 0010 */   0x00, 0x00, 0x00, 0x00, 0x10, 0x00, 0x01, 0x02,

/* 0018 */   0x00, 0x00, 0x00, 0x00, 0x00, 0x00, 0x00, 0x00,

/* 0020 */   0x00, 0x00, 0x00, 0x00, 0x00, 0x00, 0x00, 0x01,

/* 0028 */   0x14, 0x00, 0x01, 0x42, 0x00, 0x00, 0x00, 0x00,

/* 0030 */   0x00, 0x00, 0x00, 0x00, 0x00, 0x00, 0x00, 0x00,

/* 0038 */   0x00, 0x00, 0x00, 0x10, 0x1C, 0x00, 0x01, 0x02,

/* 0040 */   0x00, 0x00, 0x00, 0x00, 0x00, 0x00, 0x00, 0x00,

/* 0048 */   0x00, 0x00, 0x00, 0x00, 0x00, 0x00, 0x00, 0x02,

/* 0050 */   0x24, 0x00, 0x01, 0x01, 0x00, 0x00, 0x00, 0x00,

/* 0058 */   0x00, 0x00, 0x00, 0x00, 0x00, 0x00, 0x00, 0x00,

/* 0060 */   0x80, 0x00, 0x00, 0x00, 0x30, 0x00, 0x01, 0x02,

/* 0068 */   0x00, 0x00, 0x00, 0x00, 0x00, 0x00, 0x00, 0x00,

/* 0070 */   0x00, 0x00, 0x00, 0x00, 0x00, 0x00, 0x02, 0x00

  }

  }, Local0)

  DTGP (Arg0, Arg1, Arg2, Arg3, RefOf (Local0))

  Return (Local0)

  }

  }

  }


Renowned for our card in the code outsider.
                                                     
If you look at the letters in blue is suggested, you will see that marked the buffer and the name of the card, why?, It is simple, you will have to change the name of the card
for yours, and the buffer indicating the number of characters (including spaces) is in the name quoted 1 if you change the name but not the buffer, the
compilation will fail.
How to find the buffer (which is also in hexadecimal).
It is very simple, we need a converter decimal to hexadecimal and vice versa.
A site that you can come very convenient is this:
http://www.parkenet.com/apl/HexDecConverter.html
or this:
http://www.paulschou.com/tools/xlate/
Well, he began:
Sample buffer for the line "Nvidia GeForce 8600M GS 256MB, the number of letters and spaces contained here is 30 (decimal), add 1 to the result (actually it
The problem is that the account number starts from zero), which gives us 31, using the websites listed above, we put 31 in decimal and as a result gives us 1F
hexadecimal, ie, the buffer used.
If we change the name to our card, we use the same approach to calculate the size of the buffer.

2a. The loader code.

We will give an overview of the concept of loader code already discussed in the previous guide.
Our code is not ACPI is a string of information that add to the ACPI code, and if we as-is, our record's not OSX not being charged this compatible
ACPI, so this is loaded, we must use a "shipper" which is nothing more than a bit of code that define our entry code and allow its load by
system.
Where to insert the "shipper"?
This is simple, you must seek with the text editor area code _WAK called, and when the definition of it, fit the loader code.
Charger Code:


CODE

Method (DTGP, 5, NotSerialized)

{

If (LEqual (Arg0, Buffer (0x10)

{

/* 0000 */ 0xC6, 0xB7, 0xB5, 0xA0, 0x18, 0x13, 0x1C, 0x44,

/* 0008 */ 0xB0, 0xC9, 0xFE, 0x69, 0x5E, 0xAF, 0x94, 0x9B

}))

{

If (LEqual (Arg1, One))

{

If (LEqual (Arg2, Zero))

{

Store (Buffer (One)

{

0x03

}, Arg4)

Return (One)

}

If (LEqual (Arg2, One))

{

Return (One)

}

}

}

Store (Buffer (One)

{

0x00

}, Arg4)

Return (Zero)

}


Cargo Area:
The code in this area will depend on the machine, and basically you have to find the end _WAK code, which ends:


CODE

Return (Package (0x02)

{

Zero,

Zero

})

}


I include below the code loader.
EXAMPLE:
More cargo area shipper:


CODE

Method (_WAK, 1, NotSerialized)

{

P8XH (One, 0xAB)

If (LOr (LEqual (Arg0, 0x03), LEqual (Arg0, 0x04)))

{

If (And (CFGD, 0x01000000))

{

If (LAnd (And (CFGD, 0xF0), LEqual (OSYS, 0x07D1)))

{

TRAP (0x3D)

}

}

}

If (LEqual (RP2D, Zero))

{

Notify (\_SB.PCI0.RP02, Zero)

}

If (LEqual (Arg0, 0x03)) {}

If (LEqual (Arg0, 0x04))

{

\_SB.PCI0.LPCB.EC0.SELE ()

}

P8XH (Zero, 0xCD)

Return (Package (0x02)

{

Zero,

Zero

})

}

Method (DTGP, 5, NotSerialized)

{

If (LEqual (Arg0, Buffer (0x10)

{

/* 0000 */ 0xC6, 0xB7, 0xB5, 0xA0, 0x18, 0x13, 0x1C, 0x44,

/* 0008 */ 0xB0, 0xC9, 0xFE, 0x69, 0x5E, 0xAF, 0x94, 0x9B

}))

{

If (LEqual (Arg1, One))

{

If (LEqual (Arg2, Zero))

{

Store (Buffer (One)

{

0x03

}, Arg4)

Return (One)

}

If (LEqual (Arg2, One))

{

Return (One)

}

}

}

Store (Buffer (One)

{

0x00

}, Arg4)

Return (Zero)

}


Salváis the file and compile to see if there were errors in the code.
Open the terminal, as root logueamos us and tune into the DSDT folder (cd "path to the folder) then type
iasl-f dsdt.dsl

If errors occur is that you put the wrong charger, if warnings occur, is that it may come before, not do them much attention now.
If no error occurs, delete the file that was generated DSDT.aml and continued work within DSDT.dsl
3. Comparison of our code with Ioreg added Nvcaps, reg and
renamed.
We now proceed to seek the necessary data on our IOREG for insertion into each unit in the code.
NVCAPS or seek first the configuration of the outputs of our video card and NVPM or energy management.
We opened the IOREG and seek our video card, pointing device and look for the entry child NVCAP and NVPM:


Pic2

Once we have NVCAP values and NVPM, amend our code.
Now look at the value of the input REG:


Pic 3

Change value of REG in the graphical code, so you get the real value is in our system.

4. Basic structure of video devices and the DSDT added
of our code.
4a. Example using a laptop.
Let's open the DSDT.dsl and look through the keyword "device" until we get to:


CODE

Device (AGP)


We will find the device tree in this way (different colors for each device):
In short without our code:


CODE

Device (AGP) (Dispositivo madre)

{

Nombre y dirección.

DEVICE VID0 (Dispositivo hijo)

{

   Nombre y dirección de VID0

Inicio del método

{

   Método

   }

   Device (TV)

Device (CRT)

   Device (LCD)

Device (DVI)

}

}


Briefly our code:


CODE

Device (AGP) (Dispositivo madre)

{

Nombre y dirección.

DEVICE VID0 (Dispositivo hijo)

{

   Nombre y dirección de VID0

Inicio del método

{

   Método

   }

   Device (TV)

Device (CRT)

   Device (LCD)

Device (DVI)

Device (GFX) <-------- Nuestro codigo.

}

}

Extended:


CODE

Device (AGP)

{

Name (_ADR, 0x00010000)

Device (VID)

{

Name (_ADR, Zero)

Method (_DOS, 1, NotSerialized)

{

Store (Arg0, MIS4)

SMI (0x9E, MIS4)

}

Method (_DOD, 0, NotSerialized)

{

Store (SMI (0x6D, Zero), Local0)

If (LEqual (Local0, One))

{

Return (Package (0x04)

{

0x00010100,

0x00010200,

0x00010110,

0x00010210

})

}

Else

{

Return (Package (0x04)

{

0x00010100,

0x00010200,

0x00010118,

0x00010120

})

}

}

Device (TV)

{

Method (_ADR, 0, NotSerialized)

{

Return (0x0200)

}

Method (_DCS, 0, NotSerialized)

{

Store (SMI (0x8E, 0x04), Local0)

Return (Local0)

}

Method (_DGS, 0, NotSerialized)

{

Store (SMI (0x99, 0x04), Local0)

Return (Local0)

}

Method (_DSS, 1, NotSerialized)

{

DSS (0x04, Arg0)

}

}

Device (CRT)

{

Method (_ADR, 0, NotSerialized)

{

Return (0x0100)

}

Method (_DCS, 0, NotSerialized)

{

Store (SMI (0x8E, 0x02), Local0)

Return (Local0)

}

Method (_DGS, 0, NotSerialized)

{

Store (SMI (0x99, 0x02), Local0)

Return (Local0)

}

Method (_DSS, 1, NotSerialized)

{

DSS (0x02, Arg0)

}

}

Device (LCD)

{

Method (_ADR, 0, NotSerialized)

{

Store (SMI (0x6D, Zero), Local0)

If (LEqual (Local0, One))

{

Return (0x0110)

}

Else

{

Return (0x0118)

}

}

Method (_DCS, 0, NotSerialized)

{

Store (SMI (0x8E, One), Local0)

Return (Local0)

}

Method (_DGS, 0, NotSerialized)

{

Store (SMI (0x99, One), Local0)

Return (Local0)

}

Method (_DSS, 1, NotSerialized)

{

DSS (One, Arg0)

}

Name (BTVL, 0x64)

Name (DBCL, Package (0x0A) {})

Method (_BCL, 0, NotSerialized)

{

SX10 ()

SX30 (0x19)

SX30 (Zero)

SX11 ()

Store (SX40 (), Index (DBCL, Zero))

Store (SX40 (), Index (DBCL, One))

Store (SX40 (), Index (DBCL, 0x02))

Store (SX40 (), Index (DBCL, 0x03))

Store (SX40 (), Index (DBCL, 0x04))

Store (SX40 (), Index (DBCL, 0x05))

Store (SX40 (), Index (DBCL, 0x06))

Store (SX40 (), Index (DBCL, 0x07))

Store (SX40 (), Index (DBCL, 0x08))

Store (SX40 (), Index (DBCL, 0x09))

SX12 ()

Return (DBCL)

}

Method (_BCM, 1, NotSerialized)

{

SX10 ()

SX30 (0x19)

SX30 (One)

SX30 (Arg0)

Store (Arg0, BTVL)

SX11 ()

SX12 ()

}

Method (_BQC, 0, NotSerialized)

{

SX10 ()

SX30 (0x19)

SX30 (0x02)

SX11 ()

Store (SX40 (), Local0)

Store (Local0, BTVL)

SX12 ()

Return (Local0)

}

}

Device (DVI)

{

Method (_ADR, 0, NotSerialized)

{

Store (SMI (0x6D, Zero), Local0)

If (LEqual (Local0, One))

{

Return (0x0210)

}

Else

{

Return (0x0120)

}

}

Method (_DCS, 0, NotSerialized)

{

Store (SMI (0x8E, 0x08), Local0)

Return (Local0)

}

Method (_DGS, 0, NotSerialized)

{

Store (SMI (0x99, 0x08), Local0)

Return (Local0)

}

Method (_DSS, 1, NotSerialized)

{

DSS (0x08, Arg0)

}

}

Device (GFX0) <------------- Comienzo de nuestro codigo

{

Name (_ADR, Zero)

Name (_SUN, One)

Method (_DSM, 4, NotSerialized)

{

Store (Package (0x1A)

{

"@0,compatible",

Buffer (0x0B)

{

"NVDA,NVMac"

},

"@0,device_type",

Buffer (0x08)

{

"display"

},

"@0,name",

Buffer (0x0F)

{

"NVDA,Display-A"

},

"@1,compatible",

Buffer (0x0B)

{

"NVDA,NVMac"

},

"@1,device_type",

Buffer (0x08)

{

"display"

},

"@1,name",

Buffer (0x0F)

{

"NVDA,Display-B"

},

"NVCAP",

Buffer (0x18)

{

/* 0000 */ 0x04, 0x00, 0x00, 0x00, 0x00, 0x00, 0x01, 0x00,

/* 0008 */ 0x06, 0x00, 0x00, 0x00, 0x00, 0x00, 0x00, 0x00,

/* 0010 */ 0x00, 0x00, 0x00, 0x00

},

"NVPM",

Buffer (0x20)

{

/* 0000 */ 0x01, 0x00, 0x00, 0x00, 0x00, 0x00, 0x00, 0x00,

/* 0008 */ 0x00, 0x00, 0x00, 0x00, 0x00, 0x00, 0x00, 0x00,

/* 0010 */ 0x00, 0x00, 0x00, 0x00, 0x00, 0x00, 0x00, 0x00,

/* 0018 */ 0x00, 0x00, 0x00, 0x00

},

"VRAM,totalsize",

   Buffer (0x04)

   {

0x00, 0x00, 0x00, 0x20

},

"device_type",

Buffer (0x0D)

{

"NVDA,GeForce"

},

"model",

Buffer (0x1F)

{

"Nvidia GeForce 8600M GS 256 MB"

},

"rom-revision",

Buffer (0x20)

{

"DSDT ROM v.1a #irc.osx86.es (c)"

},

"reg",

   Buffer (0x78)

{

/* 0000 */ 0x00, 0x00, 0x01, 0x00, 0x00, 0x00, 0x00, 0x00,

   /* 0008 */ 0x00, 0x00, 0x00, 0x00, 0x00, 0x00, 0x00, 0x00,

   /* 0010 */ 0x00, 0x00, 0x00, 0x00, 0x10, 0x00, 0x01, 0x02,

   /* 0018 */ 0x00, 0x00, 0x00, 0x00, 0x00, 0x00, 0x00, 0x00,

   /* 0020 */ 0x00, 0x00, 0x00, 0x00, 0x00, 0x00, 0x00, 0x01,

   /* 0028 */ 0x14, 0x00, 0x01, 0x42, 0x00, 0x00, 0x00, 0x00,

   /* 0030 */ 0x00, 0x00, 0x00, 0x00, 0x00, 0x00, 0x00, 0x00,

   /* 0038 */ 0x00, 0x00, 0x00, 0x10, 0x1C, 0x00, 0x01, 0x02,

   /* 0040 */ 0x00, 0x00, 0x00, 0x00, 0x00, 0x00, 0x00, 0x00,

   /* 0048 */ 0x00, 0x00, 0x00, 0x00, 0x00, 0x00, 0x00, 0x02,

   /* 0050 */ 0x24, 0x00, 0x01, 0x01, 0x00, 0x00, 0x00, 0x00,

   /* 0058 */ 0x00, 0x00, 0x00, 0x00, 0x00, 0x00, 0x00, 0x00,

   /* 0060 */ 0x80, 0x00, 0x00, 0x00, 0x30, 0x00, 0x01, 0x02,

   /* 0068 */ 0x00, 0x00, 0x00, 0x00, 0x00, 0x00, 0x00, 0x00,

   /* 0070 */ 0x00, 0x00, 0x00, 0x00, 0x00, 0x00, 0x02, 0x00

}

}, Local0)

DTGP (Arg0, Arg1, Arg2, Arg3, RefOf (Local0))

Return (Local0)

}

   } <------------- Fin de nuestro codigo (No incluir esta reseña en el DSDT)

}

}


4b. Example using a computer tower.
We will seek to explore our IOregistry video card, and here we notice a difference with the code on the laptop, and is as follows:
In the computer tower, we will find the video devices that we saw in the previous example, LCD, CRT etc., except in cases of integrated graphics, we
ioreg to look at the site of our graph, usually it be under some PCI devices such as PC1, P0P1 etc. .. depends
motherboard manufacturer, but sometimes we do not see the device with a clear demarcation in ioreg and appears as PCI2BRIDGE or in this case PCIBRIDGE
add the entry directly into the ICP as all these devices have the device "mother" to the main PCI ..... In plates with integrated graphics
we can find something closer to the example of the laptop, but we must not fall into errors, the code must be added in the code
for the device that is located not on our card and the integrated video board.
Set in the PCI code.


CODE

Device (PCI0)

{

Name (_HID, EisaId ("PNP0A03"))

Name (_ADR, 0x00)

Name (_UID, 0x01)

Name (_BBN, 0x00)

Method (_S3D, 0, NotSerialized)

{

If (LEqual (OSFL, 0x02))

{

Return (0x02)

}

Else

{

Return (0x03)

}

}

   Method (_STA, 0, NotSerialized)

{

Return (0x0F)

}

Method (_CRS, 0, NotSerialized)

{

Name (BUF0, ResourceTemplate ()

{


The code continues much longer, but we will take this as a reference.
Here we would have our code added to the PCI video:


CODE

Device (PCI0)

{

Name (_HID, EisaId ("PNP0A03"))

Name (_ADR, 0x00)

Name (_UID, 0x01)

Name (_BBN, 0x00)

   Device (PEGP)

{

Name (_ADR, 0x00060000)

Device (GFX0)

{

Name (_ADR, Zero)

Name (_SUN, One)

Method (_DSM, 4, NotSerialized)

{

Store (Package (0x1C)

{

   "AAPL,slot-name",

   Buffer (0x0D)

   {

"PCI-E Slot-1"

}, },

"@0,compatible",

Buffer (0x0B)

{

"NVDA,NVMac"

},

"@0,device_type",

Buffer (0x08)

{

"display"

},

"@0,name",

Buffer (0x0F)

{

"NVDA,Display-A"

},

"@1,compatible",

Buffer (0x0B)

{

"NVDA,NVMac"

},

"@1,device_type",

Buffer (0x08)

{

"display"

},

"@1,name",

Buffer (0x0F)

{

"NVDA,Display-B"

},

"NVCAP",

Buffer (0x18)

{

/* 0000 */ 0x04, 0x00, 0x01, 0x00, 0x00, 0x00, 0x03, 0x00,

/* 0008 */ 0x0C, 0x00, 0x00, 0x00, 0x00, 0x00, 0x00, 0x07,

/* 0010 */ 0x00, 0x00, 0x00, 0x00

},

"NVPM",

Buffer (0x20)

{

/* 0000 */ 0x01, 0x00, 0x00, 0x00, 0x00, 0x00, 0x00, 0x00,

/* 0008 */ 0x00, 0x00, 0x00, 0x00, 0x00, 0x00, 0x00, 0x00,

/* 0010 */ 0x00, 0x00, 0x00, 0x00, 0x00, 0x00, 0x00, 0x00,

/* 0018 */ 0x00, 0x00, 0x00, 0x00

},

"VRAM,totalsize",

Buffer (0x04)

{

0x00, 0x00, 0x00, 0x20

},

"device_type",

Buffer (0x0D)

{

"NVDA,GeForce"

},

"model",

Buffer (0x22)

{

"POV Nvidia GeForce 8800 GT 512 MB"

},

"rom-revision",

Buffer (0x23)

{

"DSDT ROM v.1a by #irc.osx86.es (c)"

},

"reg",

Buffer (0x78)

{

/* 0000 */ 0x00, 0x00, 0x01, 0x00, 0x00, 0x00, 0x00, 0x00,

/* 0008 */ 0x00, 0x00, 0x00, 0x00, 0x00, 0x00, 0x00, 0x00,

/* 0010 */ 0x00, 0x00, 0x00, 0x00, 0x10, 0x00, 0x01, 0x02,

/* 0018 */ 0x00, 0x00, 0x00, 0x00, 0x00, 0x00, 0x00, 0x00,

/* 0020 */ 0x00, 0x00, 0x00, 0x00, 0x00, 0x00, 0x00, 0x01,

/* 0028 */ 0x14, 0x00, 0x01, 0x42, 0x00, 0x00, 0x00, 0x00,

/* 0030 */ 0x00, 0x00, 0x00, 0x00, 0x00, 0x00, 0x00, 0x00,

/* 0038 */ 0x00, 0x00, 0x00, 0x10, 0x1C, 0x00, 0x01, 0x02,

/* 0040 */ 0x00, 0x00, 0x00, 0x00, 0x00, 0x00, 0x00, 0x00,

/* 0048 */ 0x00, 0x00, 0x00, 0x00, 0x00, 0x00, 0x00, 0x02,

/* 0050 */ 0x24, 0x00, 0x01, 0x01, 0x00, 0x00, 0x00, 0x00,

/* 0058 */ 0x00, 0x00, 0x00, 0x00, 0x00, 0x00, 0x00, 0x00,

/* 0060 */ 0x80, 0x00, 0x00, 0x00, 0x30, 0x00, 0x01, 0x02,

/* 0068 */ 0x00, 0x00, 0x00, 0x00, 0x00, 0x00, 0x00, 0x00,

/* 0070 */ 0x00, 0x00, 0x00, 0x00, 0x00, 0x00, 0x02, 0x00

}

}, Local0)

DTGP (Arg0, Arg1, Arg2, Arg3, RefOf (Local0))

Return (Local0)

}

}

}

Method (_S3D, 0, NotSerialized)

{

If (LEqual (OSFL, 0x02))

{

Return (0x02)

}

Else

{

Return (0x03)

}

}

Method (_STA, 0, NotSerialized)

{

Return (0x0F)

}


5. Compiling and testing.

Now we only save the file and compile it to check for syntax errors or not.
Open the terminal, as root logueamos us and tune into the folder where we have our DSDT (cd "path to folder") Keyboards
iasl dsdt.dsl

If errors occur is that you put the wrong charger, if warnings occur, is that it may come before, not do them much attention now.
If you have them, make certain that brackets have not been orphaned, or deleted.
If not, you can rename the file you have in DSDT.aml the root of the system to "DSDTold.aml" and copy the new (to open created when compiling) to the root of the disk.
We delete the injector that we are using (Nvkush, Nvinject or NVdarwin) or EFI string if we use this method and proceed to reboot. If our site has
been right and proper coding of our graphics should be fully recognized and activated yet.
If you fail the new DSDT.aml (eg freezes the system), you can boot the system using the command DSDTold.aml DSDT = (introducidlo when you see the boot
chameleon by pressing F8 and selecting the installation of Leopard).
We hope that this third guide on the possibilities of DSDT system has been of your liking.
We will be updating the guidelines as new data have ....


ANNEX
In this annex, see how to optimize a laptop, removing the graphic code is not used by OSX, obtaining with this a greater fluidity in the video
because the register is only the code that is functional, our code added.
In the summary view can better see the tree of devices, so we can determine who should stay and who must not be erased to useful code and
prepare for the inclusion of our code of video.
In summary, our code should look like in after deleting unnecessary devices:
BEFORE:


CODE

Device (AGP)

{

Nombre y dirección.

Cabezera de VID0

{

   Nombre y dirección de VID0

Inicio del método

{

   Método

   }

   Device (TV)

Device (CRT)

   Device (LCD)

Device (DVI)

}

}


LATER:


CODE

Device (AGP)

{

Nombre y dirección.

Cabezera de VID0

{

   Nombre y dirección de VID0

Inicio del método

{

   Método

   }

   }

}

}


Extended BEFORE:


CODE

Device (AGP)

{

Name (_ADR, 0x00010000)

Device (VID)

{

Name (_ADR, Zero)

Method (_DOS, 1, NotSerialized)

{

Store (Arg0, MIS4)

SMI (0x9E, MIS4)

}

Method (_DOD, 0, NotSerialized)

{

Store (SMI (0x6D, Zero), Local0)

If (LEqual (Local0, One))

{

Return (Package (0x04)

{

0x00010100,

0x00010200,

0x00010110,

0x00010210

})

}

Else

{

Return (Package (0x04)

{

0x00010100,

0x00010200,

0x00010118,

0x00010120

})

}

}

Device (TV)

{

Method (_ADR, 0, NotSerialized)

{

Return (0x0200)

}

Method (_DCS, 0, NotSerialized)

{

Store (SMI (0x8E, 0x04), Local0)

Return (Local0)

}

Method (_DGS, 0, NotSerialized)

{

Store (SMI (0x99, 0x04), Local0)

Return (Local0)

}

Method (_DSS, 1, NotSerialized)

{

DSS (0x04, Arg0)

}

}

Device (CRT)

{

Method (_ADR, 0, NotSerialized)

{

Return (0x0100)

}

Method (_DCS, 0, NotSerialized)

{

Store (SMI (0x8E, 0x02), Local0)

Return (Local0)

}

Method (_DGS, 0, NotSerialized)

{

Store (SMI (0x99, 0x02), Local0)

Return (Local0)

}

Method (_DSS, 1, NotSerialized)

{

DSS (0x02, Arg0)

}

}

Device (LCD)

{

Method (_ADR, 0, NotSerialized)

{

Store (SMI (0x6D, Zero), Local0)

If (LEqual (Local0, One))

{

Return (0x0110)

}

Else

{

Return (0x0118)

}

} If (LEqual (Local0, One))


Method (_DCS, 0, NotSerialized)

{

Store (SMI (0x8E, One), Local0)

Return (Local0)

}

Method (_DGS, 0, NotSerialized)

{

Store (SMI (0x99, One), Local0)

Return (Local0)

}

Method (_DSS, 1, NotSerialized)

{

DSS (One, Arg0)

}

Name (BTVL, 0x64)

Name (DBCL, Package (0x0A) {})

Method (_BCL, 0, NotSerialized)

{

SX10 ()

SX30 (0x19)

SX30 (Zero)

SX11 ()

Store (SX40 (), Index (DBCL, Zero))

Store (SX40 (), Index (DBCL, One))

Store (SX40 (), Index (DBCL, 0x02))

Store (SX40 (), Index (DBCL, 0x03))

Store (SX40 (), Index (DBCL, 0x04))

Store (SX40 (), Index (DBCL, 0x05))

Store (SX40 (), Index (DBCL, 0x06))

Store (SX40 (), Index (DBCL, 0x07))

Store (SX40 (), Index (DBCL, 0x08))

Store (SX40 (), Index (DBCL, 0x09))

SX12 ()

Return (DBCL)

}

Method (_BCM, 1, NotSerialized)

{

SX10 ()

SX30 (0x19)

SX30 (One)

SX30 (Arg0)

Store (Arg0, BTVL)

SX11 ()

SX12 ()

}

Method (_BQC, 0, NotSerialized)

{

SX10 ()

SX30 (0x19)

SX30 (0x02)

SX11 ()

Store (SX40 (), Local0)

Store (Local0, BTVL)

SX12 ()

Return (Local0)

}

}

Device (DVI)

{

Method (_ADR, 0, NotSerialized)

{

Store (SMI (0x6D, Zero), Local0)

If (LEqual (Local0, One))

{

Return (0x0210)

}

Else

{

Return (0x0120)

}

}

Method (_DCS, 0, NotSerialized)

{

Store (SMI (0x8E, 0x08), Local0)

Return (Local0)

}

Method (_DGS, 0, NotSerialized)

{

Store (SMI (0x99, 0x08), Local0)

Return (Local0)

}

Method (_DSS, 1, NotSerialized)

{

DSS (0x08, Arg0)

}

}

   }

   }


Extended LATER:


CODE

Device (AGP)

{

Name (_ADR, 0x00010000)

Device (VID)

{

Name (_ADR, Zero)

Method (_DOS, 1, NotSerialized)

{

Store (Arg0, MIS4)

SMI (0x9E, MIS4)

}

Method (_DOD, 0, NotSerialized)

{

Store (SMI (0x6D, Zero), Local0)

If (LEqual (Local0, One))

{

Return (Package (0x04)

{

0x00010100,

0x00010200,

0x00010110,

0x00010210

})

}

Else

{

Return (Package (0x04)

{

0x00010100,

0x00010200,

0x00010118,

0x00010120

})

}

}

   }

}


Obviously, if we are to compile after erasing all those devices, we report a number of errors will disappear as many references as well
that we look for the lines marked as errors and remove them as follows:


CODE

Errores generados al compilar cuando eliminamos el device "LCD":

/Users/xxx/Desktop/pruebas dsdt/Tools/DSDToriginal.dsl 721: Notify (\_SB.PCI0.AGP.VID.LCD, 0x86)

Error 4063 - Object does not exist ^ (\_SB.PCI0.AGP.VID.LCD)

/Users/xxx/Desktop/pruebas dsdt/Tools/DSDToriginal.dsl 726: Notify (\_SB.PCI0.AGP.VID.LCD, 0x87)

Error 4063 - Object does not exist ^ (\_SB.PCI0.AGP.VID.LCD)


We move to the line 721 and 726 as shown and we find:

CODE

If (LGreaterEqual (OSID (), 0x20))

{

If (And (Local0, 0x04))

{

Notify (\_SB.PCI0.AGP.VID.LCD, 0x86)

Notify (\_SB.PCI0.VID.LCD, 0x86)

}

If (And (Local0, 0x02))

{

Notify (\_SB.PCI0.AGP.VID.LCD, 0x87)

Notify (\_SB.PCI0.VID.LCD, 0x87)

}

}


If we remove those two entries, and compile again, the errors are gone.

CODE

If (LGreaterEqual (OSID (), 0x20))

{

If (And (Local0, 0x04))

{

Notify (\_SB.PCI0.VID.LCD, 0x86)

}

If (And (Local0, 0x02))

{

Notify (\_SB.PCI0.VID.LCD, 0x87)

}

}


It is recommended to compile every time you delete an entry, so you can gradually correct our code.
Guide by: Roisoft and Pere

'Hackintosh > DSDT' 카테고리의 다른 글

DSDT 생성  (4) 2010.06.19
8600 GTS 256 MB DSDT  (0) 2010.02.18
Fix'y DSDT for ASUS P5W DH Deluxe and Snow & Leopard  (0) 2009.11.06
Windows용 DSDT 추출 및 Patcher  (0) 2009.10.30
Enabling ACPI, EIST, etc for ASUS P5W DH DELUXE  (0) 2009.10.25
:
Posted by Ritz®™