달력

12

« 2024/12 »

  • 1
  • 2
  • 3
  • 4
  • 5
  • 6
  • 7
  • 8
  • 9
  • 10
  • 11
  • 12
  • 13
  • 14
  • 15
  • 16
  • 17
  • 18
  • 19
  • 20
  • 21
  • 22
  • 23
  • 24
  • 25
  • 26
  • 27
  • 28
  • 29
  • 30
  • 31
2012. 9. 30. 14:45

코덱 QuickTime Component Application/Final Cut2012. 9. 30. 14:45


먼저 Filp4Mac 사용은 현재로서는 자제를 해야 한다.  자세한 사항은 참고글을 읽어보면 된다.

우선 동영상 인코딩시 사용된 코덱을 확인해야 한다.

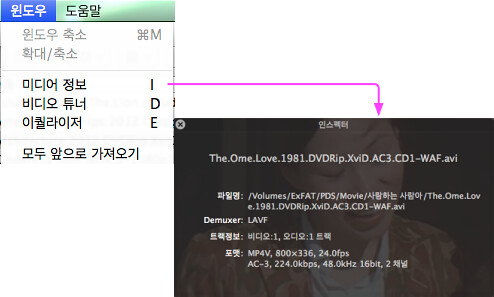
- 아래 그림은 MPlayerX를 이용하여 미디오 정보기능에서 코덱 정보를 확인하는 방법이다.
- 포맷 항목에 보면 필요한 코덱을 확인할 수 있다.

MPlayerX

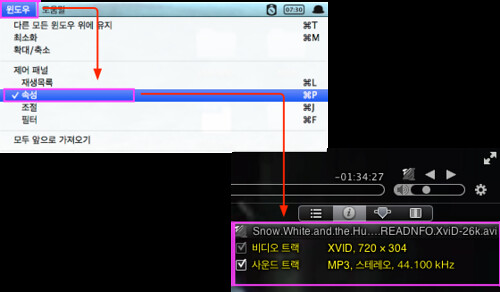
무비스트에서는 다음과 같이 확인할 수 있다.

Moviest


우선 아래 코덱들을 이용하여도 해결이 되지 않는다면 팟벗을 이용하여 인코딩하여야 한다.

http://osx86.tistory.com/130

QuickTime Component

http://www.apple.com/quicktime/resources/components.html?os=OSX&ctype=696d6463&csubtype=464d5034


특히, Divx Trial 버전과 Perian은 필수로 설치하는 것이 좋다.
 
제품소개 : 
http://www.divx.com/en/software/divx-plus/player 

다운로드 : http://www.divx.com/en/software/download/start/mac
Perian : 
http://perian.en.softonic.com/mac

기타 코덱 : A52Codec 코덱

http://www.cod3r.com/download/get.php?name=a52codec.dmg

AC3 오디오 코덱은..
http://trac.cod3r.com/a52codec/   a52codec

  • QuickTime Player supports standard CEA-608 closed captions. Version 7.1.6 or higher is required to playback media with closed captions. Download the latest QuickTime version.

  • The latest DivX Codec (Win or Mac) lets you play DivX video in QuickTime Player and also consists of improved tools for the utmost encoding quality and performance, making it the best choice to convert or create your own DivX video content.

  • The Xvid component for QuickTime allows users to play & encode Xvids in QuickTime Player. Xvid is a video codec library following the MPEG-4 standard.

  • ZyGoVideo’s great looking, smooth playing, web-video codec is now available for Windows, Mac PPC and Mac Intel machines. ZyGoVideo provides high-quality video at prevalent modem rates. The ZyGoVideo component adds encoding capabilities to QuickTime Pro.

  • The ACT-L3 codec enables users to bring ACT-L3 into an Apple QuickTime environment. The combination of Apple QuickTime and ACT-L3 provides a low cost, high quality, high compression solution ideal for electronic field production. The codec works with any application that supports broadcasting or editing in an Apple QuickTime environment.

  • Autodesk’s FBX for QuickTime enables QuickTime as a 3D viewing solution that supports content from any professional 3D package. With FBX for QuickTime, digital artists can share, view, and interact with 3D content seamlessly, efficiently, and at no cost. Now available for both Mac OS X and Windows.

  • SheerVideo is a powerful, faster-than-real-time nondestructive codec for production, postproduction, and archival. For uncompressed formats, SheerVideo doubles disk speed, disk capacity, and transmission bandwidth with perfect fidelity, bit-for-bit identical to the original. Supports all standard uncompressed formats: RGB, YCbCr; 4:4:4, 4:2:2; optional alpha; 10bit, 8bit; progressive, interlaced; SD, HD, anyD; NTSC, PAL; 4:3, 16:9, any:any; arbitrary frame rate. Includes Synchromy™ nondestructive color conversion.

  • Totally Hip’s QScript Extension Essentials (QSXE) component allows you to utilize custom wired actions inside your QuickTime movies. Wired actions allow a QuickTime movie to modify and control itself (and other QuickTime movies) via scripts embedded within the movie.

    QSXE Key Features:

    - Store and retrieve data using cookies

    - Print directly within your QuickTime movie

    - Add video into Panoramic VRs

    You can author using this component with LiveStage Professional — Totally Hip’s award winning QuickTime authoring package.”M

  • Totally Hip’s Audio Visualizations component allows you to visualize audio in the form of a spectrogram, waveform, or spectrum analyzer.

    The Audio Visualizations components were developed by Totally Hip Technologies Inc. for the Cornell Lab of Ornithology - Macaulay Library & Bioacoustics Research Program.

    You can author using this component with LiveStage Professional — Totally Hip’s award winning QuickTime authoring package.

  • EnSharpen Video Codec is designed to produce the highest compression possible for screen recording content, while maintaining completely lossless video quality - even through the multiple decompression/recompression cycles in production processes. EnSharpen is perfect for delivering cross-platform software training videos and online learning objects. This component allows playback of EnSharpen encoded movies. For Mac OS9, OSX, and Windows.

  • REDCODE RAW QuickTime codec supports RT playback in Final Cut Pro and editing of the QuickTime Reference movies generated in camera. The REDCODE RAW QuickTime codec also allows for playback of REDCODE RAW movies directly from QuickTime Player or other QuickTime-enabled applications.

:
Posted by Ritz®™
2012. 7. 20. 17:34

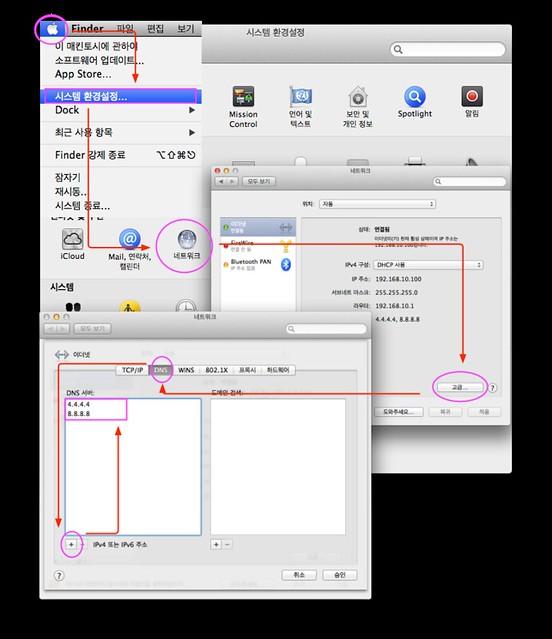
Mac OS X 에서 DNS 설정하는 방법 macOS2012. 7. 20. 17:34

dns

'macOS' 카테고리의 다른 글

Mac Book Hardware Control - Fan  (0) 2012.07.24
Hotmail의 캘린더를 Mac OS X 의 캘린더와 동기화하는 방법  (0) 2012.07.21
iCloud  (0) 2012.05.30
iTunes 10.6.1 Update  (0) 2012.03.29
Update for Mountain Lion  (0) 2012.03.01
:
Posted by Ritz®™
2012. 7. 16. 16:01

IRC Client 한글 세팅 Application2012. 7. 16. 16:01

아래는 Linkinus 라는 IRC 응용프로그램을 이용할 때 한글세팅하는 방법입니다.


'Application' 카테고리의 다른 글

iPhoto 슬라이드 쇼 만들기  (0) 2012.09.30
Split & ConCat  (0) 2012.09.02
iStat Menus  (0) 2012.07.12
Android on Vmware Fusion EXP(Build 754644) Update  (0) 2012.06.23
Moviest  (0) 2012.05.31
:
Posted by Ritz®™
2012. 7. 13. 13:06

uTorrent 이슈 해결방법 Application/Internet2012. 7. 13. 13:06

Update ; 02-10, 2012

uTorrent 가 동작하지 않을 때 해결방안

아래 방법은 정상적인 상황에서 다운로드가 안될때 불가피하게 사용하는 방법으로 대신 다운로드 속도는 정상적인 방법보다 느리게 되고 또한 불법적인 미디어나 소프트웨어 다운을 위해 악용하지 말기를 당부합니다.


1. uTorrent 2.0 이 제대로 동작하지 않는 난감한 상황이 발생했다면 다음글이 도움이 될 것이다.

대체적으로 gonig, err, not going 세가지 종류가 있다. uTorrent가 제대로 다운로드를 받지 못하고 있는 상황인데도 불구하고 transmission은 제대로 실행될 때가 있다. uTorrent 가 연결이 안되고 여유분의 포트를 제대로 이용하지 못하는 상황이 발생된 것이다.  이때는 다음과 같이 몇가지 설정 조정이 필요하다.


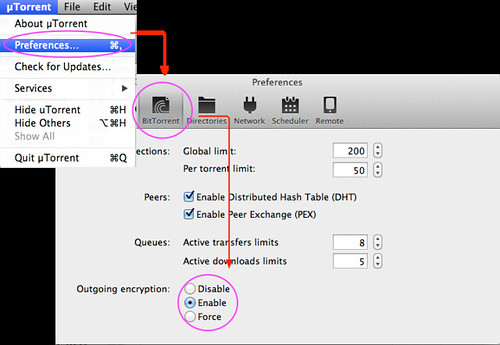
uTorrent Setting


즉, Outgoing Encryptionenabled로 설정해 주는 것이다.


2. 해당 국가내에서만 토런트를 다운로드 받을 수 있게 설정되어 있는 경우

다음 그림과 같이 해당국가의 Proxy 서버를 설정하여 다운로드 받을 수 있다.

proxy 서버 리스트는 다음글을 참고하기 바란다.  : http://osx86.tistory.com/1209


3. Lion에서 해결방안


Lion(10.7.?)에서도 가끔 uTorrent 제대로 동작이 안되는 경우가 있다. 물론, Transmission을 사용할 수 도 있지만 ratio 관리가 제대로 안되는 사항이 있어 일부 트래커들은 Transmission 사용자 계정을 중지하거나 불이익을 주기도 한다. 보통 에러 메시지가 "invalid downloading state."라는 에러 메시지를 뿜어 주신다.  다음 그림과 같이 해결하여 본다.


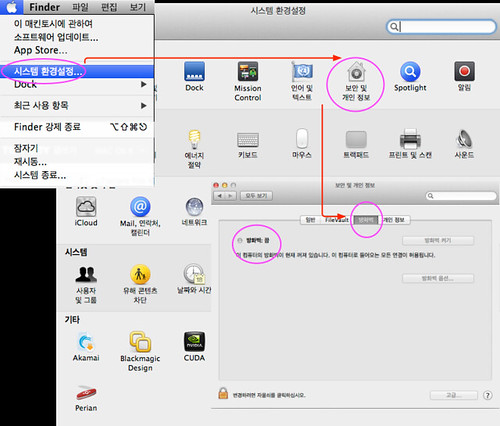
FireWall
- 즉, 방화벽 끔을 점검해야 한다.

또한, 아래 폴더의 설정 화일을 제거하여 주거나 시스템을 재부팅 한다. 
~/Library/Preferences/ByHost
~/Library/Caches
~/Library/Application Support/uTorrent


'Application > Internet' 카테고리의 다른 글

DropBox  (0) 2012.07.26
Netshade  (0) 2012.07.19
구글 메일 비정상적인 로그인 시도 - 이스라엘  (1) 2012.07.11
Socialite for FaceBook 환경설정  (0) 2012.03.16
Twitter 관련 소프트웨어  (0) 2012.02.05
:
Posted by Ritz®™
2012. 7. 2. 16:42

USB를 이용한 Windows 설치 Other OS/Windows2012. 7. 2. 16:42

USB를 이용하여 Windows를 설치하기 위해서는 여러가지 방법이 있지만 다음 방법도 그 한가지 방법이다.


다른 방법 참고http://osx86.tistory.com/1200

준비물:  Windows 7 USB/DVD Download tool 


그림이 제대로 보이지 않는다면 클릭하면 자세하게 볼 수 있다.


Windows 7 이상이라면 8G 이상의 USB메모리 스틱을 이용하는 것이 좋다.


:
Posted by Ritz®™
2012. 6. 21. 04:10

Nik Software Studio/Media2012. 6. 21. 04:10

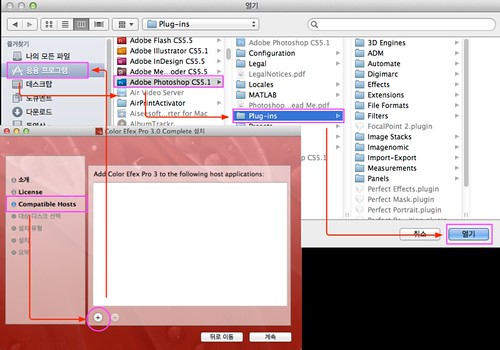
다른 프로그램들과는 달리 플러그인을 설치할 때는 설치 경로를 지정해야 하는 경우가 있다.


Nik Software

포토샵을 실행하면 다음과 같이 등록화면과 설정화면이 실행된다.


Nik Software


'Studio > Media' 카테고리의 다른 글

Rhinoceros  (0) 2012.06.21
Bigasoft Audio converter  (0) 2012.06.21
Resolume Avenue 4.0 Mac OsX  (0) 2012.06.20
Davinci Resolve Demo  (3) 2012.06.13
PulpMotion Advanced  (0) 2012.06.09
:
Posted by Ritz®™
2012. 3. 4. 15:10

Mac의 PRAM 과 NVRAM 재설정하는 방법 macOS/RealMac2012. 3. 4. 15:10

NVRAM 혹은 PRAM 을 재설정한 다음 스피커 볼륨, 모니터 해상도, 시동디스크 선택, 시간대 설정 정보는 재설정해야 한다. 만약 이슈가 지속된다면 Mac의 로직보드 밧데리를 교체해야할 필요성이 있을 수도 있다. 로직보드 밧데리는 컴퓨터가 셧다운 되었을때, NVRAM/PRAM 세팅을 유지하게 해준다. Mac을 Apple 공인 서비스 센타에 가져가면 로직 밧데리 교체 서비스를 받을 수 있을 것이다.


PRAM 과 NVRAM 리세팅

  1. 컴퓨터를 종료한다.
  2. 우선 다음 키보드를 확인한다: Command, Option, P, 그리고 R 키. 4단계에서 동시에 지긋이 눌러주는 것이 필요하다.
  3. 컴퓨터를 켠다.
  4. Command-Option-P-R 키를 지긋이 누른다. 컴퓨터 전원을 ON 시킨후 반드시 이 키 조합을 동시에 지긋이 눌러주어야 한다.
  5. 컴퓨터가 재부팅할때까지 지긋이 눌러 주어야 한고 두번째 부팅시 시동음을 들을 수 있을 것이다.
  6. 이제 키보드에서 손을 뗀다.

이제 컴퓨터의 PRAM 과 NVRAM 값이 공장 초기화 되었다. 시간도 공장 초기화 되었다.

구형 PowerBook 혹은 iBook 컴퓨터의  PMU 리세팅

몇가지 트러블슈팅 상황에서 만약 PRAM 리세팅으로 이슈가 해결되지 않는 다면 PMU 리세팅이 다음 단계가 될 것이다. 이와 관련된 정보는 Resetting PowerBook and iBook Power Management Unit (PMU)을 참고하기 바란다.

추가정보

구형맥의 Open Firmware NVRAM 재설정

Open Firmware 베이스의 구형 Power PC이고 위에서 설명한 방법으로 NVRAM 을 리세팅하지 못했다면 대체방법으로 Message “To continue booting, type 'mac-boot' and press return”글을 참고하기 바란다.

몇몇 경우에는 Open Firmware 베이스의 컴퓨터가 위에서 설명한 방법으로 키보드나 커맨드에 응답하지 않는 경우도 있고 지긋이 눌러서 유지하는 방법이 먹히지 않거나 시동하는 동안 Command, Option, O, 그리고 F 키가 먹히지 않는 경우도 있다. 만약 Open Firmware 프람프트가 나타나지 않거나 (비록 컴퓨터가 지원한다고 한다면) 펌웨어 업데이트를 진행하고 있다면 전원버튼을 지속적으로 지긋이 눌러주어 컴퓨터를 시동한다.

PRAM 항목

몇몇 Macintosh 컴퓨터는 아래 설명한 세팅값 전부를 가지고 있지 않다. Mac OS X: What's Stored in PRAM? 을 참고하기 바란다.

  • Status of AppleTalk
  • Serial Port Configuration and Port definition
  • Alarm clock setting
  • Application font
  • Serial printer location
  • Autokey rate
  • Autokey delay
  • Speaker volume
  • Attention (beep) sound
  • Double-click time
  • Caret blink time (insertion point rate)
  • Mouse scaling (mouse speed)
  • Startup disk
  • Menu blink count
  • Monitor depth
  • 32-bit addressing
  • Virtual memory
  • RAM disk
  • Disk cache
:
Posted by Ritz®™

Source : http://support.apple.com/kb/TS2570
현상

맥시스템 부팅후, Finder 나 로긴 윈도우가 보이는 대신 그레이 화면이나 커널패닉(Apple Logo) 혹은 금지마크 또는 끊임없는 로딩이 보인다.
주의: 시동시 불루스크린이 보이면 아래 단계는 적용 안된다.

해결방안

주의: 아래 몇가지 단계는 시스템 리세팅이나 계정 등록이 필요하다.

네트웍 케이블과 모든주변장치등 모든 것을 제거한다.

주의: "주변장치"란 하드디스크, 프린터 혹은 USB나 FireWire 케이블등 모든 것을 의미한다.

  1. 필요하다면 파워버튼을 몇초동안 지속적으로 눌러서 강제적으로 Mac을 셧다운한다.
  2. 모든 주변장치를 제거한다.(단지, 모니터, 키보드, 마우스만 연결하여 시스템을 가장 간단하게 만든다).
  3. 물론, Lan케이블까지 제거한다.
  4. Mac을 시작한다.
  • 만약 이 방법으로 시동이 된다면, 주변장치(혹은 디바이스와 관련된 소프트웨)가 근본적인 원인이 될 가능성이 있다. 디바이스 하나를 연결하고 Mac을 재부팅하여 테스트를 한다. 디바이스가 문제를 일으킬때까지 Device 하나씩 연결하여 테스트를 반복한다. 작동에 필요한 전원연결이 디바이스에 연결되었는지 확인한다. 제조사의 디바이스 관련 소프트웨어 드라이버나 펌웨어 업데이트가 다운로드 가능한지 확인한다. 만약 가능하다면 다른 연결케이블을 이용하여 테스트한다.( 예를 들면 다른 USB나 FireWire케이블).

    주의: 만약 모든 주변장치가 연결되어 있을때만 이슈가 생긴다면 아래 추가 정보를 참고한다.
  • 만약 써드파티 키보드나 마우스를 이용하고 있고 이슈가 여전히 발생하고 있다면 대신에 Apple 키보드나 마우스로 바꾸어 다시 시동 테스트를 한다. 또한 키보드나 마우스 없이 맥을 시작하여 다시 써드파티 키보드와 마우스를 연결하여 본다. 또한 다른 USB포트에 연결하여 테스트해본다.

만약 주변장치를 연결하지 않아도 이 문제가 여전히 발생한다면 다음단계를 진행한다.(물론 주변장치는 빼어두고 진행해야 한다.)

Safe Boot(안전모드) 실행

이슈를 해결하기 위해 단순히 안전모드로 부팅시도한다.

  1. 필요하다면 맥의 전원버튼을 몇초간 지긋이 눌러주어 강제로 종료한다.
  2. Mac 전원을 키고 즉시 Shift 키를 누른다. Safe Boot를 실행하기 위한 과정이다. 추가 팁: 만약 안전모드가 진행이 되면 재부팅하여 (Shift 키 대신) Shift-Command-V를 눌러서 부팅과정을 확인할 수 있다.

    주의
    : 안전모드 부팅은 디스크 점검등 여러가지 기능이 실행되므로 통상적인 부팅보다 시간이 더 오래 걸린다.
  3. 만약 Mac이 정상적으로 부팅하였다면, 즉시 재부팅을 해본다.

만약 안전모드로 부팅이 안되거나 안전모드 부팅후 재부팅에 실패하였다면 다음 단계로 넘어간다.


NVRAM / PRAM 리세팅

  1. Mac을 종료하고 필요하다면 전원버튼을 몇초간 눌러서 강제로 종료한다.
  2. NVRAM / PRAM 을 Reset한다.

만약 여전히 이슈가 발생한다면 다음 단계를 진행한다.

Mac OS X Install 디스크로 시작; Disk Utility 이용

  1. Mac OS X 10.4, 10.5, 10.6, 10.7 설치용 CD나 USB를 연결한다.(가능한 하드디스크에 설치된 버전과 동일한 버전을 사용한다. 다른 맥이나 구버전의 Mac 설치용 버전을 이용하면 안된다.)
  2. Mac을 종료한다. 필요하다면 전원버튼을 수초간 눌러서 강제종료한다.
  3. Mac을 시작하고 C키를 지긋이 누르고 있는다.(USB일 경우 옵션키)
  4. 설치용 버전으로 시작하면 Utility 메뉴에서 Disk Utility 를 실행한다.

    주의: 만약 이슈가 그대로 진행이 된다면 설치디스크/USB로도 부팅이 안될 것이다. 주변장치 제거 단계로 간다.
  5. Disk Utility에서, Mac OS X 볼륨을 선택하여 디스크 복구(Disk Repair)를 수행한다. 만약 별다른 이슈가 생기지 않는다면 디스크 권한복구(permissions repair)도 실행하여 준다. 디스크 복구(disk repair)를 실행하는 동안 문제가 발생하면, 복구를 다시 한번 실행한다.
  6. 디스크 유틸리티 실행이 끝나면 시스템을 정상 부팅하여 본다.

문제가 계속 발생한다면 다음단계를 진행한다.

Check 테이블과 전원 점검

전원 케이블이 제대로 연결되었는지 (특히 데스크탑 Mac인 경우) 확인한다. 가능하다면 다른 케이블을 이용한다. 만약 써지 보호기를 사용한다면 써지 보호기를 배제하고 직접 콘센트에 연결하여 테스트한다.

만약 전원과 관련된 이슈라면 (예를들면 데스크탑 Mac인 경우 셧다운, 재부팅 혹은 실내 조명기 등의 설치로 인해 발생한 문제라면 전기 기술자에게 실내내부 콘센트와 전기배선을 점검받아야 한다.).

해결되지 않았다면 다음단계를 진행한다.


써드파티 RAM 과 내부 장착된 하드웨어 제거

주의: Mac에 Apple사의 RAM 이 설치되어 있다면 이 단계는 생략한다.

Remove any non-Apple RAM 이 아니거나 다른 써드파티 하드웨어 (확장카드나 혹은 써드파티 CD/DVD 드라이버 혹은 하드디스크)를 설치하였다면 이 제품들을 제거하는 것이 문제해결에 도움이 될 것이다. 이방법은 기본적인 공장세팅된 하드웨어 구성에 근접하게 하여 근본적인 원인을 해결하는데 도움을 준다.

만약 RAM 모듈이나 다른 하드웨어가 Apple 제품인지 혹은 써드파티 제품인지 확실하지 않다면 또한 이 과정을 진행하는 것이 불편하거나 Mac mini를 보유하고 있다면 Apple 공인 서비스 센타에 도움을 받아야 한다. 그렇지 않다면 다음 단계를 수행한다.

  1. Mac을 종료하는데 필요하다면 전원버튼을 몇 초동안 지긋이 눌러서 강제종료한다.
  2. Mac의 케이스를 열어서 메모리 슬롯을 확인한다. 사용자 가이드를 참고하거나 혹은 Mac 사용자 가이드 PDF문서로 된 Apple 지원 Manuals 을 참고한다.
  3. 설치되어 있는 써드파티사의 RAM 을 제거한다.
  4. 가능하다면 Apple RAM 을 재설치한다. 주의할 점은 Mac OS X 10.5 는 최소 512 MB 이상의 RAM을 필요로 한다.; Mac OS X 10.4 는 최소 256 MB 이상의 RAM을 필요로 한다.
  5. 만약 Apple RAM 을 설치하여 Mac이 부팅된다면, 써드파티 RAM 제조사에 문의를 한다.

If the gray screen issue persists, go to the next section.

Archive 와 Mac OS X 설치 수행

위 과정을 수행하여도 이슈가 해결되지 않으면 위해서 언급한 Mac OS X 설치 디스크를 이용할 수도 있다.:

  1. Insert your Mac OS X 10.4 이나 10.5 설치 디스크를 넣고 (만약 두가지 버전 다 보유중이라면 하드디스크에 설치된 Mac OS X 버전과 동일한 버전을 사용한다.); 하드디스크에 설치된 Mac OS X 와 다른 버전이나 다른 맥과 같이 온 시동디스크나 혹은 이전버전의 Mac OS X를 사용하지 않아야 한다.
  2. 필요하다면 전원버튼을 지긋이 몇초간 눌러서 맥을 강제종료한다.
  3. C키를 지긋이 눌러서 설치디스크를 이용하여 Mac을 시작한다.
  4. Archive 와 설치과정을 진행한다.(사용자 계정과 네트웍 세팅을 유지한다)

After installation, if the gray screen issue persists, go to the next section.

Perform an Erase and Install installation of Mac OS X as a last resort

Important: You should only perform this step after trying all of the above steps. This process will erase all files from your Mac OS X volume. If possible, back up important files first, or use Time Machine. You may be able to connect your Mac to another Mac with a FireWire cable and FireWire target disk mode, in order to try to manually back up files. Alternatively, you may wish to make an appointment with a Mac Genius at an Apple store, or contactan Apple Authorized Service Provider for assistance.

To erase your Mac OS X volume and reinstall Mac OS X:

  1. Insert your Mac OS X 10.4 or 10.5 installation disc.
  2. Shut down your Mac. If necessary, hold your Mac's power button for several seconds to force it to power down.
  3. Startup your Mac while holding the C key to start from the disc.
  4. Perform an Erase and Install installation of Mac OS X.
  5. After installing, starting from your Mac OS X volume, and verifying the issue is resolved, you should use Software Update to update to the latest available version of Mac OS X.

Additional Information

If the issue persists after you follow the above steps, you may wish to make an appointment with a Mac Genius at an Apple store, contact AppleCare via phone, or contact an Apple Authorized Service Provider for assistance.

If the issue only occurs when multiple peripheral devices are connected

If a gray screen appears during start up only when several peripheral devices (that is, USB and/or FireWire devices) are connected, and you don't want to have only one device connected at a time, the issue may be caused by a combination of the peripheral devices.

To illustrate this hypothetically, you may have three USB devices, which we'll call "A", "B", and "C". The issue may be that peripherals A and C have a conflict of some sort, and a gray screen only appears if they both are connected, but not if each one is connected separately. In the above "Disconnect, test peripheral devices and network cables" section you may have inferred that you have an issue only with device C because it was added after A. To avoid an inaccurate analysis, connect device C to your computer with no other devices. If your Mac has the startup issue with only device C connected, then you know it is the source of the issue. However if your Mac starts up, you have a conflict of devices to work out. To do this add the other devices one at a time with device C connected until your startup issue occurs (restart after adding one device). Repeat this process until you have just the minimum set of devices to produce your startup issue.

'macOS > RealMac' 카테고리의 다른 글

BootCamp에서 Shift+Space키로 한영전환하는 방법  (0) 2012.03.08
Mac의 PRAM 과 NVRAM 재설정하는 방법  (0) 2012.03.04
시스템 점검하기  (0) 2011.11.08
:
Posted by Ritz®™