달력

4

« 2024/4 »

  • 28
  • 29
  • 30

이미 철지난 기사지만 의외로 모르시는 분들이 많아 다시 한번 재탕하여 봅니다.

[펌, 이찬진 블로그 http://blog.dreamwiz.com/chanjin]

게임이고 제목은 Heavy Mach. 입니다.

무료 버전인 Heavy Mach. Lite는 25위에 올라 있습니다.

유료가 5위이고 무료가 25위인 것으로 보아 무료 버전이 유명해진 다음에 유료 버전이 팔리는 식은 아니었던 것 같습니다.

그리고 무료 버전을 다운로드 받아서 해보시면 아시겠지만 꽤 완성도가 높습니다.

Studio 이름은 'IndieAn'이라고 되어 있고 판매자는 '해준 Byun'이라고 되어 있는데 미국에 사는 교포이신지 한국에 사시는 분인지는 아직 모르겠습니다.

이 포스팅을 보시는 분 중에서 홈페이지인 http://indiean.com/의 IP 어드레스를 파악해서 ISP가 한국인지 미국인지 혹은 다른 곳인지 알려주시면 감사하겠습니다. ^_^

어쨌든 전체 5위면 아마도 하루에 수천개씩은 팔릴테니 하루에 수백만원씩은 버는 셈입니다.

일이주일이만 지나면 저희가 몇 달 해서 올린 수입보다도 더 많은 수입을 올리시게 되는 셈입니다. ^_^

청년재벌 탄생을 모두 축하해 주십시오. ^__^

그리고 사돈이 땅을 샀으니 모두다 배아퍼 하십시오.

그리고 그 배아픔을 내가 더 잘할 수 있다는 오기와 동기부여로 삼으셨으면 합니다.

저희도 아픈 배를 꼭 잡고 직접 이런 히트작은 개발하든지 저희 능력이 모자라면 개발하시는 훌륭한 분들의 작품을 퍼블리싱하든지 해서 히트작을 꼭 내도록 노력하겠습니다...


:
Posted by Ritz®™
2009. 5. 5. 18:57

Wii - Remote Project etc2009. 5. 5. 18:57

Source ; http://johnnylee.net/projects/wii/

As of June 2008, Nintendo has sold nearly 30 million Wii game consoles. This significantly exceeds the number of Tablet PCs in use today according to even the most generous estimates of Tablet PC sales. This makes the Wii Remote one of the most common computer input devices in the world. It also happens to be one of the most sophisticated. It contains a 1024x768 infrared camera with built-in hardware blob tracking of up to 4 points at 100Hz. This significantly out performs any PC "webcam" available today. It also contains a +/-3g 8-bit 3-axis accelerometer also operating at 100Hz and an expandsion port for even more capability. These projects are an effort to explore and demonstrate applications that the millions of Wii Remotes in world readily support.


Any software on this page is primarily meant for developers and may not run without proper the development tools installed. Downloading and installing this software is at your own risk, and no support or guarantee is provided with this software. The official discussion forums for my wiimote projects can be found here:WiimoteProject.com

NOTE: For most of these projects, you don't need the Nintendo Wii console. You only need the Wii controller and a bluetooth connection.

Tracking Your Fingers with the Wiimote

Using an LED array and some reflective tape, you can use the infrared camera in the Wii remote to track objects, like your fingers, in 2D space. This lets you interact with your computer simply by waving your hands in the air similar to the interaction seen in the movie "Minority Report". The Wiimote can track upto 4 points simultaneously. The multipoint grid software is a custom C# DirectX program.

Software
To run the grid program you see in the video:
1. First, follow this walkthrough on using the wiimote with C#. You may need to download a copy of Visual C# Express to compile/run this sample if you don't have it yet.
2. Download a copy of the DirectX SDK. You may not need this to simply run the sample grid program, but you will need it if you want to make any changes to it.
3. Download the Wiimote Multipoint Grid sample program. Make sure your wiimote is connected via bluetooth, and then run the ".exe" shortcut in the main folder.

A visit to this project's FAQ and Advanced Discussion post may be very englightening. You may also find the official discussion forums for my wiimote projects helpful: WiimoteProject.com


Low-Cost Multi-point Interactive Whiteboards Using the Wiimote

Since the Wiimote can track sources of infrared (IR) light, you can track pens that have an IR led in the tip. By pointing a wiimote at a projection screen or LCD display, you can create very low-cost interactive whiteboards or tablet displays. Since the Wiimote can track upto 4 points, up to 4 pens can be used. It also works great with rear-projected displays.

Software
The calibration and mouse cursor emulation software is available for you to download and try yourself. Note: My mouse emulation code isn't perfect. If any of you are programmers and can get it working with Alias Sketchbook, drop me a line.
1. Connect your wiimote to your PC via Bluetooth. There are a number of tutorials online on how to do this, possibly even for you specific software/hardware configuration. The Wiimote works with many (but not all) Bluetooth drivers. You can report/read about compatibility issues at WiimoteProject.com
2. Download the Wiimote Whiteboard software to the right. Please read the "READ ME.txt" file first! Make sure your wiimote is connected via Bluetooth, and then run the ".exe" in the main folder. NOTE: Good placement of the wiimote is key to good tracking. View the README for more info.

Multitouch: The multitouch demos are custom C# DirectX programs. You may download the sample program to the right, but this is provided for developers without support or documentation. The code is built on top of this Wiimote library. Unfortunately, multi-touch capable applications are currently extremely rare. Hopefully, that will change as more developers explore its potential.

Building pens: Here is a simple schematic of the light pen. The LEDs that I use are Vishay TSAL6400s running at 100mA, but lots of other LEDs will work too. You also might be able to jump start your experimentation by retro-fitting a mini keychain light with an IR LED. I'm currently looking into manufacturing and selling IR pens, but this may take several months.

Mac/Linux Versions: Due to personal time contraints, I probably won't be able to make a port myself. But fairly mature versions are available online. However, I haven't tried them myself. I've also created a Source Forge Project - Wiimote Whiteboard, but it does not seem to be getting much love.

A visit to this project's FAQ and Advanced Discussion post may be very englightening. You may also find the official discussion forums for my wiimote projects helpful: WiimoteProject.com


Downloads:
Windows (32-bit)
Wiimote Whiteboard* (original 12/19/07) - includes source
Wiimote Whiteboard v0.2* (updated 3/27/08) - includes source
Wiimote Whiteboard v0.3* (updated 8/20/08) - includes source

* there appear to be some issues with 64-bit machines, and BlueSoleil. Alternative Bluetooth software may work. Check the forum for more info.

Mac (Java)
You can do a quick webserach or try the version created by uweschmidtwhich is a fairly mature Java-based version for Mac.

Multitouch:source code


Fun software (mostly free) to try with this:
Mapping software: Microsoft Virtual Earth, Google Earth
Physics simulation software: Phun
Virtual Tourism: Photosynth
Media Browsing: CoolIris
Painting progams: Alias Sketchbook Pro
Note taking:One Note
Handwritting recognition: Windows Tablet PC Edition - works great if you have it, not a stand alone program to install.


Head Tracking for Desktop VR Displays using the Wii Remote

Using the infrared camera in the Wii remote and a head mounted sensor bar (two IR LEDs), you can accurately track the location of your head and render view dependent images on the screen. This effectively transforms your display into a portal to a virtual environment. The display properly reacts to head and body movement as if it were a real window creating a realistic illusion of depth and space.

The program only needs to know your display size and the size of your sensor bar. The software is a custom C# DirectX program and is primarily provided as sample code for developers without support or additional documentation. You may need the most recent version of DirectX installed for this to work.

Software
To run the DesktopVR program you see in the video:
1. Connect your wiimote to your PC via Bluetooth. If you don't know how to do this, you can follow this tutorial. I've been told it works with other Bluetooth drivers, but I have not tested them myself.
2. Download the WiiDesktopVR (v02) sample program. Read the README file on program usage and configuration. Launch the "WiiDesktopVR.exe" in the main folder. A potentially more stable/Vista/64-bit compatible version has been created by Andrea Leganza. There also may be more variants on the web.

NOTE: If you are having trouble with running the program, you can check myproject blog post about it or check the forum for assistance. I am unable to replicate these problems, so it hard for me to debug them. But, other people have figured it out. Things that have been identified to help: delete the "config.dat" file and re-run the program, install a new version of Direct X, or istall .NET 2.0.

Developers Notes: The code is built on top of this Wiimote library. To compile the program, you will need a C# IDE and the DirectX SDK. More notes are in the README.

A visit to this project's FAQ and Advanced Discussion post may be very englightening. You may also find the official discussion forums for my wiimote projects helpful: WiimoteProject.com


'etc' 카테고리의 다른 글

MAC OSX의 약진 1  (0) 2009.05.08
Wii - Remote Project  (0) 2009.05.05
Space  (0) 2009.04.16
MAC Pro 성능이 엄청나군요.  (0) 2009.04.10
:
Posted by Ritz®™

First of all, thanks noxdg

Source from ; http://www.insanelymac.com/forum/index.php?showtopic=157937

시스템 스펙:

ASUS M3A78-EM
-780G / SB700 chipset
-Realtek ALC1200 audio
-Realtek RTL8168C(P) gigabit network
-ATI 3200 imbedded graphics (not used)
4 gig Patriot RAM (I’ll edit this when I figure out the exact type)
SATA LG SuperMultiBlue DVD/Blu-ray/HD-DVD drive
SATA Seagate 250GB hard drive
Visiontek HD4850 512mb video card

설치 이미지: iDeneb 10.5.6 v1.4
SB700 칩셋을 위해 수정된 설치 이미지

IDE HDD에 설치할 때 유용한 방법이다.  IDE HDD에 설치하면 대부분 “waiting for boot device” 메시지를 보게 된다. iDeneb 10.5.5 v1.3 이미지를 제외한 대부분의 설치 이미지는 무한 재부팅 혹은 설치 과정으로 진입하기 어렵다.

Mac OS X 를 설치하기 위해 중요한 하드웨어 요소중의 하나가 SATA HDD이다.  그렇지 않으면 “waiting” 에러를 벗어날 수 없다.

The second problem I had was SB700 chipset support. Luckily, I stumbled across a solution. As mentioned above, I modified the iDeneb 10.5.6 v1.4 ISO and added SB700 drivers. I found the process here by nicholasblock. (To be honest, not positive that I modified it, because I never tried the install before modifying the ISO. SB700 support may already be included. If someone wants to verify either way, that’d be great for anyone else interested in using it.) I tried modifying other ISOs like iPC, and Kalyway, but the process didn’t work for me.

On with my install:

First, in the bios, I put my SATA setting to AHCI.
Boot with the DVD, and within a minute or so, I entered the install section.
Using DiskUtility, I earased the partitions and used Mac OS extented journaled.
Continuing on, I selected only a couple customized options:
Kernel - Voodoo 9.5
Audio - ALC1200
Chipset - ATI with SB700 support (I forgot the actual name of it… highlight them and read the discription. The correct one will mention the SB700)
Video - NONE
LAN - NONE
Clicked install and literally, in 5 minutes, it was done.

On the reboot, I pressed F8 and loaded with -f to be sure the drivers were firmly installed.

A minute later I was in OSX. Internet worked. Sound worked after selecting speakers in the system preferences. There was only 1024x768 video resolution and no QE/CI because of no 4850 drivers.

After a simple install of drumthrasher’s 4850/4870 drivers. I had the 4850 up and running.

That is where I’m at the moment. There are a few glitches, as I mentioned it’s not a perfect install, but it is functional.

Issues:
— mouse stops working and requires me to unplug and replug its USB connection. update - issue resolved itself after installing drumthrasher’s “jumpy screen fix” for 4850 video card.
— Sound gitters here and there (noticed while watching a Quicktime HD trailer). * update - still gitters, but studdering stops if mouse in in movement. Weird.
— iChat removed all function of mouse. Had to use keyboard strokes to reboot. *
update — resolved after “jumpy screen fix” iChat now works perfectly
— No native 1680x1050 resolution. I know there’s a way to add it. I recall doing so with my 10.4.8 install, but I can’t remember how. * added screen res and color bit depth to .plist, repair permissions, reboot…still no 1680 res.
— Screen is jumpy when moving mouse/scrollwheel. *
resolved — drumthrasher’s fix

I haven’t done much testing. So if there’s something that you might want me to check out, to see how it runs, feel free to ask.

So, there it is. A Phenom II 920 up and running OSX.

**UPDATE

Read issues above.


'Hackintosh > AMD' 카테고리의 다른 글

sapphire r9-270x dual-x oc d5 2gb with 10.9.2  (0) 2014.02.26
MSI 770-C45에 해킨토시 설치하기  (0) 2012.03.01
Asrock A780GM  (0) 2009.10.26
Gigabyte GA-MA770-DS3 AMD Motherboard  (0) 2009.10.24
GA-MA78GM-US2H IDE  (0) 2009.10.23
:
Posted by Ritz®™

First of all, thanks noxdg

Source from ; http://www.insanelymac.com/forum/index.php?showtopic=157937

I figured I’d share my results with this configuration. There’s not much out there about my system specs as I was to find out, but I do have Leopard up and running. It’s not perfect yet, but it is functioning.


My system:
ASUS M3A78-EM
-780G / SB700 chipset
-Realtek ALC1200 audio
-Realtek RTL8168C(P) gigabit network
-ATI 3200 imbedded graphics (not used)
4 gig Patriot RAM (I’ll edit this when I figure out the exact type)
SATA LG SuperMultiBlue DVD/Blu-ray/HD-DVD drive
SATA Seagate 250GB hard drive
Visiontek HD4850 512mb video card

Install: iDeneb 10.5.6 v1.4
Modified the ISO with SB700

I tried every OSX86 release that I could find with NO luck using an IDE hard drive. They never even made it to the installation screen. It was always “waiting for boot device”. All except iDeneb 10.5.5 v1.3 which actually made it to installing (for 4 hours), which resulted in an infinite reboot; never to make it into the OS.

In my experience with installing Leopard (which I’ll admit is rather low), the most important hardware is getting a SATA hard drive. Without it, you’re practically doomed for the “waiting” error. Now, I’m sure there are successful installs out there on IDE, but not in my case. As soon as I started using SATA, every install disc I had would boot to the installation screen.

The second problem I had was SB700 chipset support. Luckily, I stumbled across a solution. As mentioned above, I modified the iDeneb 10.5.6 v1.4 ISO and added SB700 drivers. I found the process here by nicholasblock. (To be honest, not positive that I modified it, because I never tried the install before modifying the ISO. SB700 support may already be included. If someone wants to verify either way, that’d be great for anyone else interested in using it.) I tried modifying other ISOs like iPC, and Kalyway, but the process didn’t work for me.

On with my install:

First, in the bios, I put my SATA setting to AHCI.
Boot with the DVD, and within a minute or so, I entered the install section.
Using DiskUtility, I earased the partitions and used Mac OS extented journaled.
Continuing on, I selected only a couple customized options:
Kernel - Voodoo 9.5
Audio - ALC1200
Chipset - ATI with SB700 support (I forgot the actual name of it… highlight them and read the discription. The correct one will mention the SB700)
Video - NONE
LAN - NONE
Clicked install and literally, in 5 minutes, it was done.

On the reboot, I pressed F8 and loaded with -f to be sure the drivers were firmly installed.

A minute later I was in OSX. Internet worked. Sound worked after selecting speakers in the system preferences. There was only 1024x768 video resolution and no QE/CI because of no 4850 drivers.

After a simple install of drumthrasher’s 4850/4870 drivers. I had the 4850 up and running.

That is where I’m at the moment. There are a few glitches, as I mentioned it’s not a perfect install, but it is functional.

Issues:
— mouse stops working and requires me to unplug and replug its USB connection. update - issue resolved itself after installing drumthrasher’s “jumpy screen fix” for 4850 video card.
— Sound gitters here and there (noticed while watching a Quicktime HD trailer). * update - still gitters, but studdering stops if mouse in in movement. Weird.
— iChat removed all function of mouse. Had to use keyboard strokes to reboot. *
update — resolved after “jumpy screen fix” iChat now works perfectly
— No native 1680x1050 resolution. I know there’s a way to add it. I recall doing so with my 10.4.8 install, but I can’t remember how. * added screen res and color bit depth to .plist, repair permissions, reboot…still no 1680 res.
— Screen is jumpy when moving mouse/scrollwheel. *
resolved — drumthrasher’s fix

I haven’t done much testing. So if there’s something that you might want me to check out, to see how it runs, feel free to ask.

So, there it is. A Phenom II 920 up and running OSX.

**UPDATE

Read issues above.

'Hackintosh > Mainboard' 카테고리의 다른 글

Enabling ACPI, EIST, etc for ASUS P5W DH DELUXE  (0) 2009.05.20
P5Q Series BIOS ready for MAC OSX (Update)  (0) 2009.05.11
ASUS psgc mx/1333 CMOS 공장초기화  (0) 2009.04.23
Zotac GeForce 9300-ITX WiFi  (2) 2009.04.23
Modify cmos bios  (0) 2009.04.06
:
Posted by Ritz®™
2009. 5. 5. 06:25

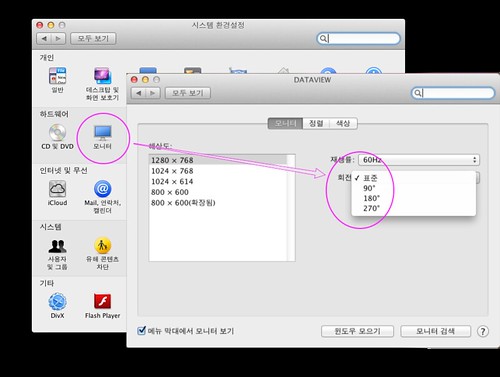
Monitor 설정 Hackintosh/Tip2009. 5. 5. 06:25

모니터 설정

Monitor01
 

:
Posted by Ritz®™
2009. 5. 4. 11:39

맥에서 하는 디스크 조각모음 Hackintosh/Tip2009. 5. 4. 11:39


'Hackintosh > Tip' 카테고리의 다른 글

GPT-GUID 파티션 복원하기  (3) 2009.05.06
Monitor 설정  (0) 2009.05.05
사용하던 화일이 사라졌다?  (0) 2009.05.04
MAC Theme  (0) 2009.05.03
:
Posted by Ritz®™