Install a Radeon HD 4890 PC in a Mac Pro Without Flashing It!
롬 플레싱 없이 Mac Pro에 HD 4890 PC카드를 Mac Pro에 설치하는 방법!!
source : http://www.planetamac.es/como-instalar-una-radeon-hd-4890-en-un-mac-pro-sin-flashear
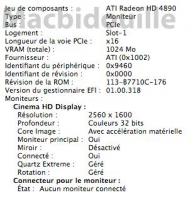
We were dreaming about it, and Netkas did. Originating from the Hackintosh projects, those "extensions" can be installed on most PC version of Radeon without requiring to flash the BIOS of those cards. How does it work? In summary, those extensions include part of the EFI code required for the card to be recognized by the Mac and to have them active in Mac OS X. Hereafter are results obtained after installing a Radeon HD 4890 PC version in a Mac Pro 2008:
Hereafter is the procedure to get to this point:

This procedure works with most Radeon: HD 4870, 4870X2 (recognized as 2 HD 4870), HD 3870, HD 4890, ... On our card, the first DVI works perfectly as a DVI Dual Link port, while the second one is only a single link. Beside this detail, everything is just working fine. Unlike with the Mac Edition card, such extension-activated card is becoming only active during the loading of Mac OS X and all components, and not immediately after the boot. This could be a problem is you want to boot from another partition or as a single users, however, it is so much easier than flashing the original BIOS of the card, that it should be considered by most users.


