ATI 그래픽 카드를 사용하시는 분들은 Vmware에서 느린 속도와 잘못된 렌더링에 대한 경고를 하고 있군요. Hackintosh/Install2009. 5. 17. 01:30
VMware Fusion 사용자중 ATI 그래픽 카드를 사용하는 유저들에게 Mac OS X 10.5.7 설치에 대해 경고를 하였습니다.
윈도우즈에서 VMware를 설치해서 Mac OS X 를 사용하는 사용자는 다음글을 참고하세요.
http://osx86.tistory.com/1098

퓨전은 인텔맥에서 부트캠프나 패러렐처럼 가상화 소프트웨어를 이용하여 재부팅 없이 윈도우즈나 리눅스를 사용가능하게 해줍니다.
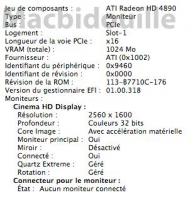
VMware 웹사이트의 “Team Fusion” 블로거에 따르면, 화요일 발표된 Mac OS X 10.5.7은 퓨전에 의해 지원되는 3D 그래픽 가속 기능을 무력화시킨다고 합니다.
다음은 그 전문입니다.
“You will likely see issues ranging from slow performance, to incorrect rendering, and even crashes, when you run your 3D applications in a Windows virtual machine on Mac OS X 10.5.7,” reads the blog.
“Both Apple and ATI are aware of this problem and are working to correct it in a future software update. In the meantime, if you have an ATI graphics card in your Mac and need VMware Fusion’s 3D features to work, we recommend that you do not upgrade to Mac OS X 10.5.7,” the entry concludes.
'Hackintosh > Install' 카테고리의 다른 글
| 호환성 좋은 시스템 사양 - 일명 국민보드, (0) | 2009.07.13 |
|---|---|
| Fat32에서 MAC Journaling으로 파티션 변환하는 방법 (0) | 2009.05.23 |
| ATI 그래픽 카드를 사용하시는 분들은 Vmware에서 느린 속도와 잘못된 렌더링에 대한 경고를 하고 있군요. (0) | 2009.05.17 |
| Disk Image를 마운트하여 Snow/Leopard 설치하는 방법 (0) | 2009.05.16 |
| Live Ubuntu 8.10 USB 에 설치하기 (Windows) (0) | 2009.05.12 |