Update: http://cafe.naver.com/uefi/30
참고로 Little Snitch는 더이상 도움이 되질 않는다. 아래 글을 적용한 다음, 설치하면 된다.
적용범위 : CS3,CS4, CS5
"Licensing has stopped working" error 문제 해결방안
Adobe 페이지 http://kb2.adobe.com/cps/512/cpsid_51260.html
licensing 문제가 생기면 먼저 툴을 이용하여 해결한다.
Adobe CS License Repair Tool http://www.adobe.com/support/contact/li ... _eula.html
licensing 문제가 여전히 발생한다면
다음과 같이 각 버전에 맞는 CS 제거툴을 이용하여 제거한다.
CS3 Clean Script http://download.macromedia.com/pub/creativesuite/script/3/maccs3clean.dmg
CS4 Clean Script http://download.macromedia.com/pub/creativesuite/script/4/MacCS4CleanupUtility.dmg
CS5 Clean Script http://download.macromedia.com/pub/creativesuite/script/5/MacCS5CleanupUtility.dmg
만약 시험버전(trial time) 에서 license repair tool 을 적용한 방법이 실패한다면 다음 단계를 진행한다. 세군데의 보이지 않는 화일을 제거해야 한다.
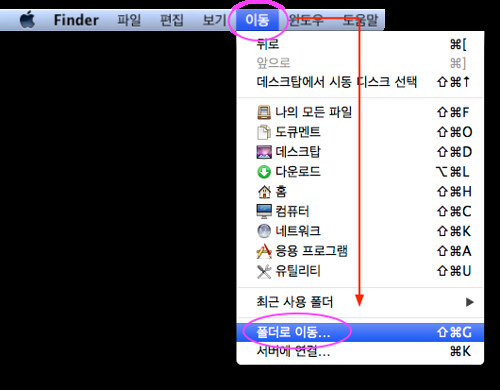
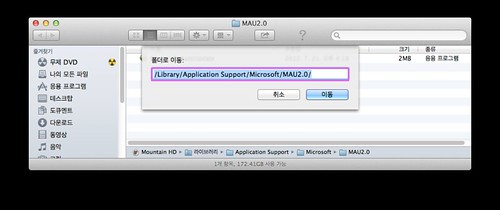
1 - SLStore 라고 하는데, /Library/Application Support/Adobe/ 폴더의 다음과 같은 파일(12 character 로 이루어진 숨겨진 파일이다.)을 제거한다.
예를 들면 ; .AC3BD89BA003 , .AE35DB9BB703 and .BB35C39BB103
2 - /Library/Caches 폴더에 있는 다음과 같이 유사한 파일을 제거한다.
; .6C4F2FE080A8 , .5566B32E3D51 and .A5F668898DB0
3 - /Users/~YOU~/Library/Preferences/Adobe 폴더에 있는 다음과 같이 유사한 파일을 제거한다.
; .6C4E2EE080AB and .5367BD2E3F46
다음 HOSTS 파일을 수정하여 Adobe 사이트를 블락시킨다.
1단계 - Terminal 을 실행하고 아래 커맨드를 실행한다.
sudo /Applications/TextEdit.app/Contents/MacOS/TextEdit /etc/hosts
( 당근 password 입력후 엔터) (설령에러메시지가 발생하더래도 무시한다.)
2단계 - TextEdit 에서 다음과 같은 내용을 hosts 화일에 붙여넣는다.
주의: 127.0.0.1 이후는 스페이스가 아니라 TAB 이다.
127.0.0.1   activate.adobe.com
127.0.0.1   practivate.adobe.com
127.0.0.1   ereg.adobe.com
127.0.0.1   activate.wip3.adobe.com
127.0.0.1   wip3.adobe.com
127.0.0.1   3dns-3.adobe.com
127.0.0.1   3dns-2.adobe.com
127.0.0.1   adobe-dns.adobe.com
127.0.0.1   adobe-dns-2.adobe.com
127.0.0.1   adobe-dns-3.adobe.com
127.0.0.1   ereg.wip3.adobe.com
127.0.0.1   activate-sea.adobe.com
127.0.0.1   wwis-dubc1-vip60.adobe.com
127.0.0.1   activate-sjc0.adobe.com
127.0.0.1   hl2rcv.adobe.com
그리고 저장한다.
3 단계(OS X 10.4.x 인 경우) 터미널에서 다음 명령어를 실행한다.
sudo lookupd -flushcache (당근 password 입력후 엔터) 혹은 그냥 시스템 재부팅한다.
3 단계(OS X 10.5.x 와 10.6.x 인 경우) - 터미널에서 다음 명령어를 실행한다.
sudo dscacheutil -flushcache (당근 password 입력후 엔터) 혹은 그냥 시스템 재부팅한다.
3 단계는 DNS cache 를 초기화하는 것이고 hosts 변경내용을 시스템에 적용하는 단계이다.
[혹은 아래와 같이 자동화 스크립터(script)를 돌려 위 3단계를 적용할 수 있다.
on gestaltVersion_info(gestalt_code, string_length)
   try
      tell application "Finder" to ¬
         copy my NumToHex((system attribute gestalt_code), ¬
            string_length) to {a, b, c, d}
      set the numeric_version to {a, b, c, d} as string
      if a is "0" then set a to ""
      set the version_string to (a & b & "." & c & "." & d) as string
      return {numeric_version, version_string}
   on error
      return {"", "unknown"}
   end try
end gestaltVersion_info

on NumToHex(hexData, stringLength)
   set hexString to {}
   repeat with i from stringLength to 1 by -1
      set hexString to ((hexData mod 16) as string) & hexString
      set hexData to hexData div 16
   end repeat
   return (hexString as string)
end NumToHex

copy my gestaltVersion_info("sysv", 4) to {system_version, system_string}
if the system_version is less than "1050" then

   do shell script "/usr/bin/printf \"\\n# Block Adobe Activation\\n127.0.0.1\\tactivate.adobe.com\\n127.0.0.1\\tpractivate.adobe.com\\n127.0.0.1\\tereg.adobe.com\\n127.0.0.1\\tactivate.wip3.adobe.com\\n127.0.0.1\\twip3.adobe.com\\n127.0.0.1\\t3dns-3.adobe.com\\n127.0.0.1\\t3dns-2.adobe.com\\n127.0.0.1\\tadobe-dns.adobe.com\\n127.0.0.1\\tadobe-dns-2.adobe.com\\n127.0.0.1\\tadobe-dns-3.adobe.com\\n127.0.0.1\\tereg.wip3.adobe.com\\n127.0.0.1\\tactivate-sea.adobe.com\\n127.0.0.1\\twwis-dubc1-vip60.adobe.com\\n127.0.0.1\\tactivate-sjc0.adobe.com\\n127.0.0.1\\thl2rcv.adobe.com\\n\" >> /etc/hosts" with administrator privileges

else if the system_version is greater than "1050" then

   do shell script "/usr/bin/printf \"\\n# Block Adobe Activation\\n127.0.0.1\\tactivate.adobe.com\\n127.0.0.1\\tpractivate.adobe.com\\n127.0.0.1\\tereg.adobe.com\\n127.0.0.1\\tactivate.wip3.adobe.com\\n127.0.0.1\\twip3.adobe.com\\n127.0.0.1\\t3dns-3.adobe.com\\n127.0.0.1\\t3dns-2.adobe.com\\n127.0.0.1\\tadobe-dns.adobe.com\\n127.0.0.1\\tadobe-dns-2.adobe.com\\n127.0.0.1\\tadobe-dns-3.adobe.com\\n127.0.0.1\\tereg.wip3.adobe.com\\n127.0.0.1\\tactivate-sea.adobe.com\\n127.0.0.1\\twwis-dubc1-vip60.adobe.com\\n127.0.0.1\\tactivate-sjc0.adobe.com\\n127.0.0.1\\thl2rcv.adobe.com\\n\" >> /etc/hosts; /usr/bin/dscacheutil -flushcache" with administrator privileges

end if
Quote:
Adobe Air 는 단지 업데이트(updates)와만 관련된다. Adobe Help 를 실행시키면 AAM을 통한 Adobe Air 가 업데이트할 것인지 물어올 것이다.
Little Snitch에서 Adobe Help 와 관련하여 아래 URL을 접근가능하게 허락(allow)으로 설정한다.
www.adobe.com
adobe.com.112.207.net
community.adobe.com
help.adobe.com.edgesuit.com
wwwimages.adobe.com.edgesuit.com
adobe.ttomtrdc.net
www.stage.adobe.com
unavailable.adobe.com
www.wip4.adobe.com
a630.g.akamai.net
www-stage.wip4.adobe.com
unavailable.wip4.adobe.com
Adobe LIve 에 가입하지 않아도 된다.