달력

5

« 2024/5 »

  • 1
  • 2
  • 3
  • 4
  • 5
  • 6
  • 7
  • 8
  • 9
  • 10
  • 11
  • 12
  • 13
  • 14
  • 15
  • 16
  • 17
  • 18
  • 19
  • 20
  • 21
  • 22
  • 23
  • 24
  • 25
  • 26
  • 27
  • 28
  • 29
  • 30
  • 31
2009. 10. 25. 03:58

10.5.7 on an Asus P5QL/EPU Hackintosh/Mainboard2009. 10. 25. 03:58

전체적인 설치가이드 : http://x86osx.textcube.com/notice/481


I. CMOS Setup

default 에서 수정부분:
- Storage Configuration - configure SATA as - AHCI
- Advanced CPU settings - CPU ratio auto (for install, E7400 running fine @+20% now though)
- Next 4 settings Enabled
- Speedstep - Disabled
- C-State - Disabled
- Onboard devices - High Def Audio & Onboard LAN Enabled, 나머지는 "disabled"

- USB Enabled, Enabled, High Speed, Auto
- Power - Suspend Auto
- ACPI 2.0 - Enabled
- ACPI APIC - Enabled
- APM Config - Power off & all disabled


II. 준비사항

iPC 10.5.6 installation Image
IDeneb 10.5.7 update Image
VoodooHDA kext
  1. Boot from the disk. flags of cpus=1 is required, -v -f may be optional
  2. 사용자화:
    1. ipc OSx86 Base System (selected by default)
    2. (OPTIONAL) 언어선택
    3. Video Drivers - 자신의 그래픽 카드 드라이버
    4. Chipset Drivers - Intel ICH10 SATA Support
    5. Ethernet Drivers - Realtek R1000
    6. USB Drivers - Patched USB Drivers
    7. Fixes and Patches
      1. ACPI Fix
      2. (OPTIONAL) CPUS=1 One Core Fix - DSDT.aml로 적용하기전 까지 사용해야 함. 가능한한 선택하지 말고 부팅시에 부팅옵션을 "cpus=1"로 주어 부팅한 후 DSDT.aml로 패치적용하는 것이 좋음.
      3. FireWire Mount Fix
      4. IOUSBMassStorage Fix
      5. Sata Drive Icon Fix
      6. IOPCIFamily.kext patched
      7. Shutdown/Restart fix
      8. AppleSMBIOS Patch - AppleSMBIOSEFI
    8. Alternative Bootloaders - Chameleon with DSDT/Custom Boot Picture
    9. applications 들은 가능한한 다 설치해주는 것이 피가되고 살이 되지만, 특히 DSDT Patcher GUI 와 Kext Helper 만큼은 반드시 선택해야 함.
  3. Install
  4. 재부팅시 "cpus=1"로 주어 부팅한 후, DSDT patcher 를 실행하고, "Force Compile"을 선택하여 주고, target disk 지정, error는 무시한다.
  5. DSDT Patcher GUI 에 Bootloader.pkg를 더블클릭하여 설치한다. 이것 대신에 Boot Think를 설치하여 주는 것이 좋다.
  6. /S/L/E/AppleHDA.kext 의 파일명을 appleHDA.kext.orig 으로 바꾼다.
  7. "Kext Helper"를 이용하여 VoodooHDA kext 를 설치한다..
  8. iDeneb update disk를 마운트하여 updater를 실행한다.
  9. 이제 재부팅하여 "cpus=1" 없이 부팅한다. 두개의 코어를 볼 수 있다.
Tips:
  1. SATA DVD 와 SATA HDD 를 사용하였다. SATA/IDE 조합이나 혹은 단순히 IDE 장비를 사용하여 보지는 않았다. 단지, CMOS SETUP에서 IDE controller 를 "DISABLED" 로 세팅하였다.
  2. AHCI enabled 로 해주었다.

'Hackintosh > Mainboard' 카테고리의 다른 글

Intel D945G Series  (0) 2009.11.07
Gigabyte GA-EX58-UD5 (core i7) USB v3.0  (0) 2009.11.04
MSI P43 Neo3-F  (0) 2009.10.22
GA-EP45-UD3L  (0) 2009.10.21
Asus P5P43TD Pro  (0) 2009.10.21
:
Posted by Ritz®™
2009. 10. 23. 19:37

myHack Installer 3.1 Hackintosh/해킨패키지2009. 10. 23. 19:37


Update : 해킨토시 설치 요약 정..

Update (2012-Jun-11)


설치전 준비: http://osx86.tistory.com/1302

준비물:

http://myhack.sojugarden.com/guide/

아래 그림과 같이 Lion(10.7)/Mountain Lion(10.8) DMG 설치 이미지를 이용하여 간단하게 Lion(10.7)/Mountain Lion(10.8) 설치용 USB 로 만들 수 있다.

제대로 안보인다면 클릭하여 그림을 클릭하여 꼼꼼하게 확인한다. 

MyHackInstaller

- Create OS X Installer    : Lion(10.7)/Mountain Lion Retail(10.8) DMG 이미지를 USB에 설치가능하게 이미지 카피를 해 준다.

- Install Extra                 : 일반 PC에 설치가능하게 /Extra 폴더를 구성해 준다.

- Install Chameleon        : Chameleon 부트로더를 설치해 준다. 


들어가며: By Conti,

myHack 설치 패키지는 retail OS X 10.6 “Snow Leopard”를 PC에 설치하기 위해 만들어 졌다.

설치과정을 아주 많이 간단하게 하여 시간을 줄일 수 있도록 설계되었지만 OS X 10.6 을 PC에 설치하는 데 원클릭 한방 솔루션은 아니다.

이 가이드는 snow leopard가 PC에 동작하는 방법을 설명하기 위한 것이 아니라 snow Leopard를 빨리 그리고 쉽게 myHack 설치 패키지를 이용하여 설치를 단순화 하는 방법을 설명한다. 해킨토쉬 개념을 포함하고 있지만 kexts, permissions, efi, gfx strings, dsdt, etc 등의 단순화를 제약하지는 않는다.


Basic Requirements:

- OS X 10.6 “Snow Leopard” Retail DVD/DMG

- myHack Installer 1.0 RC4

- “vanilla” OS X kernel이 동작되고 있는 맥 시스템

- 다음과 같은 하드웨어(제약 사항은 아님)

Processor: Intel Core 2 Duo, Core 2 Quad, Core i7

  • Chipset: Intel (G33, P35, X58, etc) w/ ICHx South-bridge.
  • At least 1GB of memory. (2GB 이상)
  • USB 키보드 와 마우스.
  • 가능한 Nvidia 8xxx, 9xxx or 2xx 시리즈 그래픽 카드.
  • 10GB 이상의 여유공간이 있는 하드디스크. (20GB 이상 추천).
  • USB 외장형 하드디스크 혹은 8G 이상의 USB 메모리 스틱.
  • 또한, OSX 10.4 이상의 리얼맥이나 해킨토쉬(USB 설치 디바이스를 준비하기 위해 필요.)

Note: myHack 설치 패키지 1.0 rc4는 AMD&Intel i5 프로세서를 위해 “chocolate” kernel을 옵션을 포함하고 있다.

하지만, 많은 위에 언급되지 않은 시스템들은 검증이 불충분하지 않으므로 직접 리스크를 안고 테스트를 해보시는 수밖에 없다. 이를테면, ATI 그래픽 카드 같은 경우도 마찬가지이다.


Section 1 : 기본 설치 가이드

단계 1 – USB Drive 준비

- 디스크 유틸리티에서 MBR 혹은 GUID 파티션을 만들어 포맷을 한다. (개인적으로는 legacy 시스템을 위해 MBR를 더 선호한다. )

- Retail OS X Install DVD 나 이미지를 USB 메모리스틱 혹은 USB외장형 하드디스크에 복원한다.

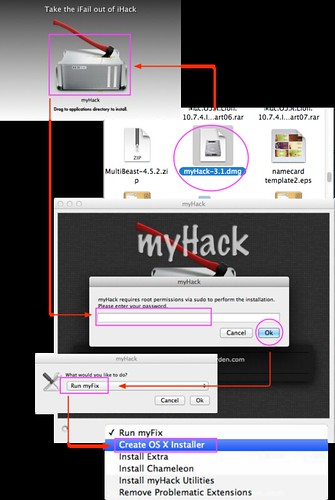
- myHack installer를 USB 메모리스틱 혹은 USB 외장형 하드디스크에 설치한다.

- 여기에서 필요한 kexts, gfx strings, injectors, dsdt 등등을 USB 드라이버에 추가한다. 만약, kext를 추가하였거나 수정하였다면 당근 권한을 복구하고 Extensinons.mkext 재생성해야 한다.

이제 설치를 테스트할 준비가 되었다.

알려진 이슈:

1) 극단적으로 중요: 재삼 확언하건데 컴퓨터의 내장 하드디스크의 root 파티션에서 installer 를 돌리는 것이 아니라 USB 드라이버에 설치하는 것이다.

I can not possibly stress how important it is that you ensure you are installing to the USB drive and NOT the root partition of the computer you have run the installer on. The root partition is selected by default. 만약 Chameleon Bootloader를 REAL Apple 컴퓨터에 설치한다면 이는 시스템을 망가뜨리는 결과를 가져오게 될 것이다.

2) com.apple.Boot.plist파일에 gfx 스트링이 없거나 그래픽 카드 enabler/injector 없이는 framebuffer 로딩시에 커널패닉을 경험하게 될 것이다. 이 문제를 방지하기 위해 FramebufferDisabler.kext를 만들어서 넣어두기는 하였지만, 만약 그것을 선택하지 않는다면 역시나 커널패닉을 경험하게 될 수 있음을 기억하여 주기 바란다.

3) 몇몇 그래픽 카드는 VESA 모드에서 정상동작하지 않는다. 커널패닉 대신 간단하게 블랭크 스크린을 보게 될 것이다.

만약 이런일이 일어난다면 적합한 gfx string 을 /Extra/com.apple.Boot.plist 화일에 넣어주거나 그래픽카드에 적합한 enabler/injector를 사용하여야 한다. myHack Installer 1.0 RC3는 customize 옵션에 GraphicsEnabler 옵션을 추가하였다. 이 옵션은 GraphicsEnabler = Y string을 가지고 있는 기존 com.apple.Boot.plist화일을 덮어 쓸 것이다. 이것은 몇몇 ATI 그래픽 카드와 대부분의 Nvidia 그래픽 카드의 그래픽 가속을 가능하게 할 것이다.

주의: 만약 그래픽 enabler 옵션이 적절하게 동작하지 않는다면 카멜레온 부트프람프트에서 -pci0 를 입력해 보기를 권고한다.


단계 2 – BIOS Setup

아래 그림과 같이 AHCI로 설정한다.  또한, HPET를 64 bit로 설정하는 것이 적절하다.


단계 3 – Installation

모든 것이 시스템에 맞게 적절하게 구성되어졌다면 USB 디바이스를 이용하여 부팅이 될 것이고 OS X installer 모드가 환영할 것이다.


일반적인 설치과정을 진행한다.

주의: 만약 USB드라이브 이외의 설치할 하드디스크를 선택할 수 없거나 하드디스크가 보이지 않는 다면 BIOS SETUP에서 SATA 디바이스가 AHCI모드로 설정되어 있는지 확인한다. 만약, CMOS설정에 AHCI설정이 없다면 대신에 일반적인 IDE방식의 하드디스크나 ICHx 칩셋이 픽스된 AppleIntelPIIXATA.kext & IOATAFamily.kext를 설치하여 재시도하여 본다.

설치가 끝난 후 재부팅한다.

주의: 만약, 설치가 거의 끝날 무렵 nstallation failed라는 에러메시지가 보일지라도 무시한다. 이 에러메시지는 Installer가 타겟 파티션을 “bless”하지 못해서 일어나고 시스템이 부팅가능하지 못할때 발생한다.

단계 4 – 첫 부팅

재부팅시에 USB디바이스의 chameleon bootloader 와 kexts를 로딩하는 USB디바로 부팅하면 OSX installer를 실행할 것이다. 새로이 설치된 Snow Leopard system을 로딩할려면 boot prompt에서 Snow Leopard가 새로이 설치된 하드디스크를 선택해야 한다.

계속 실행하면 초기 구성을 실행하게 될 것이다. 만약 기존의 설치된 Leopard가 있다면 유틸리티의 migration assistant를 이용하여 마이그레이션 할 수도 있지만, 여전히 많은 응용프로그램이 Snow Leopard와의 호환에 문제점이 있으므로 충분히 고려하여 결정하면 된다.

단계 5 – Post Install

데스크탑에서 finder가 실행된 후, USB 디바이스를 열면 "단계 1"에서 설치했었던 myHack installer v1.0 RC4 가 USB의 최상단(/ )폴더에 있을 것이다. 이제 USB에 있는 myHack installer를 실행하게 되면 이번에는 snow leopard 하드디스크 partition에 설치할 것이다. 반드시 단계1에서 설치할 때 선택했었던 옵션과 동일하게 옵션을 선택해야 한다. kexts, gfx strings, injectors, dsdt, 등등이 snow leopard 하드디스크 partition에 제대로 설치되었는지 확인한다.

Note: 다시 한번 만약 kexts를 수정하거나 추가하였다면 권한 수정을 해주어야 하고 Extensinons.mkext 를 반드시 재생성해야 한다.

이제, USB디바이스 없이 재부팅할 준비가 되었다. USB디바이스를 추출하고 시스템을 재부팅하여 Snow Leopard가 설치된 하드디스크로 부팅한다.

Congratulations! 제대로 부팅이 되었다면 Snow Leopard 가 설치된 시스템을 운영할 수 있다.


Section 2: Advanced Installation Instructions

This section will eventually focus on dsdt generation & patching, gfx strings, injectors, audio, additional kexts, general troubleshooting, etc…

For now look elsewhere.

Section 3: Credits

I’d like to personally thank the following people for making this all possible and for all the help they have personally given to myself and others:

(in alphabetical order)

apocolipse, aschar, chrome, Conti, fassl, Galaxy, Kabyl, lastExile, modbin, Mushishi, nawcom, netkas, p|astikman, prasys, stellarola, XyZ

Additionally thanks go out to the Voodoo Team, everyone who has worked on the Chameleon bootloader, and everyone else who has contributed to the hackint0sh scene!

Section 4: Changelog

2009/10/17 - Revision 3 – Guide updated to include relevant myHack Installer RC4 information. Edited basic requirements, added graphics card recommendations and some information about non-vanilla installs. Expanded and improved Basic Installation Instructions.

2009/09/28 – Revision 2 – Guide updated to include relevant myHack Installer RC3 information. Corrected some typos. Restructured and expanded Basic Installation Instructions. Some place holders added for planned additions.

2009/09/22 – Revision 1 – Initial Post


'Hackintosh > 해킨패키지' 카테고리의 다른 글

UniBeast: Mac OS X Lion 이상 부팅가능한 USB 드라이버 만드는 방법  (3) 2013.03.17
Multibeast  (0) 2011.03.07
KakeWalk  (0) 2010.08.20
myHack Installer 1.0 RC4 Released  (0) 2009.10.23
:
Posted by Ritz®™
2009. 10. 22. 21:00

MSI P43 Neo3-F Hackintosh/Mainboard2009. 10. 22. 21:00

Motherboard: MSI P43 Neo3-F
Processor: Intel Core 2 Duo E7200 2.5ghz
RAM: Corsair 4GB XMS2 1066mhz
HDD: Western Digital 500 GB SATA
Video Card: XFX nVidia 9600 GT 512 MB
Optical Drive: IDE DVD/CD drive

소개

리테일 설치 방법에는 두가지가 있다. 해킨 이미지를 이용하여 설치한 OSX가 있으면 더욱 좋다. 그렇지 않다면 BOOT-132 USB를 이용한 설치방법을 참고하고 첨부된 kext를 Transmac프로그램을 이용하여 윈도우즈에서 initrd.img 화일에 넣어주거나 설치된 맥에서 initrd.img화일을 마운트하여 넣어주면 된다.

설치방법 1.
다음 화일을 다운로드 한다.
http://www.mediafire.com/file/jozmlme5nzz/MSI_P43_Neo3-F_Retail.zip
P43칩셋을 사용하는 마더보드를 위한 드라이버와 사운드 카드용 코덱 덤프를 넣어 두었으므로 유사한 보드나 사운드 카드를 사용한다면 다운로드 받은 화일을 이용하면 좋다. 이더넷 카드 드라이버는 뺏다.

1) 다운로드 받은 화일을 데스트탑(바탕화면)에 저장하고 압축을 푼다.

2) 디스크 유틸리티를 실행하여 새로운 GPT+GUID 파티션을 만들고 이름을 "MachintoshHD"로 준다.

3) 10.5.6 Retail DVD나 이미지를 마운트한다.

4) 터미날을 실행하여 다음 순서대로 명령어를 준다.

#sudo -s
#cd /Volumes/Mac\ OS\ X\ Install\ DVD/System/Installation/Packages

(enter)

#open OSInstall.mpkg

5) 2번에서 만들었던 "MachintoshHD"에 10.5.6 을 설치한다.

6) 10.5.7 combo update를 다운로드 받아서 실행한다.
다음 링크는 10.5.6 콤보 업데이트 링크이다.

link:
http://wsidecar.apple.com/cgi-bin/nph-reg3...Combo10.5.6.dmg


7) Boot Think나 Chameleon 최신 버전을 "MachintoshHD"에 설치한다. 이때, 초보이신 분들은 efi 옵션을 선택하지 않는 것이 좋다.

8) extra폴더에 가서 DSDT patch를 실행한다. "Force Compile"을 체크하고 destination drive는 "MachintoshHD"를 선택하고 "apply patch to"를 체크한다.

9) 재부팅하여 "MachintoshHD"로 부팅한다.


10) IEthernet 드라이버등을 설치하여 준다.
11) Extra 폴더의 codec dump를 AppleHDAPatcher에 드래그 앤 드랍으로 떨구어 오디오 카드를 설정하여 준다.
12) 나머지는 필요에 따라 패치를 적용하여 준다.

'Hackintosh > Mainboard' 카테고리의 다른 글

Gigabyte GA-EX58-UD5 (core i7) USB v3.0  (0) 2009.11.04
10.5.7 on an Asus P5QL/EPU  (0) 2009.10.25
GA-EP45-UD3L  (0) 2009.10.21
Asus P5P43TD Pro  (0) 2009.10.21
ASUS P5KC 에 IATKOS 설치 DVD로 OSX 설치하기  (0) 2009.10.17
:
Posted by Ritz®™

Boot think는 Boot camp와 아주 유사한 부트로더군요..

한번 사용하여 보세요.


On the boot think


1, like Apple's Boot camp interface


2, a custom icon


1, suitable for the target
Apple installed in the PC system , And and operating system to Windows XP, Vista, Windows7or Linux, such as coexistence, at the same time want to experience the perfect start to guide the process of Mac and enjoy the flavor of the original Apple.

2, Boot-Think what
Boot think is installed on your computer in general the original Mac OS's a multi-system guidance tools on the computer and to facilitate the coexistence of multiple system start-up options.

3, Why should we use the Boot-think
Boot think is designed to let the PC is more convenient to start the original Mac OS system, so also in the design style as much as possible of the original Mac to inherit the graphical interface to start the effect. Boot think, after all, is designed as an ordinary PC, it also enhances the performance of the Windows system boot support.

4, a description of the problem
a, Boot think only provide the original Mac OS on the guidance, but specific to a computer can install the original Mac OS systems, can refer tohttp://wiki.osx86project.org/wiki/index.php/HCL_10. 5.6


b, Boot think although it is to guide the design of the original system, but the same version ofMac OS support systems break guide


c, Boot think 1.1.0 is currently only supports HFS + format in the primary partition to install


5, Boot-Think Functional Description

Function


Remarks


Support GUID and MBR partition

Support the hidden EFI partition installation
Can be installed in the EFI partition GUIDformat
To support the hard disk, U disk to install
Recommended in the U disk
Supporting documents to guide
The need to manually create the WindowsStart menu under
Hard disk operating systems and more and more guide
To support the XP, Vista, Win7, Ubuntu and other operating systems
GUI interface

Mac OS X installed on the original CD-ROM

Shortcut keys to start

Startup configuration

To simplify the zonal list

Default boot partition


6, operating instructions

Shortcut keys to start


Description


c
Original CD-ROM to start the installation of Leopard
Alt (Option)
Start into the Startup Manager, you can choose to boot from a partition
Shift
To start in Safe Mode and log in the temporary closure of
Ctrl (Command) + v
Verbose startup mode for
Ctrl (Command) + s
Start for the single-user mode


Set command


Description


#-B
Select the current partition settings as the default boot partition
# P =-
Show only bootable partition
# P = +
Shows that the restoration of Zoning
# G = WxHxDEPTH
For example, g = 1024x768x32 set default startup resolution
~
Cancel all settings

Boot_Camp graphical interface to guide, Leopard original PC CD-ROM to install the video: http://www.tudou.com/programs/view/9wyX20MjGPc/

XP, vista, Win7 support for video: http://www.tudou.com/programs/view/V-_PUcMzu2c/

Default boot partition set up, the Chinese label support video boot Shortcuts:http://www.tudou.com/programs/view/PFdQGJjyQyY/

Show only bootable partition in the menu Video:http://www.tudou.com/programs/view/eShFSYP3V6k/


7, Boot think the installation of

Download the latest version of boot think the installation package, extract the Apple system running after the double-click the installation process need to select the installation location, the default system partition for the Mac OS (Note: Boot think 1.1.0currently only supports HFS + in the primary partition to install).


Select the installation path can click on the bottom left corner after the custom button for custom configuration

Offers three installation modes:


1)
Only option Boot1h election. After installation boot think does not boot directly from theboot think to start, but as usual into the Windows system, and then guided through the browser from the Windows boot / Darwin/standalone/i386 / copy files from the fileboot toachieve the re-boot think guidance, in order to get graphics interface, select the system tostart.


Such installation, the installation package file boot1h only choice to write the partition to install inside a sector that is the command: dd if = boot1h of = / dev / rdiskXsY), in order to be discovered and boot0 or run fileboot


2)
At the same time check the two options Boot1h and boot0 (This is the default installation mode). After installation boot think boot directly from the boot think started to enter the graphical interface, select your system, such installation, the installation package in addition to the completion of a mode of operation, but also to document boot0 write MBR sector of the disk (that is, the command : fdisk-f boot0-u-y / dev / rdiskX).


3)
EFI only option election, the abolition of the two options Boot1h and boot0. Boot think will be installed on the hidden EFI partition GUID partition, select the installation mode to install partitions, select the GUID partition can be arbitrary, the installation program to find hidden with EFI disk partition, and installed to the EFI partition.


The proposed primary use default settings.


8, Boot think the use of
When the boot think the interface is activated, can be used around or up and down arrow keys to achieve the system to start the selection, for the Mac OS system, if the need to enter an order parameter, can be F8 key to enter text mode. Specific operations, see 6

9, Boot think that the issue should be
boot think installation package must contain only the boot drive, if the need to crack the driver, please install itself.

(Qq base 18458890)

download for boot think:
(The same as the three download links, choose a download link on the line)


http://www.mediafire.com/download.php?zymkwgiawmt

http://uploaded.to/file/p2itba

http://www.megaupload.com/?d=NZSZA9II


'Hackintosh > Boot Think' 카테고리의 다른 글

Boot Think 설치하기  (0) 2009.10.27
:
Posted by Ritz®™

First of all, Thanks ab___73.


source : http://www.insanelymac.com/forum/index.php?showtopic=145792&pid=1163564&mode=threaded&start=#entry1163564

This posting will be translate to Korean, that's why ab_73's posting is in here for understanding who duuno english.

Update:


Upload of Release version 1 with source code.

boot1h 와 관련된 파일크기의 제약상 SMBIOS나 /Extras폴더와는 아직 호한이 안된다는 점을 유의해 주세요.

변경사항:

+ load upto 30 SSDT tables.
+ load extra additional SSDT tables.
+ ACPI v1 and v2 and v3 support.
+ source code refined.

SSDT 테이블을 올려주시면 많은 사람들에게 도움이 될것입니다.
가능하면 www.mediafire.com 에 올려주시면 되겠습니다.

다음 부트로더를 다운로드 받으세요.
Attached File ssdtboot_chameleon2.zip ( 314.39K ) Number of downloads: 500


Update:

30 SSDT tables을 로딩할 수 있게 소스코드를 수정하였다. 테스트 중에 있으며, 성공하면 이 bootloader 와 소스코드를 공개할 것입니다.
tonight.

SMBIOS source code diff를 추가하는 부분에 있어 몇가지 이슈가 있는데, 부트파일의 파일크기 제한과 관련된 것 같군요.
만약 파일크기가 62000bytes 이하에서 bootloader를 운용하게끔 한다면 SMBIOS + DSDT + SSDT 패치를 62700bytes 까지 증가시킬 수 있을 것 같습니다. 부팅시에 /boot0 hang이라는 부팅에러를 겪었다면 이 부분이 해결될 수 있겠군요.

파일 크기 제한과 관련하여 어떤분이라도 좋으니 알고 있으신 분은...^ ^

왜 boot1h 가 단지 <64k boot 파일 이하로 로딩해야 하는 건지...알고 싶습니다!!

-------------------


아주 일반적인 chameleon DSDT override bootloader 를 수정하였는데, 이는 수정된 DSDT 와 SSDT 테이블을 로딩하기 위한 것입니다.

다음과 같은 이점이 있습니다:

+ 컴파일 에러를 이해하고 또, SSDT 테이블 내에서 가끔은 DSDT가 external methods를 레퍼런스 하기도 합니다..

+ Fix Powermanagement.

+ Fix PStates (CPU performance management)

+ Fix CStates (Power Saving managenent)

+ Fix TStates (CPU throttling)

+ View SATA controllers ACPI functions.

이 버전은 디버그 버전입니다. 곧 새로운 버전을 소스코드와 같이 발표할 것입니다.

Chameleon bootloader 와 DSDT 패칭 프로젝트에 관심 가져줘서 고맙군요.

이 bootloader를 이용할려면,

특정 폴더에 압축을 풀고.

Terminal 에서 해당 폴더로 이동합니다.

기존의 bootloader를 다음과 같이 백업합니다.

#sudo cp /boot /boot.bak

사용할 bootloader 를 다음과 같이 복사하여 줍니다.

#sudo cp ssdtboot /boot

SSDT 테이블을 추출하기 위해서는

터미널에서 압축을 풀어놓은 폴더로 이동하여 다음과 같이 실행합니다.

#./getSSDT5.sh

이 명령어는 다음과 같은 디컴파일된 SSDT 테이블을 생성합니다.

SSDT-0.dsl
SSDT-1.dsl
..
SSDT-4.dsl

SSDT Tables의 숫자는 하드웨어 숫자에 기인하므로 숫자에 연연할 필요는 없습니다

텍스트 에디터나 Text Mate를 이용하여 이 화일들을 열어서 수정합니다.

SSDT tables수정하였으면, 터미널에서 다음과 같은 커맨드를 입력하여 컴파일 하여 줍니다.

./iasl -sa SSDT-0.dsl
./iasl -sa SSDT-1.dsl
./iasl -sa SSDT-2.dsl
..

./iasl -sa SSDT-x.dsl
(where x is the table you wish to compile)

컴파일된 파일을 다음과 같은 명령어를 이용하여 최상위 디렉토리에 복사하여 줍니다.

#cp SSDT-x.aml /
(where x is the table you wish to copy)

이 bootloader 를 이용하여 재부팅하고 나면 이미 SSDT 테이블을 로딩하였을 것입니다.

DSDT와 관련하여 다음 글들을 참고합니다.

DSDT Patcher

DSDT BIOS Patcher

다음과 같이 Boot 옵션을 사용할 수 있는데 수정된 것을 사용하는 것 대신에 기본적인 oem SSDT 테이블을 로딩하기 위해 사용할 수 있습니다.
(Use this at darwin boot)

oemSSDT=y

voodoo kernel 에서는 boot 옵션을 다음과 같이 주어 동작되는지 확인하여 봅니다.

kprintf=1 -v

OSX로 부팅하였다면

터미널에서 다음과 같은 명령어를 입력합니다.

#sudo dmesg | grep ACPI

OEM SSDT 테이블 예:
CODE
ACPI: SSDT @ 0x7f7f4440/0x0024 (v001 HP HPQNLP 0x00000001 MSFT 0x0100000E)
ACPI: SSDT @ 0x7f7f4464/0x0326 (v001 HP HPQSAT 0x00000001 MSFT 0x0100000E)
ACPI: SSDT @ 0x7f7f4f9d/0x025F (v001 HP Cpu0Tst 0x00003000 INTL 0x20060317)
ACPI: SSDT @ 0x7f7f51fc/0x00A6 (v001 HP Cpu1Tst 0x00003000 INTL 0x20060317)
ACPI: SSDT @ 0x7f7f52a2/0x04D7 (v001 HP CpuPm 0x00003000 INTL 0x20060317)


수정 적용된 SSDT 예:
CODE
ACPI: SSDT @ 0x7f7f4440/0x0024 (v001 HP HPQNLP 0x00000001 MSFT 0x0100000E)
ACPI: SSDT @ 0x7f7f4464/0x0326 (v001 HP HPQSAT 0x00000001 MSFT 0x0100000E)
ACPI: SSDT @ 0x7f7f4f9d/0x025F (v001 HP Cpu0Tst 0x00003000 INTL 0x20060317)
ACPI: SSDT @ 0x7f7f51fc/0x00A6 (v001 HP Cpu1Tst 0x00003000 INTL 0x20060317)
ACPI: SSDT @ 0x1956000/0x051E (v001 HP CpuPm 0x00003000 INTL 0x20080926)


5라인의 변화를 유의하여 보면 (SSDT-4) e.g. 0x7f7f52a2/0x4D7 -> 0x1956000/0x051E

이 주소가 변화된 의미는 수정된 SSDT 성공적으로 로딩된 것입니다.

이제 SSDT 테이블을 공유하여 서로간의 정보를 공유하여 봅시다. www.mediafire.com 에 업로드하여 공유하면 될 것 같군요.

다음 화일이 도움이 될 것 같군요.

[attachment=42483:ssdtboot_chameleon.zip]

Cheers,

AB

Voodoo kernel :

voodoo kernel
:
Posted by Ritz®™