달력

10

« 2025/10 »

  • 5
  • 6
  • 7
  • 8
  • 9
  • 10
  • 11
  • 12
  • 13
  • 14
  • 15
  • 16
  • 17
  • 18
  • 19
  • 20
  • 21
  • 22
  • 23
  • 24
  • 25
  • 26
  • 27
  • 28
  • 29
  • 30
  • 31

First of all, thanks noxdg

Source from ; http://www.insanelymac.com/forum/index.php?showtopic=157937

I figured I’d share my results with this configuration. There’s not much out there about my system specs as I was to find out, but I do have Leopard up and running. It’s not perfect yet, but it is functioning.


My system:
ASUS M3A78-EM
-780G / SB700 chipset
-Realtek ALC1200 audio
-Realtek RTL8168C(P) gigabit network
-ATI 3200 imbedded graphics (not used)
4 gig Patriot RAM (I’ll edit this when I figure out the exact type)
SATA LG SuperMultiBlue DVD/Blu-ray/HD-DVD drive
SATA Seagate 250GB hard drive
Visiontek HD4850 512mb video card

Install: iDeneb 10.5.6 v1.4
Modified the ISO with SB700

I tried every OSX86 release that I could find with NO luck using an IDE hard drive. They never even made it to the installation screen. It was always “waiting for boot device”. All except iDeneb 10.5.5 v1.3 which actually made it to installing (for 4 hours), which resulted in an infinite reboot; never to make it into the OS.

In my experience with installing Leopard (which I’ll admit is rather low), the most important hardware is getting a SATA hard drive. Without it, you’re practically doomed for the “waiting” error. Now, I’m sure there are successful installs out there on IDE, but not in my case. As soon as I started using SATA, every install disc I had would boot to the installation screen.

The second problem I had was SB700 chipset support. Luckily, I stumbled across a solution. As mentioned above, I modified the iDeneb 10.5.6 v1.4 ISO and added SB700 drivers. I found the process here by nicholasblock. (To be honest, not positive that I modified it, because I never tried the install before modifying the ISO. SB700 support may already be included. If someone wants to verify either way, that’d be great for anyone else interested in using it.) I tried modifying other ISOs like iPC, and Kalyway, but the process didn’t work for me.

On with my install:

First, in the bios, I put my SATA setting to AHCI.
Boot with the DVD, and within a minute or so, I entered the install section.
Using DiskUtility, I earased the partitions and used Mac OS extented journaled.
Continuing on, I selected only a couple customized options:
Kernel - Voodoo 9.5
Audio - ALC1200
Chipset - ATI with SB700 support (I forgot the actual name of it… highlight them and read the discription. The correct one will mention the SB700)
Video - NONE
LAN - NONE
Clicked install and literally, in 5 minutes, it was done.

On the reboot, I pressed F8 and loaded with -f to be sure the drivers were firmly installed.

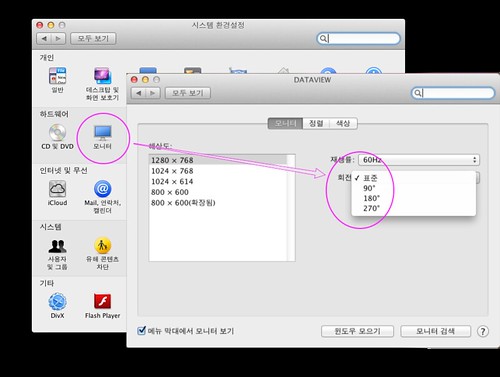
A minute later I was in OSX. Internet worked. Sound worked after selecting speakers in the system preferences. There was only 1024x768 video resolution and no QE/CI because of no 4850 drivers.

After a simple install of drumthrasher’s 4850/4870 drivers. I had the 4850 up and running.

That is where I’m at the moment. There are a few glitches, as I mentioned it’s not a perfect install, but it is functional.

Issues:
— mouse stops working and requires me to unplug and replug its USB connection. update - issue resolved itself after installing drumthrasher’s “jumpy screen fix” for 4850 video card.
— Sound gitters here and there (noticed while watching a Quicktime HD trailer). * update - still gitters, but studdering stops if mouse in in movement. Weird.
— iChat removed all function of mouse. Had to use keyboard strokes to reboot. *
update — resolved after “jumpy screen fix” iChat now works perfectly
— No native 1680x1050 resolution. I know there’s a way to add it. I recall doing so with my 10.4.8 install, but I can’t remember how. * added screen res and color bit depth to .plist, repair permissions, reboot…still no 1680 res.
— Screen is jumpy when moving mouse/scrollwheel. *
resolved — drumthrasher’s fix

I haven’t done much testing. So if there’s something that you might want me to check out, to see how it runs, feel free to ask.

So, there it is. A Phenom II 920 up and running OSX.

**UPDATE

Read issues above.

'Hackintosh > Mainboard' 카테고리의 다른 글

Enabling ACPI, EIST, etc for ASUS P5W DH DELUXE  (0) 2009.05.20
P5Q Series BIOS ready for MAC OSX (Update)  (0) 2009.05.11
ASUS psgc mx/1333 CMOS 공장초기화  (0) 2009.04.23
Zotac GeForce 9300-ITX WiFi  (2) 2009.04.23
Modify cmos bios  (0) 2009.04.06
:
Posted by Ritz®™
2009. 5. 5. 06:25

Monitor 설정 Hackintosh/Tip2009. 5. 5. 06:25

모니터 설정

Monitor01
 

:
Posted by Ritz®™
2009. 5. 4. 11:39

맥에서 하는 디스크 조각모음 Hackintosh/Tip2009. 5. 4. 11:39


'Hackintosh > Tip' 카테고리의 다른 글

GPT-GUID 파티션 복원하기  (3) 2009.05.06
Monitor 설정  (0) 2009.05.05
사용하던 화일이 사라졌다?  (0) 2009.05.04
MAC Theme  (0) 2009.05.03
:
Posted by Ritz®™
2009. 5. 4. 11:23

사용하던 화일이 사라졌다? Hackintosh/Tip2009. 5. 4. 11:23

만약 지우지 않았다면 다음과 같이 간단하게 찾으실 수 있습니다.


'Hackintosh > Tip' 카테고리의 다른 글

Monitor 설정  (0) 2009.05.05
맥에서 하는 디스크 조각모음  (0) 2009.05.04
사용하던 화일이 사라졌다?  (0) 2009.05.04
MAC Theme  (0) 2009.05.03
:
Posted by Ritz®™
2009. 5. 4. 11:23

사용하던 화일이 사라졌다? Hackintosh/Tip2009. 5. 4. 11:23

만약 지우지 않았다면 다음과 같이 간단하게 찾으실 수 있습니다.


'Hackintosh > Tip' 카테고리의 다른 글

맥에서 하는 디스크 조각모음  (0) 2009.05.04
사용하던 화일이 사라졌다?  (0) 2009.05.04
MAC Theme  (0) 2009.05.03
root 계정 활성화 하기  (0) 2009.04.30
:
Posted by Ritz®™

Source : http://ipis-osx.wikidot.com/forum/t-135336 

1. Boot from Apple Install DVD, wait all the stuffs to load, and launch Disk Utility.
2. Unmount your OSX partition in Disk Utility
3. Close Disk Utility, open Terminal and type:

diskutil list

— you will see something similar to this:
/dev/disk0
   #:                       TYPE NAME                    SIZE       IDENTIFIER
   0:     FDisk_partition_scheme                        *149.1 Gi   disk0
   1:               Windows_NTFS SYSTEM                  80.0 Gi    disk0s1
   2:                  Apple_HFS OSX                     69.0 Gi    disk0s2
   3:                                                    39.2 Mi    disk0s3
/dev/disk1
   #:                       TYPE NAME                    SIZE       IDENTIFIER
   0:     Apple_partition_scheme                        *4.4 Gi     disk1
   1:        Apple_partition_map                         31.5 Ki    disk1s1
   2:                  Apple_HFS iDeneb v1.3 10.5.5      4.4 Gi     disk1s3
/dev/disk2
   #:                       TYPE NAME                    SIZE       IDENTIFIER
   0:     FDisk_partition_scheme                        *111.8 Gi   disk2
   1:               Windows_NTFS eMag                    111.8 Gi   disk2s1
/dev/disk3
   #:                       TYPE NAME                    SIZE       IDENTIFIER
   0:                            untitled               *467.0 Ki   disk3
/dev/disk4
   #:                       TYPE NAME                    SIZE       IDENTIFIER
   0:                            untitled               *467.0 Ki   disk4
/dev/disk5
   #:                       TYPE NAME                    SIZE       IDENTIFIER
   0:                            untitled               *95.0 Ki    disk5
/dev/disk6
   #:                       TYPE NAME                    SIZE       IDENTIFIER
   0:                            untitled               *95.0 Ki    disk6

— at this stage remember the correct ID for Apple_HFS OSX and id of the physical HDD.

4. Now we gonna install boot0 part of Darwin boot loader in the Master Boot Record by typing:

dd if=/usr/standalone/i386/boot0 of=/dev/disk0 bs=400 count=1

— if your path to Darwin boot loader package differs, feel free to change the path. It is important to identify the disk ID of your MBR; if it is not 'disk0' feel free to change it too.
5. Now we should install boot1h part of Darwin boot loader in the boot sector of our OSX partition:
dd if=/usr/standalone/i386/boot1h of=/dev/rdisk0s2 bs=512 count=1

As I said before, it is always a good idea to have a tool for Win you can use to display and modify your OSX files. In mine case I own MacDrive 7.
6. Type reboot in Terminal and return to your Windows.
7. Boot in Windows and check you got this line in your boot.ini:
C:\chain0="Mac OS X 10.5.6 Leopard"

8. Copy from /usr/standalone/i386/ a fresh copy of chain0 in your C:\ partition.
9. You may also want to refresh from /usr/standalone/i386/ your copy of boot which is in the root volume of your OSX partition.
10. Restart, you should see the Windows boot loader menu and if everything was properly set clicking on „Mac OS X 10.5.6 Leopard“ will bring you back to your beloved OSX part of life.

Hope this will help someone in trouble as I was.

:
Posted by Ritz®™
2009. 5. 4. 03:40

Adobe CS 시리즈 설치하기 Application/Adobe2009. 5. 4. 03:40

언어별 버전 구별하는 방법

http://osx86.tistory.com/1308


 다음과 같이 MasterCollection_CS5_5_LS3.dmg 이미지를 클릭클릭하여 설치할 수 있다.

CS5.5_01

라이센스 이슈나 터미날 작업이 필요한 경우는 다음글을 참조하면 된다.
http://osx86.tistory.com/414


Flash
 

'Application > Adobe' 카테고리의 다른 글

Adobe CS4 Illustrator  (0) 2010.03.24
adobe output module 2.1 failed to install  (0) 2009.10.30
Photoshop Performance 설정  (0) 2009.04.30
Photoshop Performance 설정  (1) 2009.04.30
Adobe CS4 licence expire  (0) 2009.03.28
:
Posted by Ritz®™
2009. 5. 3. 05:50

MAC Theme Hackintosh/Tip2009. 5. 3. 05:50

http://www.deviantart.com/#catpath=customization/icons/os/mac&order=9

http://macthemes2.net/forum/viewtopic.php?id=16795442

'Hackintosh > Tip' 카테고리의 다른 글

사용하던 화일이 사라졌다?  (0) 2009.05.04
MAC Theme  (0) 2009.05.03
root 계정 활성화 하기  (0) 2009.04.30
시스템 로그 위치  (0) 2009.04.30
:
Posted by Ritz®™