달력

3


Update : http://cafe.naver.com/uefi/7136

클로버 부트로더를 사용하면 간단하게 설정가능하다. http://cafe.naver.com/uefi/6


다음 방법은 그래픽 카드를 새로이 설정하거나 그래픽 카드 교체시 활용할 수 있다. 

MAC OS X를 PC에 설치하였지만, 그래픽 카드 설정이 안되면(QE/CI, OpenGL등의 그래픽 가속 기능을 사용하지 못하면) OS X를 제대로 활용할 수 없다 .

이런 경우 그래픽 카드를 설정하여 주는 방법이다. GFX-String방법이외에도 다음 아래 방법중의 하나로 설정할 수 있다.  또 이 방법은 부트로더에 따라 사용할 수 있는 방법과 사용하지 못하는 방법이 있으니 유의하여 적용하여야 한다.

일단, 이미 부트로더를 하드디스크에 설치한 다음 다음 방식중 하나를 하나하나 적용해 보아야 한다.

즉, 아래글들을 전부 훓어본다음 자신이 설치한 부트로더에 적합한 방식으로 활용해야 한다.

특히, Geforce 계열 그래픽 카드는 "Graphic Enabler=Yes" 혹은 "Graphic Enabler=No"로 거의 대부분 설정가능하다.

설정 방법은 /System/Library/Extensions/ 폴더 밑의 Geforce 계열 그래픽 카드 드라이버를 백업 받아 둔 다음 위 옵션을 활용한다. * 제발 그래픽 드라이버 설정한다고 Mac OS X 재설치 몇번했다는 등의 불필요한 시간낭비를 하지 말았으면 한다.

또한 Clover BootLoader인 경우에는 대부분 지포스 계열은 다음과 같은 방법으로 설정가능하다.

config.plist

<key>Graphics</key>

<dict>

<key>DualLink</key>

<false/>

<key>GraphicsInjector</key>

<true/>

<key>InjectEDID</key>

<true/>

<key>LoadVBios</key>

<false/>

<key>PatchVBiosBytes</key>

<dict>

<key>Find</key>

<string>gAeoAqAF</string>

<key>Replace</key>

<string>gAeoAjgE</string>

</dict>

<key>VRAM</key>

<integer>536870912</integer>

<key>VideoPorts</key>

<integer>0</integer>

<key>display-cfg</key>

<string>0000000000000000</string>

<key>ig-platform-id</key>

<string>0x0</string>

</dict>


아래 그림은 두개의 DVI 포터를 가진 그래픽 카드에서 터미네이터로 활용되는 젠더이다.


그래픽 카드는 2dvi가 좋으며 아래 그림과같은 그래픽 카드는 피하는 것이 좋다.  아래 그림의 그래픽 카드는 nvcap을 따로이 구해서 적용해야 하는 번거러움이 있다.  녹록치않은 작업이다.  


❍ NVidia & ATI 계열 그래픽 카드 설정하는 방법
-* 가능한 "GraphicsEnabler" 방식을 이용하는 것이 여러모로 깔끔하다. 특히, 8600, 8800, 9600, 9800, 250, 260 시리즈는 이 방법으로 간단히 잡을 수 있다.
- ① dsdt.aml방식,  pc_efi 1.0, Chameleon 2.0 rc-2 이하등의 하위버전 부트로더 또는 Boot Think사용시 
- ② GraphicsEnabler 방식, Chameleon 2.0-rc3이상 버전 사용시 
- ③ 그래픽 카드의 Video ROM을 추출하여 활용하는 방법, Chameleon 2.0-rc3이상 버전 사용시
- ④ GFX-String방법
- ⑤ "nvenabler.kext" 등의 드라이버를 설치하는 방법, pc_efi 1.0등의 하위버전 부트로더도 가능, Boot Think, Chameleon 사용가능


1. DSDT.aml로 설정하는 방법(8600 GT /GTS 그래픽 카드인 경우) 이 코드는 다음 글 참조.
다음과 같이 IORegistryExplorer를 이용하여 그래픽 카드의 디바이스 설정을 확인한다.


         Device (P0P1) <<  자기 메인보드에 맞게 바꾸어 주어야 한다. (대부분 P0P0)
            {
                Device (GFX0)
                {
                    Name (_ADR, Zero)
                    Name (_SUN, One)
                    Method (_DSM, 4, NotSerialized)
                    {
                        Store (Package (0x16)
                            {
                                "@0,compatible",
                                Buffer (0x0B)
                                {
                                    "NVDA,NVMac"
                                },

                                "@0,device_type",
                                Buffer (0x08)
                                {
                                    "display"
                                },

                                "@0,name",
                                Buffer (0x0F)
                                {
                                    "NVDA,Display-A"
                                },

                                "@1,compatible",
                                Buffer (0x0B)
                                {
                                    "NVDA,NVMac"
                                },

                                "@1,device_type",
                                Buffer (0x08)
                                {
                                    "display"
                                },

                                "@1,name",
                                Buffer (0x0F)
                                {
                                    "NVDA,Display-B"
                                },

                                "NVCAP",
                                Buffer (0x18)
                                {
                                    /* 0000 */    0x04, 0x00, 0x00, 0x00, 0x00, 0x00, 0x03, 0x00,
                                    /* 0008 */    0x0C, 0x00, 0x00, 0x00, 0x00, 0x00, 0x00, 0x07,
                                    /* 0010 */    0x00, 0x00, 0x00, 0x00
                                },

                                "VRAM,totalsize",
                                Buffer (0x02)  <<< 256MB는 02, 512MB는 04
                                {
                                    0x00, 0x00, 0x00, 0x28
                                },

                                "device_type",
                                Buffer (0x0D)
                                {
                                    "NVDA,GeForce"
                                },

                                "model",
                                Buffer (0x18)
                                {
                                    "nVidia GeForce 8600 GTS"
                                },

                                "rom-revision",
                                Buffer (0x26)
                                {
                                    "nVidia GeForce 8600 GTS OpenGL Engine"
                                }
                            }, Local0)
                        DTGP (Arg0, Arg1, Arg2, Arg3, RefOf (Local0))
                        Return (Local0)
                    }
                }

                Name (_ADR, 0x00010000)
                Method (_PRW, 0, NotSerialized)
                {
                    Return (GPRW (0x09, 0x04))
                }

                Method (_PRT, 0, NotSerialized)
                {
                    If (PICM)
                    {
                        Return (AR01)
                    }

                    Return (PR01)
                }

. 위 코드를 DSDT에 적용하는 방법은 다음글을 참조 : http://osx86.tistory.com/category/Hackintosh/DSDT


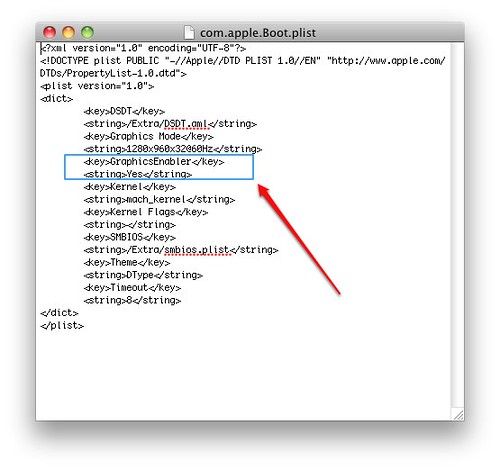
2. "GraphicsEnabler" 를 이용한 방식

- /Extra/org.chameleon.Boot.plist(구 com.apple.Boot.plist) 파일 혹은 /Library/Preferences/SystemConfigurations/com.apple.Boot.plist 파일에 다음과 같이 첨가하여 준다.
- Chameleon 2.0 RC3부터 적용가능하니 부트로더를 카멜레온으로 설치하여 주면 된다.

<key>GraphicsEnabler</key>
<string>Yes</string>

Graphic


3. Video ROM을 추출하여 활용하는 방법


- /Extra 폴더 혹은 /Library/Preferences/SystemConfigurations/ 의 com.apple.Boot.plist 화일에 다음과 같이 첨가하여 준다.
- Chameleon 2.0 RC3부터 적용가능하니 부트로더를 카멜레온으로 설치하여 준다.

<key>VideoROM</key>
 

<string>nVidia8600GTS.rom</string>
* 간혹 그래픽 카드 설정이 제대로 되어 있지 않는 것 처럼 보이는 경우가 있는데, 이런 경우 Chess 게임 같은 걸 돌려보면 QE/CI가 제대로 잡혀 체스 게임이 돌아가는 경우가 있다.만약 그래픽 카드 설정이 되지 않았다면 체스 케임을 아예 할 수 없다. 물론, OpenGL 도 테스트 해보면 문제 없을 것이다.다만, 해상도 설정을 자유롭게 할 수 없다는 문제가 있긴 하지만 이러한 경우 매뉴얼로 수동으로 할 수 밖에 없다.아니면 간단하게 그래픽 카드 교체를 하는 것이 적절하다.


4. 드라이버를 설치하여 설정하는 방법

- http://www.mediafire.com/file/lky3emjhd2d/NVEnabler 64.kext.zip                                                               - http://www.osx86.nl/dload/video/index.html
압축 풀어서 kext helper 로 설치하기
http://osx86.tistory.com/7
- 모든 부트로더에 적용가능하다.
                                                                                                          

- 9200m 이나 기타 Geforce계열 그래픽 드라이버의 경우에는다음글을 참조하면 된다.


5. 마지막으로 확인


#############################################################


6. 그래픽 카드 교체
 만약 그래픽 카드를 교체하였다면 위의 방법들을 원상태로 돌려두고 새로운 그래픽 카드에 맞게 설정하면 된다.

6-1. 만약, 8600GT 에서 ATI 4870 그래픽 카드로 교체할 경우, 다음과 같은 과정을 따른다.
우선 8600GT 는 대부분 "Graphic Enabler"를 이용하여 설정하거나 DSDT.aml 혹은 GFX-String 방식을 이용한다.  
그리고 ATI 4870 같은 경우에는 간단하게 "Graphic Enabler"를 이용하여 설정한다.
① 이런 경우에는 /Extra/com.apple.Boot.plist 화일이나 혹은 /Library/Preference/SystemConfiguration/com.apple.Boot.plist화일에서 GFX-String을 제거하여 준다.
혹은 DSDT.aml 인 경우에는 /Extra/DSDT.aml이나 /DSDT.aml 화일을 재 컴파일 하여 DSDT.dst 화일로 만들어 준 다음 그래픽 카드 부분을 제거하여 준다.

② 마지막으로 /Extra/com.apple.Boot.plist 화일이나 혹은 /Library/Preference/SystemConfiguration/com.apple.Boot.plist 에 "Graphic Enabler" 만 입력하여 준다.   

③ 확인은 위의 5 단계를 다시 실행하여 확인하여 본다.

검색신공 배양하기 구글링 6종 세트

1. 시스템 스펙/상황 파악하기


http://j.mp/58hmuA

2. 추가 조치 방안 및 질문하는 방법


http://j.mp/6Jui2v

3. 해킨 설치 이미지의 종류

https://bfy.tw/PJbH
http://j.mp/5bKbXc

4. 특정 패키지 혹은 드라이버만 골라 설치하기

https://bfy.tw/PJbJ
http://j.mp/7oKbwJ


5. 관련시스템 설치이력 찾기(제품 모델명이 “GA-EP45” 시리즈인 경우)

http://j.mp/7d8gfp

6. p55-ud3r i5 750 보드에 4850 일 경우- 밥떠먹여주기 프로젝트팁

https://bfy.tw/PJbY
http://j.mp/8DfTQv
#############################################################


'Hackintosh > Graphic Card' 카테고리의 다른 글

4870x2  (0) 2012.02.09
해킨토시 - GTX 550 Ti  (0) 2012.02.03
ati mobility HD5400시리즈  (0) 2012.01.02
Graphics Card Hierarchy Chart  (0) 2011.12.04
PC 조립 및 Graphic Card 설치  (0) 2011.11.14
:
Posted by Ritz®™


설치하기전에 먼저 다음글을 읽어보시고 설치하시면 많은 도움이 될 것입니다.

물론, 이 글로 도움을 받으실 수 있는 분과 도움을 전혀 받지 못하실 분이 계실 것입니다.

여기 몇몇 링크에는 Ritz님과 해커들의 숨은 뜻이 있습니다.

뭐냐구요?  금방 답이 나올 것입니다.  

누구나 이 글을 볼 수 있지만, 이해할 수 있는 사람을 선택할 수도 있다는 거,,,,,,,

물론, 이해하실 수 있는 분은 응용스킬을 시전하여 고수의 지름길을 찾을수 있다는 거,,,,


아실 수 있는 분은 아실 것입니다.


추가로 당근 이 글을 보기 싫으신 분들은 안보시면 됩니다.  

시간이 흘러넘쳐서 이 글을 쓰는 건 아니니까요.


전체적인 설치간략개념(간략 개념이 아니라 아주 복잡한 장문의 글이 되어 버렸습니다.) 시스템 상황 파악하기(시스템 스펙 파악하기)
  • Windows설치할때처럼 그냥 대충 해킨이미지를 가지고 설치해볼려는 분들이 아직도 많이 있는 것 같더군요.
  • 사전에 자신의 시스템 스펙을 정확히 확인하지 않고 이렇게 설치시도하면 설치실패 확률 90% 이상입니다.
  • 이를테면, MSI Neo시리즈, ASUS P5Q 시리즈 마더보드인 경우 Bios 수정부터 해주어야 합니다.
  • 이걸 수정하지 않고 설치시도하게 되면 해킨이미지에서 사용자화를 하여야 합니다.
  • 이를테면, P5Q메인보드나 AMD 시스템인 경우, 사용자화에서 CPU=1 이런 패치를 해주어야 합니다.
  • 혹은 부팅 옵션에 "cpu=1 -v -f"을 주어 부팅을 해야 합니다.
  • 즉,CPU를 코어 하나만 사용하여 부팅하게 되는 것입니다.
  • 자신의 시스템 스펙 파악을 자세하게 하신분들마저도 설치하는데 6개월 걸리시는 분들이 있습니다.
  • 자신의 시스템 스펙을 정확하게 알면 해킨이미지 설치시 사용자화에 많은 도움을 받을 수 있어 성공확률이 그만큼 높아지게 됩니다.
  • 그리고 한번 이렇게 자세하게 정리하여 두면 차후 시스템 복구시에도 많은 도움이 될 것입니다.
  • Windows 처럼 범용성을 지닌 운영체제가 아니기 때문에 시스템 모듈별로 드라이버가 따로이 있습니다.
  • 물론, 드라이버 자체가 없는 경우도 있습니다.
  • 자기 시스템 스펙을 파악하는 것은 선택이 아니라 필수입니다.
  • 메인보드가 인텔계열의 ASUS P5W, 기가바이트 보드 계열이면 설치가 아주 무난할 것입니다.
  • 시스템 스펙 파악하기
  • 메인보드별 설치방법-1, 메인보드별 설치 방법-2
  • 노트북별 설치 방법
이미지의 종류(해킨 배포본 이미지와 Retail 정품 이미지로 나누어 보았습니다.)

파티션 설정하는 방법(파티션 설정 중요합니다.)

그래픽 카드 설정하는 방법(파티션 설정 중요합니다.)

  • 처음으로 OS X를 설치하였다면 그래픽 카드 설정이 안되어 있을 것입니다.
  • 물론, 사용자화에서 그래픽 카드를 잘 선택하여 QE/CI, CL까지 설정되어 있다면 특별한 문제는 없지만, 요즈음은 드라이버를 설치하지 않고 다양한 방법을 통하여 그래픽 카드를 설정하여 주고 있습니다.
  • http://x86osx.textcube.com/category/Compatibility

추가 조치방안 및 질문하는 방법

해당 드라이버만 골라 설치하는 방법

  • 설치한후, 그래픽카드가 설정이 안된다거나 랜이 설정이 안되는 경우가 있습니다.
  • 이때 대부분 설치를 다시 반복하는 사례가 많은 데, OS X는 윈도우즈가 아닙니다.
  • 재설치하지 마시고 그냥 해당 드라이버만 재설치를 하면 됩니다.
  • 이방법을 알아두면 설치 DVD이미지에서 해당드라이버만 골라서 설치할 수 있습니다.
  • 즉, 재설치하는 번거러움을 줄일 수 있습니다.
  • OSX는 윈도우즈 처럼 전체적인 시스템이 잘못되었다거나 뭔가 꼬였다라는 일이 거의 없습니다.
  • 다만, 해당 드라이버를 설치하였는 지 유무가 시스템 안정성에 많은 영향을 미칩니다.
  • 추가로 관련 드라이버를 설치하였는데 제대로 동작을 하지 않을 경우 반드시 Retail DVD이미지를 이용하여 해당드라이버를 원래대로 복원하는 것이 중요한데 이런 경우에도 유용하게 사용할 수 있습니다.
  • 물론, 해당드라이버를 설치하였을 경우에 반드시 다음 부팅옵션에 "-v -f " 부팅옵션을 주어 설치한 드라이버를 로딩하여 주는 것이 중요합니다.
  • 싱글유저로 부팅한 후에 "exit"라는 커맨드를 주면 정상적인 부팅과정을 수행하거나 혹은 업그레이드 이후라면 재부팅하라는 메시지가 나옵니다. 이때 재부팅하시면 됩니다.
  • Leopard 드라이버 설치하기
  • 해당 드라이버만 설치하기

자기 시스템에 맞는 설치사례 찾아보기

  • 보유하고 있는 메인보드를 이용하여 다른 사용자가 이미 설치한 사례가 있다면, 그 사례에 따라 설치할 경우 설치하기가 쉬워집니다.
  • 이럴때 이 방법을 사용하면 설치하기가 쉬워집니다.
  • 만약 설치사례가 없다면 당신이 세계최초의 해당시스템의 설치시도자가 될 것입니다. ^ ^
  • 혹은 설치후에 부팅문제가 발생할 경우에 많은 도움이 됩니다.
  • 설치사례 찾아보기 (메인보드가 GA-EP45 인 경우에 해당되며 응용하시면 됩니다.)

부트로더 설치 방법

  • PC에 설치하는 해킨토시에서 부트로드는 반드시 필요합니다.
  • 부트로더를 설치하여 주지 않으면 부팅이 안됩니다.
  • 물론, 해킨 배포본에서는 기본적으로 포함되어 있어 설치되어지고 윈도우즈와의 멀티부팅도 부트로드에서 제공됩니다.
  • 결과론적으로 멀티부팅이 한결 쉬워졌습니다.
  • Chain0 방식보다 진보된 멀티부팅 방식입니다.
  • Boot-132 설치방법 Leopard용과 Snow Leopard용이 따로 있습니다.
  • Chameleon 설치방법 맥용만 있으며 Tiger, Leopard, Snow Leopard를 지원합니다.
  • Boot Think 설치방법 윈도우즈용과 맥용이 따로 있으며 Tiger, Leopard, Snow Leopard를 지원합니다.
  • XPC(UEFI) 설치방법 XPC 설치방법은 최근에 디시 Snow Leopard를 지원하기 위해 개발중입니다. Tiger, Leopard, Snow Leopard까지 지원합니다.
  • PC_EFI 설치방법, Tiger시절 이래로 가장 오래된 부트로더입니다. Snow Leopard를 지원합니다.
  • Snow Leopard ✒RebelEFI CD 설치방법


 USB Memory Stick 나 DVD가 없을때 설치 방법

USB Memory Stick을 이용한 설치 방법

  • DVD나 일시적인 파티션을 이용하여 설치하는 방식은 향후 새로운 버전 업그레이드나 신버전의 kext가 나올시에 유연하게 대처할 수 없습니다.
  • 이때, USB Memory Stick을 이용하면 설시속도나 신버전 kext, 업그레이드 등에 유연하게 대처할 수 있습니다.
  • Leopard용은 xpc, ✒boot-132, Chameleon, Boot Think 등의 부트로더를 설치할 수 있습니다.
  • Snow Leopard 용은 ✒Chameleon, Boot Think 를 설치하여 이용합니다.
  •  보편적인 cmos setup 방법입니다.  심심해서 그림을 올린 것은 아닙니다.  해킨의 첫걸음이기도 하구요.  꼬옥 AHCI로 설정해주는 것이 필요합니다.  물론, 시스템에 따라 MANUAL로 해주어야 하는 경우도 있습니다만,,,

'Hackintosh > Install' 카테고리의 다른 글

370만원대의 OSX 를 내PC에 설치하는 방법  (6) 2011.01.18
Leopard HD install helper v0.3(Win32)  (2) 2011.01.16
USB Memory Stick 을 이용하여 해킨토시 설치하기  (0) 2010.07.01
MBOUTCD  (0) 2010.07.01
BootCD 종류  (0) 2010.06.07
:
Posted by Ritz®™
2010. 4. 10. 00:08

ATI Graphic Card Driver Hackintosh/Graphic Card2010. 4. 10. 00:08

10.6.4

혹은

Update!!


patched files - http://tinyurl.com/q4ku5r


NEW: ATI RadeonHD installers - http://tinyurl.com/5fvndd

HD 4650 kexts for 10.6.2 http://www.sendspace.com/file/zvcy13

NEW 3870x2 support - http://tinyurl.com/bqpkn9

Multi-Cards How to - http://tinyurl.com/yd
:
Posted by Ritz®™
2009. 12. 6. 19:24

Code injection via DSDT for NVIDIA graphics Hackintosh/DSDT2009. 12. 6. 19:24

Created by Team EvOSX86
In this third guide, board and add to our DSDT code, graphics injection that will enable us to stop using Efi strings or injectors
Nvidia video card.
* Note: We've had success with this technique for some GMA950, ATI X3100 and some of the series X1xxx but not yet in HD.
Tools needed:
Ioregistry explorer
Nvidia graphics card working 100% including video outputs needed (QE and Hardware CI).
Having previously read chapter one and two of the guide
Content:
1. How to recognize where our video card in the registry and its associated devices.
2. Decompilation file and added COFIG DSDT.aml chart.
2a. The loader code.
3. Comparison of our code with Ioreg added Nvcaps, reg and renamed.
4. Basic structure of video devices and the DSDT added to our code.
4a. Example portable.
4b. Example computer tower.
5. Compiling and testing.
APPENDIX: How to clean our DSDT video inputs nonfunctional
1. How to recognize where our video card and registration devices
partners.
After downloading the program Ioregistry explorer, executive, we walk the tree of entries until we find the reference for our
video card, usually tends to be quite clear:
This example is from a laptop with a 256MB Nvidia 8600GT using the latest patches as Nvinject video and injector.
Pic1

As you will see, is not marked in green line corresponds to the card, but the upper, and has an explanation: in the DSDT code does not find his name, but with
the device that houses it.
Let me explain a bit these devices:
Marked in red is the AGP device @ 1, which depends on PCI @ 0, this device houses a device called a sub-VID @ 0, which is our video card.
In turn, the device VID @ 0 contains other devices that do not see, such as LCD, VGA, etc.
2. Decompilation of the code and added dsdt.aml chart.

Assuming that prior to this guide you have got to have a fixed DSDT and operational (HPET and RTC patched etc ...) you make a backup file and DSDT.aml
We have to work on.
In previous guides we have spoken of the binary called "iasl" found inside the folder "tools" created by the patcher Fassler. I repeat the recommendation that
copieis this file in / usr / bin with this I will always be available when you open the terminal and not have to be Recordade where we have given, or drag it to the terminal
every time we change our archive dst.dsl
That said, having copied the binary to start with where we mentioned decompilation of DSDT.aml:
Open terminal as root logueamos us and agree to the folder where we alamacenado the DSDT (cd "path to the folder")
once inside type in "-d iasl dsdt.aml"
This will create DSDT.dsl, we make a copy for backup and have it move away from the tools folder to avoid overcrowding of.
Now prodeas DSDT.dsl edit using a text editor of our choice (suggested textmate)
For this example we will use a DSDT from a laptop.
Note: The code marked in red is not used.
   
The blue outlines the part that we must adapt to our video card.


CODE

Device (PEGP)  

  {

  Name (_ADR, 0x00010000)

  Device (GFX0)

  {

  Name (_ADR, Zero)

  Name (_SUN, One)

  Method (_DSM, 4, NotSerialized)

  {

  Store (Package (0x1A)

  {

  "@0,compatible",

  Buffer (0x0B)

  {

  "NVDA,NVMac"

  },

  "@0,device_type",

  Buffer (0x08)

  {

  "display"

  },

  "@0,name",

  Buffer (0x0F)

  {

  "NVDA,Display-A"

  },

  "@1,compatible",

  Buffer (0x0B)

  {

  "NVDA,NVMac"

  },

  "@1,device_type",

  Buffer (0x08)

  {

  "display"

  },

  "@1,name",

  Buffer (0x0F)

  {

  "NVDA,Display-B"

  },

  "NVCAP",   <----------------   Nuestro NVCAP para salidas múltiples extraído de IOREG.

  Buffer (0x18)

  {

  /* 0000 */   0x04, 0x00, 0x00, 0x00, 0x00, 0x00, 0x01, 0x00,

  /* 0008 */   0x06, 0x00, 0x00, 0x00, 0x00, 0x00, 0x00, 0x00,

  /* 0010 */   0x00, 0x00, 0x00, 0x00

  },

  "NVPM",   <----------------   Nuestro NVPM (gestión de energía), normalmente no hay que cambiarlo, pero es bueno compararlo en IOREG.

  Buffer (0x20)

  {

  /* 0000 */   0x01, 0x00, 0x00, 0x00, 0x00, 0x00, 0x00, 0x00,

  /* 0008 */   0x00, 0x00, 0x00, 0x00, 0x00, 0x00, 0x00, 0x00,

  /* 0010 */   0x00, 0x00, 0x00, 0x00, 0x00, 0x00, 0x00, 0x00,

  /* 0018 */   0x00, 0x00, 0x00, 0x00

  },

  "VRAM,totalsize",

  Buffer (0x04)

  {

     0x00, 0x00, 0x00, 0x20

  },

   "device_type",

  Buffer (0x0D)

  {

  "NVDA,GeForce"

  },

  "model",

     Buffer (0x1F)   <----------------   Dependerá de la longitud del nombre + los espacios + 1.

     {

  "Nvidia GeForce 8600M GS 256 MB"   <----------------   El nombre de nuestra tarjeta y su memoria (a vuestra elección).

  },

   "rom-revision",

  Buffer (0x20)

     {

  "DSDT ROM v.1a #irc.osx86.es (c)"

  },

  "reg",   <----------------   Nuestro REG extraído de IOREG.

   Buffer (0x78)

   {

  /* 0000 */   0x00, 0x00, 0x01, 0x00, 0x00, 0x00, 0x00, 0x00,

/* 0008 */   0x00, 0x00, 0x00, 0x00, 0x00, 0x00, 0x00, 0x00,

/* 0010 */   0x00, 0x00, 0x00, 0x00, 0x10, 0x00, 0x01, 0x02,

/* 0018 */   0x00, 0x00, 0x00, 0x00, 0x00, 0x00, 0x00, 0x00,

/* 0020 */   0x00, 0x00, 0x00, 0x00, 0x00, 0x00, 0x00, 0x01,

/* 0028 */   0x14, 0x00, 0x01, 0x42, 0x00, 0x00, 0x00, 0x00,

/* 0030 */   0x00, 0x00, 0x00, 0x00, 0x00, 0x00, 0x00, 0x00,

/* 0038 */   0x00, 0x00, 0x00, 0x10, 0x1C, 0x00, 0x01, 0x02,

/* 0040 */   0x00, 0x00, 0x00, 0x00, 0x00, 0x00, 0x00, 0x00,

/* 0048 */   0x00, 0x00, 0x00, 0x00, 0x00, 0x00, 0x00, 0x02,

/* 0050 */   0x24, 0x00, 0x01, 0x01, 0x00, 0x00, 0x00, 0x00,

/* 0058 */   0x00, 0x00, 0x00, 0x00, 0x00, 0x00, 0x00, 0x00,

/* 0060 */   0x80, 0x00, 0x00, 0x00, 0x30, 0x00, 0x01, 0x02,

/* 0068 */   0x00, 0x00, 0x00, 0x00, 0x00, 0x00, 0x00, 0x00,

/* 0070 */   0x00, 0x00, 0x00, 0x00, 0x00, 0x00, 0x02, 0x00

  }

  }, Local0)

  DTGP (Arg0, Arg1, Arg2, Arg3, RefOf (Local0))

  Return (Local0)

  }

  }

  }


Renowned for our card in the code outsider.
                                                     
If you look at the letters in blue is suggested, you will see that marked the buffer and the name of the card, why?, It is simple, you will have to change the name of the card
for yours, and the buffer indicating the number of characters (including spaces) is in the name quoted 1 if you change the name but not the buffer, the
compilation will fail.
How to find the buffer (which is also in hexadecimal).
It is very simple, we need a converter decimal to hexadecimal and vice versa.
A site that you can come very convenient is this:
http://www.parkenet.com/apl/HexDecConverter.html
or this:
http://www.paulschou.com/tools/xlate/
Well, he began:
Sample buffer for the line "Nvidia GeForce 8600M GS 256MB, the number of letters and spaces contained here is 30 (decimal), add 1 to the result (actually it
The problem is that the account number starts from zero), which gives us 31, using the websites listed above, we put 31 in decimal and as a result gives us 1F
hexadecimal, ie, the buffer used.
If we change the name to our card, we use the same approach to calculate the size of the buffer.

2a. The loader code.

We will give an overview of the concept of loader code already discussed in the previous guide.
Our code is not ACPI is a string of information that add to the ACPI code, and if we as-is, our record's not OSX not being charged this compatible
ACPI, so this is loaded, we must use a "shipper" which is nothing more than a bit of code that define our entry code and allow its load by
system.
Where to insert the "shipper"?
This is simple, you must seek with the text editor area code _WAK called, and when the definition of it, fit the loader code.
Charger Code:


CODE

Method (DTGP, 5, NotSerialized)

{

If (LEqual (Arg0, Buffer (0x10)

{

/* 0000 */ 0xC6, 0xB7, 0xB5, 0xA0, 0x18, 0x13, 0x1C, 0x44,

/* 0008 */ 0xB0, 0xC9, 0xFE, 0x69, 0x5E, 0xAF, 0x94, 0x9B

}))

{

If (LEqual (Arg1, One))

{

If (LEqual (Arg2, Zero))

{

Store (Buffer (One)

{

0x03

}, Arg4)

Return (One)

}

If (LEqual (Arg2, One))

{

Return (One)

}

}

}

Store (Buffer (One)

{

0x00

}, Arg4)

Return (Zero)

}


Cargo Area:
The code in this area will depend on the machine, and basically you have to find the end _WAK code, which ends:


CODE

Return (Package (0x02)

{

Zero,

Zero

})

}


I include below the code loader.
EXAMPLE:
More cargo area shipper:


CODE

Method (_WAK, 1, NotSerialized)

{

P8XH (One, 0xAB)

If (LOr (LEqual (Arg0, 0x03), LEqual (Arg0, 0x04)))

{

If (And (CFGD, 0x01000000))

{

If (LAnd (And (CFGD, 0xF0), LEqual (OSYS, 0x07D1)))

{

TRAP (0x3D)

}

}

}

If (LEqual (RP2D, Zero))

{

Notify (\_SB.PCI0.RP02, Zero)

}

If (LEqual (Arg0, 0x03)) {}

If (LEqual (Arg0, 0x04))

{

\_SB.PCI0.LPCB.EC0.SELE ()

}

P8XH (Zero, 0xCD)

Return (Package (0x02)

{

Zero,

Zero

})

}

Method (DTGP, 5, NotSerialized)

{

If (LEqual (Arg0, Buffer (0x10)

{

/* 0000 */ 0xC6, 0xB7, 0xB5, 0xA0, 0x18, 0x13, 0x1C, 0x44,

/* 0008 */ 0xB0, 0xC9, 0xFE, 0x69, 0x5E, 0xAF, 0x94, 0x9B

}))

{

If (LEqual (Arg1, One))

{

If (LEqual (Arg2, Zero))

{

Store (Buffer (One)

{

0x03

}, Arg4)

Return (One)

}

If (LEqual (Arg2, One))

{

Return (One)

}

}

}

Store (Buffer (One)

{

0x00

}, Arg4)

Return (Zero)

}


Salváis the file and compile to see if there were errors in the code.
Open the terminal, as root logueamos us and tune into the DSDT folder (cd "path to the folder) then type
iasl-f dsdt.dsl

If errors occur is that you put the wrong charger, if warnings occur, is that it may come before, not do them much attention now.
If no error occurs, delete the file that was generated DSDT.aml and continued work within DSDT.dsl
3. Comparison of our code with Ioreg added Nvcaps, reg and
renamed.
We now proceed to seek the necessary data on our IOREG for insertion into each unit in the code.
NVCAPS or seek first the configuration of the outputs of our video card and NVPM or energy management.
We opened the IOREG and seek our video card, pointing device and look for the entry child NVCAP and NVPM:


Pic2

Once we have NVCAP values and NVPM, amend our code.
Now look at the value of the input REG:


Pic 3

Change value of REG in the graphical code, so you get the real value is in our system.

4. Basic structure of video devices and the DSDT added
of our code.
4a. Example using a laptop.
Let's open the DSDT.dsl and look through the keyword "device" until we get to:


CODE

Device (AGP)


We will find the device tree in this way (different colors for each device):
In short without our code:


CODE

Device (AGP) (Dispositivo madre)

{

Nombre y dirección.

DEVICE VID0 (Dispositivo hijo)

{

   Nombre y dirección de VID0

Inicio del método

{

   Método

   }

   Device (TV)

Device (CRT)

   Device (LCD)

Device (DVI)

}

}


Briefly our code:


CODE

Device (AGP) (Dispositivo madre)

{

Nombre y dirección.

DEVICE VID0 (Dispositivo hijo)

{

   Nombre y dirección de VID0

Inicio del método

{

   Método

   }

   Device (TV)

Device (CRT)

   Device (LCD)

Device (DVI)

Device (GFX) <-------- Nuestro codigo.

}

}

Extended:


CODE

Device (AGP)

{

Name (_ADR, 0x00010000)

Device (VID)

{

Name (_ADR, Zero)

Method (_DOS, 1, NotSerialized)

{

Store (Arg0, MIS4)

SMI (0x9E, MIS4)

}

Method (_DOD, 0, NotSerialized)

{

Store (SMI (0x6D, Zero), Local0)

If (LEqual (Local0, One))

{

Return (Package (0x04)

{

0x00010100,

0x00010200,

0x00010110,

0x00010210

})

}

Else

{

Return (Package (0x04)

{

0x00010100,

0x00010200,

0x00010118,

0x00010120

})

}

}

Device (TV)

{

Method (_ADR, 0, NotSerialized)

{

Return (0x0200)

}

Method (_DCS, 0, NotSerialized)

{

Store (SMI (0x8E, 0x04), Local0)

Return (Local0)

}

Method (_DGS, 0, NotSerialized)

{

Store (SMI (0x99, 0x04), Local0)

Return (Local0)

}

Method (_DSS, 1, NotSerialized)

{

DSS (0x04, Arg0)

}

}

Device (CRT)

{

Method (_ADR, 0, NotSerialized)

{

Return (0x0100)

}

Method (_DCS, 0, NotSerialized)

{

Store (SMI (0x8E, 0x02), Local0)

Return (Local0)

}

Method (_DGS, 0, NotSerialized)

{

Store (SMI (0x99, 0x02), Local0)

Return (Local0)

}

Method (_DSS, 1, NotSerialized)

{

DSS (0x02, Arg0)

}

}

Device (LCD)

{

Method (_ADR, 0, NotSerialized)

{

Store (SMI (0x6D, Zero), Local0)

If (LEqual (Local0, One))

{

Return (0x0110)

}

Else

{

Return (0x0118)

}

}

Method (_DCS, 0, NotSerialized)

{

Store (SMI (0x8E, One), Local0)

Return (Local0)

}

Method (_DGS, 0, NotSerialized)

{

Store (SMI (0x99, One), Local0)

Return (Local0)

}

Method (_DSS, 1, NotSerialized)

{

DSS (One, Arg0)

}

Name (BTVL, 0x64)

Name (DBCL, Package (0x0A) {})

Method (_BCL, 0, NotSerialized)

{

SX10 ()

SX30 (0x19)

SX30 (Zero)

SX11 ()

Store (SX40 (), Index (DBCL, Zero))

Store (SX40 (), Index (DBCL, One))

Store (SX40 (), Index (DBCL, 0x02))

Store (SX40 (), Index (DBCL, 0x03))

Store (SX40 (), Index (DBCL, 0x04))

Store (SX40 (), Index (DBCL, 0x05))

Store (SX40 (), Index (DBCL, 0x06))

Store (SX40 (), Index (DBCL, 0x07))

Store (SX40 (), Index (DBCL, 0x08))

Store (SX40 (), Index (DBCL, 0x09))

SX12 ()

Return (DBCL)

}

Method (_BCM, 1, NotSerialized)

{

SX10 ()

SX30 (0x19)

SX30 (One)

SX30 (Arg0)

Store (Arg0, BTVL)

SX11 ()

SX12 ()

}

Method (_BQC, 0, NotSerialized)

{

SX10 ()

SX30 (0x19)

SX30 (0x02)

SX11 ()

Store (SX40 (), Local0)

Store (Local0, BTVL)

SX12 ()

Return (Local0)

}

}

Device (DVI)

{

Method (_ADR, 0, NotSerialized)

{

Store (SMI (0x6D, Zero), Local0)

If (LEqual (Local0, One))

{

Return (0x0210)

}

Else

{

Return (0x0120)

}

}

Method (_DCS, 0, NotSerialized)

{

Store (SMI (0x8E, 0x08), Local0)

Return (Local0)

}

Method (_DGS, 0, NotSerialized)

{

Store (SMI (0x99, 0x08), Local0)

Return (Local0)

}

Method (_DSS, 1, NotSerialized)

{

DSS (0x08, Arg0)

}

}

Device (GFX0) <------------- Comienzo de nuestro codigo

{

Name (_ADR, Zero)

Name (_SUN, One)

Method (_DSM, 4, NotSerialized)

{

Store (Package (0x1A)

{

"@0,compatible",

Buffer (0x0B)

{

"NVDA,NVMac"

},

"@0,device_type",

Buffer (0x08)

{

"display"

},

"@0,name",

Buffer (0x0F)

{

"NVDA,Display-A"

},

"@1,compatible",

Buffer (0x0B)

{

"NVDA,NVMac"

},

"@1,device_type",

Buffer (0x08)

{

"display"

},

"@1,name",

Buffer (0x0F)

{

"NVDA,Display-B"

},

"NVCAP",

Buffer (0x18)

{

/* 0000 */ 0x04, 0x00, 0x00, 0x00, 0x00, 0x00, 0x01, 0x00,

/* 0008 */ 0x06, 0x00, 0x00, 0x00, 0x00, 0x00, 0x00, 0x00,

/* 0010 */ 0x00, 0x00, 0x00, 0x00

},

"NVPM",

Buffer (0x20)

{

/* 0000 */ 0x01, 0x00, 0x00, 0x00, 0x00, 0x00, 0x00, 0x00,

/* 0008 */ 0x00, 0x00, 0x00, 0x00, 0x00, 0x00, 0x00, 0x00,

/* 0010 */ 0x00, 0x00, 0x00, 0x00, 0x00, 0x00, 0x00, 0x00,

/* 0018 */ 0x00, 0x00, 0x00, 0x00

},

"VRAM,totalsize",

   Buffer (0x04)

   {

0x00, 0x00, 0x00, 0x20

},

"device_type",

Buffer (0x0D)

{

"NVDA,GeForce"

},

"model",

Buffer (0x1F)

{

"Nvidia GeForce 8600M GS 256 MB"

},

"rom-revision",

Buffer (0x20)

{

"DSDT ROM v.1a #irc.osx86.es (c)"

},

"reg",

   Buffer (0x78)

{

/* 0000 */ 0x00, 0x00, 0x01, 0x00, 0x00, 0x00, 0x00, 0x00,

   /* 0008 */ 0x00, 0x00, 0x00, 0x00, 0x00, 0x00, 0x00, 0x00,

   /* 0010 */ 0x00, 0x00, 0x00, 0x00, 0x10, 0x00, 0x01, 0x02,

   /* 0018 */ 0x00, 0x00, 0x00, 0x00, 0x00, 0x00, 0x00, 0x00,

   /* 0020 */ 0x00, 0x00, 0x00, 0x00, 0x00, 0x00, 0x00, 0x01,

   /* 0028 */ 0x14, 0x00, 0x01, 0x42, 0x00, 0x00, 0x00, 0x00,

   /* 0030 */ 0x00, 0x00, 0x00, 0x00, 0x00, 0x00, 0x00, 0x00,

   /* 0038 */ 0x00, 0x00, 0x00, 0x10, 0x1C, 0x00, 0x01, 0x02,

   /* 0040 */ 0x00, 0x00, 0x00, 0x00, 0x00, 0x00, 0x00, 0x00,

   /* 0048 */ 0x00, 0x00, 0x00, 0x00, 0x00, 0x00, 0x00, 0x02,

   /* 0050 */ 0x24, 0x00, 0x01, 0x01, 0x00, 0x00, 0x00, 0x00,

   /* 0058 */ 0x00, 0x00, 0x00, 0x00, 0x00, 0x00, 0x00, 0x00,

   /* 0060 */ 0x80, 0x00, 0x00, 0x00, 0x30, 0x00, 0x01, 0x02,

   /* 0068 */ 0x00, 0x00, 0x00, 0x00, 0x00, 0x00, 0x00, 0x00,

   /* 0070 */ 0x00, 0x00, 0x00, 0x00, 0x00, 0x00, 0x02, 0x00

}

}, Local0)

DTGP (Arg0, Arg1, Arg2, Arg3, RefOf (Local0))

Return (Local0)

}

   } <------------- Fin de nuestro codigo (No incluir esta reseña en el DSDT)

}

}


4b. Example using a computer tower.
We will seek to explore our IOregistry video card, and here we notice a difference with the code on the laptop, and is as follows:
In the computer tower, we will find the video devices that we saw in the previous example, LCD, CRT etc., except in cases of integrated graphics, we
ioreg to look at the site of our graph, usually it be under some PCI devices such as PC1, P0P1 etc. .. depends
motherboard manufacturer, but sometimes we do not see the device with a clear demarcation in ioreg and appears as PCI2BRIDGE or in this case PCIBRIDGE
add the entry directly into the ICP as all these devices have the device "mother" to the main PCI ..... In plates with integrated graphics
we can find something closer to the example of the laptop, but we must not fall into errors, the code must be added in the code
for the device that is located not on our card and the integrated video board.
Set in the PCI code.


CODE

Device (PCI0)

{

Name (_HID, EisaId ("PNP0A03"))

Name (_ADR, 0x00)

Name (_UID, 0x01)

Name (_BBN, 0x00)

Method (_S3D, 0, NotSerialized)

{

If (LEqual (OSFL, 0x02))

{

Return (0x02)

}

Else

{

Return (0x03)

}

}

   Method (_STA, 0, NotSerialized)

{

Return (0x0F)

}

Method (_CRS, 0, NotSerialized)

{

Name (BUF0, ResourceTemplate ()

{


The code continues much longer, but we will take this as a reference.
Here we would have our code added to the PCI video:


CODE

Device (PCI0)

{

Name (_HID, EisaId ("PNP0A03"))

Name (_ADR, 0x00)

Name (_UID, 0x01)

Name (_BBN, 0x00)

   Device (PEGP)

{

Name (_ADR, 0x00060000)

Device (GFX0)

{

Name (_ADR, Zero)

Name (_SUN, One)

Method (_DSM, 4, NotSerialized)

{

Store (Package (0x1C)

{

   "AAPL,slot-name",

   Buffer (0x0D)

   {

"PCI-E Slot-1"

}, },

"@0,compatible",

Buffer (0x0B)

{

"NVDA,NVMac"

},

"@0,device_type",

Buffer (0x08)

{

"display"

},

"@0,name",

Buffer (0x0F)

{

"NVDA,Display-A"

},

"@1,compatible",

Buffer (0x0B)

{

"NVDA,NVMac"

},

"@1,device_type",

Buffer (0x08)

{

"display"

},

"@1,name",

Buffer (0x0F)

{

"NVDA,Display-B"

},

"NVCAP",

Buffer (0x18)

{

/* 0000 */ 0x04, 0x00, 0x01, 0x00, 0x00, 0x00, 0x03, 0x00,

/* 0008 */ 0x0C, 0x00, 0x00, 0x00, 0x00, 0x00, 0x00, 0x07,

/* 0010 */ 0x00, 0x00, 0x00, 0x00

},

"NVPM",

Buffer (0x20)

{

/* 0000 */ 0x01, 0x00, 0x00, 0x00, 0x00, 0x00, 0x00, 0x00,

/* 0008 */ 0x00, 0x00, 0x00, 0x00, 0x00, 0x00, 0x00, 0x00,

/* 0010 */ 0x00, 0x00, 0x00, 0x00, 0x00, 0x00, 0x00, 0x00,

/* 0018 */ 0x00, 0x00, 0x00, 0x00

},

"VRAM,totalsize",

Buffer (0x04)

{

0x00, 0x00, 0x00, 0x20

},

"device_type",

Buffer (0x0D)

{

"NVDA,GeForce"

},

"model",

Buffer (0x22)

{

"POV Nvidia GeForce 8800 GT 512 MB"

},

"rom-revision",

Buffer (0x23)

{

"DSDT ROM v.1a by #irc.osx86.es (c)"

},

"reg",

Buffer (0x78)

{

/* 0000 */ 0x00, 0x00, 0x01, 0x00, 0x00, 0x00, 0x00, 0x00,

/* 0008 */ 0x00, 0x00, 0x00, 0x00, 0x00, 0x00, 0x00, 0x00,

/* 0010 */ 0x00, 0x00, 0x00, 0x00, 0x10, 0x00, 0x01, 0x02,

/* 0018 */ 0x00, 0x00, 0x00, 0x00, 0x00, 0x00, 0x00, 0x00,

/* 0020 */ 0x00, 0x00, 0x00, 0x00, 0x00, 0x00, 0x00, 0x01,

/* 0028 */ 0x14, 0x00, 0x01, 0x42, 0x00, 0x00, 0x00, 0x00,

/* 0030 */ 0x00, 0x00, 0x00, 0x00, 0x00, 0x00, 0x00, 0x00,

/* 0038 */ 0x00, 0x00, 0x00, 0x10, 0x1C, 0x00, 0x01, 0x02,

/* 0040 */ 0x00, 0x00, 0x00, 0x00, 0x00, 0x00, 0x00, 0x00,

/* 0048 */ 0x00, 0x00, 0x00, 0x00, 0x00, 0x00, 0x00, 0x02,

/* 0050 */ 0x24, 0x00, 0x01, 0x01, 0x00, 0x00, 0x00, 0x00,

/* 0058 */ 0x00, 0x00, 0x00, 0x00, 0x00, 0x00, 0x00, 0x00,

/* 0060 */ 0x80, 0x00, 0x00, 0x00, 0x30, 0x00, 0x01, 0x02,

/* 0068 */ 0x00, 0x00, 0x00, 0x00, 0x00, 0x00, 0x00, 0x00,

/* 0070 */ 0x00, 0x00, 0x00, 0x00, 0x00, 0x00, 0x02, 0x00

}

}, Local0)

DTGP (Arg0, Arg1, Arg2, Arg3, RefOf (Local0))

Return (Local0)

}

}

}

Method (_S3D, 0, NotSerialized)

{

If (LEqual (OSFL, 0x02))

{

Return (0x02)

}

Else

{

Return (0x03)

}

}

Method (_STA, 0, NotSerialized)

{

Return (0x0F)

}


5. Compiling and testing.

Now we only save the file and compile it to check for syntax errors or not.
Open the terminal, as root logueamos us and tune into the folder where we have our DSDT (cd "path to folder") Keyboards
iasl dsdt.dsl

If errors occur is that you put the wrong charger, if warnings occur, is that it may come before, not do them much attention now.
If you have them, make certain that brackets have not been orphaned, or deleted.
If not, you can rename the file you have in DSDT.aml the root of the system to "DSDTold.aml" and copy the new (to open created when compiling) to the root of the disk.
We delete the injector that we are using (Nvkush, Nvinject or NVdarwin) or EFI string if we use this method and proceed to reboot. If our site has
been right and proper coding of our graphics should be fully recognized and activated yet.
If you fail the new DSDT.aml (eg freezes the system), you can boot the system using the command DSDTold.aml DSDT = (introducidlo when you see the boot
chameleon by pressing F8 and selecting the installation of Leopard).
We hope that this third guide on the possibilities of DSDT system has been of your liking.
We will be updating the guidelines as new data have ....


ANNEX
In this annex, see how to optimize a laptop, removing the graphic code is not used by OSX, obtaining with this a greater fluidity in the video
because the register is only the code that is functional, our code added.
In the summary view can better see the tree of devices, so we can determine who should stay and who must not be erased to useful code and
prepare for the inclusion of our code of video.
In summary, our code should look like in after deleting unnecessary devices:
BEFORE:


CODE

Device (AGP)

{

Nombre y dirección.

Cabezera de VID0

{

   Nombre y dirección de VID0

Inicio del método

{

   Método

   }

   Device (TV)

Device (CRT)

   Device (LCD)

Device (DVI)

}

}


LATER:


CODE

Device (AGP)

{

Nombre y dirección.

Cabezera de VID0

{

   Nombre y dirección de VID0

Inicio del método

{

   Método

   }

   }

}

}


Extended BEFORE:


CODE

Device (AGP)

{

Name (_ADR, 0x00010000)

Device (VID)

{

Name (_ADR, Zero)

Method (_DOS, 1, NotSerialized)

{

Store (Arg0, MIS4)

SMI (0x9E, MIS4)

}

Method (_DOD, 0, NotSerialized)

{

Store (SMI (0x6D, Zero), Local0)

If (LEqual (Local0, One))

{

Return (Package (0x04)

{

0x00010100,

0x00010200,

0x00010110,

0x00010210

})

}

Else

{

Return (Package (0x04)

{

0x00010100,

0x00010200,

0x00010118,

0x00010120

})

}

}

Device (TV)

{

Method (_ADR, 0, NotSerialized)

{

Return (0x0200)

}

Method (_DCS, 0, NotSerialized)

{

Store (SMI (0x8E, 0x04), Local0)

Return (Local0)

}

Method (_DGS, 0, NotSerialized)

{

Store (SMI (0x99, 0x04), Local0)

Return (Local0)

}

Method (_DSS, 1, NotSerialized)

{

DSS (0x04, Arg0)

}

}

Device (CRT)

{

Method (_ADR, 0, NotSerialized)

{

Return (0x0100)

}

Method (_DCS, 0, NotSerialized)

{

Store (SMI (0x8E, 0x02), Local0)

Return (Local0)

}

Method (_DGS, 0, NotSerialized)

{

Store (SMI (0x99, 0x02), Local0)

Return (Local0)

}

Method (_DSS, 1, NotSerialized)

{

DSS (0x02, Arg0)

}

}

Device (LCD)

{

Method (_ADR, 0, NotSerialized)

{

Store (SMI (0x6D, Zero), Local0)

If (LEqual (Local0, One))

{

Return (0x0110)

}

Else

{

Return (0x0118)

}

} If (LEqual (Local0, One))


Method (_DCS, 0, NotSerialized)

{

Store (SMI (0x8E, One), Local0)

Return (Local0)

}

Method (_DGS, 0, NotSerialized)

{

Store (SMI (0x99, One), Local0)

Return (Local0)

}

Method (_DSS, 1, NotSerialized)

{

DSS (One, Arg0)

}

Name (BTVL, 0x64)

Name (DBCL, Package (0x0A) {})

Method (_BCL, 0, NotSerialized)

{

SX10 ()

SX30 (0x19)

SX30 (Zero)

SX11 ()

Store (SX40 (), Index (DBCL, Zero))

Store (SX40 (), Index (DBCL, One))

Store (SX40 (), Index (DBCL, 0x02))

Store (SX40 (), Index (DBCL, 0x03))

Store (SX40 (), Index (DBCL, 0x04))

Store (SX40 (), Index (DBCL, 0x05))

Store (SX40 (), Index (DBCL, 0x06))

Store (SX40 (), Index (DBCL, 0x07))

Store (SX40 (), Index (DBCL, 0x08))

Store (SX40 (), Index (DBCL, 0x09))

SX12 ()

Return (DBCL)

}

Method (_BCM, 1, NotSerialized)

{

SX10 ()

SX30 (0x19)

SX30 (One)

SX30 (Arg0)

Store (Arg0, BTVL)

SX11 ()

SX12 ()

}

Method (_BQC, 0, NotSerialized)

{

SX10 ()

SX30 (0x19)

SX30 (0x02)

SX11 ()

Store (SX40 (), Local0)

Store (Local0, BTVL)

SX12 ()

Return (Local0)

}

}

Device (DVI)

{

Method (_ADR, 0, NotSerialized)

{

Store (SMI (0x6D, Zero), Local0)

If (LEqual (Local0, One))

{

Return (0x0210)

}

Else

{

Return (0x0120)

}

}

Method (_DCS, 0, NotSerialized)

{

Store (SMI (0x8E, 0x08), Local0)

Return (Local0)

}

Method (_DGS, 0, NotSerialized)

{

Store (SMI (0x99, 0x08), Local0)

Return (Local0)

}

Method (_DSS, 1, NotSerialized)

{

DSS (0x08, Arg0)

}

}

   }

   }


Extended LATER:


CODE

Device (AGP)

{

Name (_ADR, 0x00010000)

Device (VID)

{

Name (_ADR, Zero)

Method (_DOS, 1, NotSerialized)

{

Store (Arg0, MIS4)

SMI (0x9E, MIS4)

}

Method (_DOD, 0, NotSerialized)

{

Store (SMI (0x6D, Zero), Local0)

If (LEqual (Local0, One))

{

Return (Package (0x04)

{

0x00010100,

0x00010200,

0x00010110,

0x00010210

})

}

Else

{

Return (Package (0x04)

{

0x00010100,

0x00010200,

0x00010118,

0x00010120

})

}

}

   }

}


Obviously, if we are to compile after erasing all those devices, we report a number of errors will disappear as many references as well
that we look for the lines marked as errors and remove them as follows:


CODE

Errores generados al compilar cuando eliminamos el device "LCD":

/Users/xxx/Desktop/pruebas dsdt/Tools/DSDToriginal.dsl 721: Notify (\_SB.PCI0.AGP.VID.LCD, 0x86)

Error 4063 - Object does not exist ^ (\_SB.PCI0.AGP.VID.LCD)

/Users/xxx/Desktop/pruebas dsdt/Tools/DSDToriginal.dsl 726: Notify (\_SB.PCI0.AGP.VID.LCD, 0x87)

Error 4063 - Object does not exist ^ (\_SB.PCI0.AGP.VID.LCD)


We move to the line 721 and 726 as shown and we find:

CODE

If (LGreaterEqual (OSID (), 0x20))

{

If (And (Local0, 0x04))

{

Notify (\_SB.PCI0.AGP.VID.LCD, 0x86)

Notify (\_SB.PCI0.VID.LCD, 0x86)

}

If (And (Local0, 0x02))

{

Notify (\_SB.PCI0.AGP.VID.LCD, 0x87)

Notify (\_SB.PCI0.VID.LCD, 0x87)

}

}


If we remove those two entries, and compile again, the errors are gone.

CODE

If (LGreaterEqual (OSID (), 0x20))

{

If (And (Local0, 0x04))

{

Notify (\_SB.PCI0.VID.LCD, 0x86)

}

If (And (Local0, 0x02))

{

Notify (\_SB.PCI0.VID.LCD, 0x87)

}

}


It is recommended to compile every time you delete an entry, so you can gradually correct our code.
Guide by: Roisoft and Pere

'Hackintosh > DSDT' 카테고리의 다른 글

DSDT 생성  (4) 2010.06.19
8600 GTS 256 MB DSDT  (0) 2010.02.18
Fix'y DSDT for ASUS P5W DH Deluxe and Snow & Leopard  (0) 2009.11.06
Windows용 DSDT 추출 및 Patcher  (0) 2009.10.30
Enabling ACPI, EIST, etc for ASUS P5W DH DELUXE  (0) 2009.10.25
:
Posted by Ritz®™
이 방법보다는 다음링크를 참조하여 "Graphic Enabler" 를 이용하여 설정하여 본다음 안된다면 차선책으로 이용하세요.


Requirement:

우선 Leopard가 설치되어 있다는 전제하에 GTS 250 그래픽 카드를 설정하여 주는 방법입니다.

Snow Leopard, 10.6.2 에서는 적용 안되는 경우도 있습니다.

그리고 nvidia 그래픽 카드의 드라이버는 원본 파일 그대로를 사용합니다.

혹여 그래픽 카드를 위해 해킨용 그래픽 카드 드라이버(NVInject, NVKush, Natit.kext 등)를 설치하였다면 제거하여 주시고 또는 원본이미지에서 추출하여 설치하여 주십시요.

당근 9800 계열 그래픽 카드도 마찬가지 방법입니다만, 9800 계열은 아래 링크된 툴이 달라지므로 아래 GFX String은 다운로드 하지 마시고 9800전용으로 받으시면 됩니다.

당근 10.5.7 버전 이후부터 이 방법을 사용합니다. 10.5.8 권고.

기존에 이것저것 잡다하게 Nvidia 관련 설치한 드라이버가 있었다면 다 제거하여 주시고 순수한 Retail 드라이버를 이용하셔야 합니다.

준비물.

- GFX String 다운로드 받기 << GTS-250용 EFI String, 자기 카드에 맞는 드라이버를 다운로드 하세요.

- GFX String 다운로드 받기 << GTS-260용 EFI String, 자기 카드에 맞는 드라이버를 다운로드 하세요.

- GFX String 다운로드 받기  << GTS-280용 EFI String

- Files for Quadro FX 4500 512mb cards:Click to Download

- Path Finder


1. 다운로드 받은 파일을 적당한 곳에 풀어주면 다음과 같은 화일이 보일 것입니다.


2. 터미널을 이용하여 다음과 같이 명령어를 실행합니다. 그래픽 카드가 장착된 pci 슬롯을 확인하기 위한 작업입니다.

Open a terminal and enter commands

./gfxutil -f display


3. 터미날에서 DevicePath 부분의 “PciRoot(0x0)/Pci(0x1,0x0)/Pci(0x0,0x0)” 부분만 복사하여 in.plist 화일의 아래 그림과 같이 해당하는 부분에 붙여준다.

Text Editor를 사용해도 좋습니다.


4. 다음은 in.plist 화일 하단의 Model Name등을 다음과 같이 원하는 값으로 수정하여 줍니다. Text Editor를 사용해도 좋습니다.

<key>model</key>

<string>NVIDIA GeForce GTS 250 1024MB</string>

<key>name</key>

<string>NVDA,Parent</string>

<key>rom-revision</key>

<string>3172a</string>


5. in.plist 화일 수정을 마치고 나면 EFI-String 값을 얻기 위하여 다음과 같은 명령어를 입력합니다.

Open a terminal and enter commands


./gfxutil -i xml -o hex ./in.plist ./output.hex


6. 새로이 만들어진 out.hex 화일을 텍스트 에디터 등으로 열어 확인하고 내용을 복사(CMD+C)합니다.


7. /Library/Preferences/SystemConfiguration/com.apple.Boot.plist 화일을 vi나 텍스트 에디터등으로 열어봅니다.

다음은 일반적인 화일내용입니다.

###############################################################

<key>Kernel Flags</key>

<string>Yes</string>


8. /Library/Preferences/SystemConfiguration/com.apple.Boot.plist 화일을 vi나 텍스트 에디터등으로 열어 다음과 같이 device-properties 항목을 추가하여 줍니다.


Reboot!


:
Posted by Ritz®™
2009. 10. 29. 23:58

Snow Leopard용 Boot -132 Hackintosh/BOOT-1322009. 10. 29. 23:58

UNFORTUNATELY THIS IS INTEL SSE3 ONLY AND WORKS ONLY ON A COMPLETE VANILLA CAPABLE PC

First of all, Thanks kdetech,

안타깝게도 Intel sse3 CPU와 VANILLA 커널이 적용되는 PC에만 사용할 수 있습니다.

준비물 :

- Snow용 Boot-132 CD다운로드

- 4G Retail Snow Leopard 다운로드

다음 그림을 보시면 Leopard용 Boot-132를 사용하셨었던 분들은 아실 수 있을 것입니다.


initrd.img 화일을 열어보면 다음과 같이 드라이버(kexts)들을 설치할 수 있습니다.

윈도우즈에서는 Transmac 소프트웨어를 이용하여 수정할 수 있습니다.

다운로드 받은 CD로 부팅을 하면 Snow Leopard 파티션이 보이실 것입니다.

혹은 USB설치 이미지가 있다면 선택하시면 설치 과정으로 진입하게 됩니다.


:
Posted by Ritz®™
2009. 10. 28. 03:07

Chameleon 설치 가이드 Hackintosh/Chameleon2009. 10. 28. 03:07


Update : http://cafe.naver.com/uefi/6

- 리얼맥 시스템에 조금 더 가깝게 만들어주는 부트로더로 요즈음 더 인기가 많은 부트로더를 소개합니다.

Chameleon 설치 가이드

Chameleon은 오픈소스코드를 충실하게 준수하는 GUI환경의 부트로더입니다.
Leopard는 물론, Snow Leopard, Lion, Mountain Lion(10.8.?) 까지 지원을 하여 주고 조금은 복잡하지만, Mac OS X 사용자들에게 많은 사랑을 받아오는 부트로더입니다.
물론, 2012년 Chimera 라는 이름으로 바뀌긴 했지만 어쨌든 혼용하여 여전히 사용되고 있습니다.
Windows 하드디스크가 있다면 일단 사타케이블을 떼어놓고 설치작업 합니다.  물론, mbr이든 guid 파티션이든 상관없이 설치할 수 있습니다.
I. Chameleon을 다운로드 받습니다.
II. 압축을 풀면 다음과 같은 화일이 생성됩니다.


III. 패키지를 더블클릭하면 설치과정이 진행됩니다. 계속을 누릅니다.

IV. 계속을 누릅니다.


V. 계속을 누르고 사용권 계약에서 동의를 클릭합니다.


VI. 설치할 대상 디스크를 선택하고 계속을 누릅니다.


VII. 사용자화를 클릭하면 다음과 같은 화면이 나옵니다.


VIII. 여러가지 선택사항들이 있지만, 처음 설치하시는 분들은 그대로 설치에 들어갑니다.
특히,  EFI 선택은 시스템 안정화를 시키고 난 후 설치해주어도 늦지 않습니다.  안정화도 안된 상황에서  EFI 문제로 질문을 하시는 분들을 보면 답답합니다.하드디스크 부팅으로 안정화 시킨다음 EFI로 설정해 주시는 것이 여러사람 피곤하게 하지 않고 스스로의 정신건강에도 좋습니다.


VIIII. 자 이제 설치를 마쳤습니다. 역시나 dsdt.aml, com.apple.Boot.plist, 그리고 Extra 폴더내의 해킨 드라이버 설치 작업이 남았습니다.
X. Chameleon을 설치하고 난 후, 중요한 파일들의 목록입니다. /Extra/Extensions 폴더에 자신의 시스템에 맞는 해킨 드라이버를 설치하여 줍니다.
Kext 종류

- 위 그림에서 AHCIPortInjector.kext 혹은 IOAHCIBlockStorageInjector.kext 와 fakesmc.kext화일은 기본적으로 들어가야 합니다.
- 또한 메인보드에서 추출한 dsdt 패치화일(dsdt.aml) 과 시스템 설정에 필요한 smbios.plist 화일이 반드시 필요하겠지요.
- 네 아래 그림과 같이 핵심점일 화일들은 다 들어가 있습니다.
- com.apple.Boot.plist 화일은 Chimera로 변경된 이후 요즈음은 org.chameleon.Boot.plist 화일명으로 변경되었습니다.

- Bak 화일들은 신경쓰지 마세요.  백업 화일들입니다.

Chameleon

부트로드를 설치하는 방법에는 여러가지 방법이 있는데 Multibeast를 이용하여 설치할 수도 있습니다.

http://osx86.tistory.com/1334


:
Posted by Ritz®™
2009. 10. 25. 05:33

efi driver Hackintosh/XPC2009. 10. 25. 05:33

1. I'm not sure I can use following efi driver from rEFIt.

2. xpc support Snow Leopard, becaus of my SnowLeopard partition is not appeard in XPC.

3. Is there any ATI Grphic Card driver for ATI HD 3650 and may I have url for downloading?

'Hackintosh > XPC' 카테고리의 다른 글

UEFI-Boot  (0) 2010.04.02
XPC bootloader Update  (0) 2009.10.27
XPC Gui v0.50a  (0) 2009.10.21
XPC Menu  (0) 2009.06.15
XPC 설치  (0) 2009.05.18
:
Posted by Ritz®™