달력

5

« 2024/5 »

  • 5
  • 6
  • 7
  • 8
  • 9
  • 10
  • 11
  • 12
  • 13
  • 14
  • 15
  • 16
  • 17
  • 18
  • 19
  • 20
  • 21
  • 22
  • 23
  • 24
  • 25
  • 26
  • 27
  • 28
  • 29
  • 30
  • 31
2012. 6. 20. 10:04

ARD come back in Mountain Lion DP4 Hackintosh/Tip2012. 6. 20. 10:04

ARD 3.5.3 but, it looks ARD 3.5.2


ARD 3.5.3


If you wanna beta of Remote Desktop 3.6 Admin and want to use version 3.5 on Mountain Lion DP3. It will be helpful for you and it need a trick for working. 

If you already have ARD in Mountain Lion, just skip to 3.

1. install the version of Remote Desktop 3.5 Admin . Then upgrade to 3.5.1. 
2. download and install Pacifist that help you.
3. go to download page update Apple Remote Desktop Client version 3.5.3 . 
4. open the package with Pacifist and selecting the root of the package and click install.
5. restart the computer and Remote Desktop running! 


This way is also working on Mountain Lion GM.

:
Posted by uno-ani
2012. 5. 30. 03:32

rEFIt 제거하기 Hackintosh/Tip2012. 5. 30. 03:32

rEFIt 를 제거하는 방법은 설치를 어떻게 했느냐에 따라 달라지게 된다.

이 제거 과정은 rEFIt 를 Mac OS X 파티션에 설치했다는 전제하에 설명한다.

만약, rEFIt 가 다른 볼륨에 설치되어 있다면, 단순히 다른 볼륨으로 부팅하거나 해당 볼륨을 제거하면 된다.

rEFItBlesser를 사용하고 있을때 제거하는 방법

만약 설치 패키지를 이용하여 설치하였다면 다음 방법을 이용한다.

While booted into Mac OS X 로 부팅하여 “efi” 폴더를 다른 이름으로 변경하거나 제거한다. 100% 제거하기 위해서는 “Library/StartupItems” 폴더내의 “rEFItBlesser”를 제거한다.

매뉴얼로 설치했을 경우 제거하는 방법

우선, 유틸리티의 시동디스크(Startup Disk)를 실행하여 부팅할 “Mac OS X”를 선택한다.

Mac OS X 볼륨을 다시 bless 할 것이고 펌웨어의 설정에 따라 부팅하게 된다. 이 작업이 완료된 후 "efi"폴더를 제거하거나 폴더명을 변경한다.

Troubleshooting

rEFIt를 제거하고 난 후 더 이상 Mac OS X로 부팅이 안된다면, Mac OS X Install Disc 로 부팅한다. (부팅하는 동안 ‘C’키를 지긋이 누르고 있는다.) 그리고 시동디스크(Startup Disk)를 실행하고 난 후 부팅 할 “Mac OS X” 볼륨을 선택한다.


http://osx86.tistory.com/1116

:
Posted by uno-ani
2012. 5. 30. 01:33

Remote Desktop 제거하는 방법 Hackintosh/Tip2012. 5. 30. 01:33

Administration software

To remove the administrator software:

  1. Drag the Remote Desktop application to the Trash.
  2. Empty the Trash.
  3. Delete the ARD database from /var/db/RemoteManagement/ by executing these commands in Terminal:

    sudo rm -rf /var/db/RemoteManagement
    sudo rm /Library/Preferences/com.apple.RemoteDesktop.plist
    rm ~/Library/Preferences/com.apple.RemoteDesktop.plist


    For Apple Remote Desktop 3, run these commands in Terminal as well:

    sudo rm -r /Library/Application\ Support/Apple/Remote\ Desktop/
    rm -r ~/Library/Application\ Support/Remote\ Desktop/

Mac OS X 10.3 and 10.4 clients

Normally, you should not try to remove Apple Remote Desktop from Mac OS X 10.3 or later clients, because it is an integral part of the operating system. Simply disable the client in Sharing preferences, if desired.

However, if you installed Apple Remote Desktop 3 (admin or client) and wish to revert to Apple Remote Desktop 2, use the Terminal commands listed below in the 10.2 section, then reinstall Apple Remote Desktop 2.

Mac OS X 10.2 clients

To disable Apple Remote Desktop client software:

  1. On the client computer, open System Preferences and click Remote Desktop. If necessary, click the lock button to authenticate as an administrator of that computer.
  2. Deselect "Make Apple Remote Desktop active on this computer."
  3. Deselect the checkbox of each account that was enabled for ARD. (Alternatively, you can open Terminal and use the kill command to stop the ARDHelper process, followed by the ARDAgent process.)

To Remove Apple Remote Desktop, execute these commands in Terminal:


sudo rm -rf /System/Library/CoreServices/Menu\ Extras/RemoteDesktop.menu
sudo rm -rf /System/Library/CoreServices/RemoteManagement/
sudo rm -rf /System/Library/PreferencePanes/ARDPref.prefPane
sudo rm -rf /System/Library/StartupItems/RemoteDesktopAgent/
sudo rm /Library/Preferences/com.apple.ARDAgent.plist
sudo rm /Library/Preferences/com.apple.RemoteManagement.plist

'Hackintosh > Tip' 카테고리의 다른 글

ARD come back in Mountain Lion DP4  (0) 2012.06.20
rEFIt 제거하기  (0) 2012.05.30
MacKeeper 삭제하는 방법  (2) 2012.05.23
대쉬보드 백그라운드 변경하는 방법  (0) 2012.05.16
사파리 활용하기  (0) 2012.05.12
:
Posted by uno-ani
2012. 5. 23. 23:17

MacKeeper 삭제하는 방법 Hackintosh/Tip2012. 5. 23. 23:17


Update : http://cafe.naver.com/uefi/2168


Mac OS X 에서 유일하게 스팸성 어플리케이션이라는 생각이 든다.

차라리 Magican 을 이용하는 것이 적절해 보인다.

또한  Magican 을 이용하여 MacKeeper를 제거할 수도 있다.

느닷없이 나타나는 맥키퍼

유료로 사용하면 어떨지 모르겠지만 어떤 소프트웨어인지 호기심에 설치했다가 제거를 하기 위해서는 다음과 같은 작업이 필요하다.

호기심의 대가치고는 T T

아래 글의 모든 화일을 제거한다.


/Applications/MacKeeper.app

In the System Library:
- /Library/Application Support/MacKeeper
- /Library/LaunchDaemons/com.zeobit.MacKeeper.plugin.AntiTheft.daemon
- /Library/LaunchDaemons/com.zeobit.MacKeeper.AntiVirus

In your User Library:
- /Users/yourname/Library/Preference/com.zeobit.MacKeeper.Helper.plist
- /Users/yourname/Library/LaunchAgents/com.zeobit.MacKeeper.Helper
- /Users/yourname/Library/Caches/com.zeobit.MacKeeper
- /Users/yourname/Library/LaunchAgents/com.zeobit.MacKeeper.plugin.Backup.agent
- /Users/yourname/Library/Preferences/com.zeobit.MacKeeper.plist


참고:http://osx86.tistory.com/1116

'Hackintosh > Tip' 카테고리의 다른 글

rEFIt 제거하기  (0) 2012.05.30
Remote Desktop 제거하는 방법  (0) 2012.05.30
대쉬보드 백그라운드 변경하는 방법  (0) 2012.05.16
사파리 활용하기  (0) 2012.05.12
Disable Time Machine Local Backups in Mac OS X Lion  (2) 2012.05.11
:
Posted by uno-ani

Mac OS X Lion 대쉬보드 백그라운드 변경하는 방법:


DashBoard

  1. 1. png 이미지 파일명을 pirelli.png으로 교체한다. 대쉬보드에서는 이 이름만 사용하므로 반드시 파일명을 교체하는 것이 필요하다.

GoTo


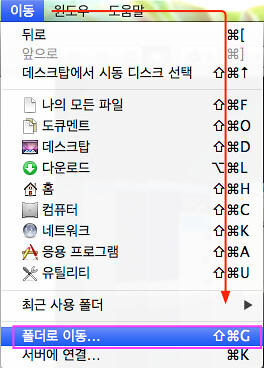
  1. 2. 이제 파인더에서 쉬프트 + cmd + G 를 눌러서 다음 폴더로 이동한다.: /System/Library/CoreServices/Dock.app/Contents/Resources/


  1. 3. 기존 pirelli.png 파일을 다른 폴더로 백업한다. 
  2. 4. 1단계에서 파일명을 변경한 화일을 Resources 폴더로 복사하여 준다.
  3. 5. 관리자 권한을 획득하기 위해 패스워드를 요구하면 입력한다.
  4. 6. 이제 터미널을 열고 다음 명령어를 입력한다.

  5. #killall Dock


이외의 맥 사용법 : http://osx86.tistory.com/1116

:
Posted by Ritz®™
2012. 5. 12. 12:26

사파리 활용하기 Hackintosh/Tip2012. 5. 12. 12:26

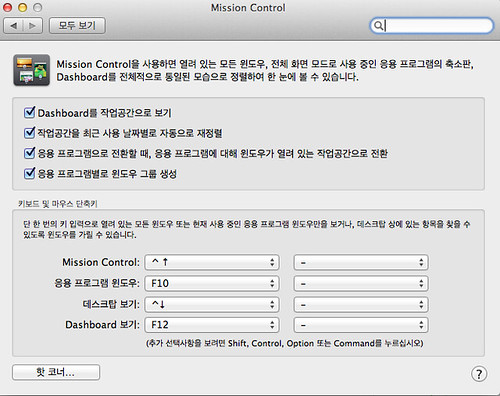
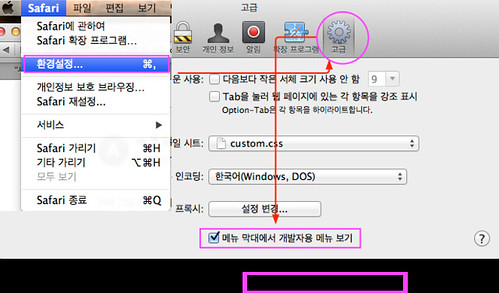
1. 다음과 같이 Safari 환경설정을 조정한다.


Safari

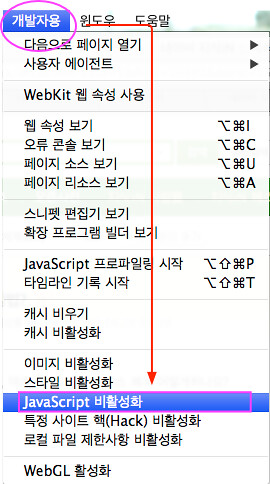
2. JavaScript 를 비활성화 한다.


Safari

3. 그림이나 이미지를 잡아서 데스크탑 으로 끌어 놓는다.


이외의 맥 사용법 : http://osx86.tistory.com/1116

:
Posted by Ritz®™

Mac OS X Lion 에서 사용할 수 있는 타임머신(Time Machine)은 때로는 유용하지만, 디스크 공간이 부족한 사용자에게는 불필요한 기능(로컬 백업이나 혹은 스냅샷(snapshot)이 될 수 있다.  맥 시스템이 랩탑이고 타임 머신이 외장형 드라이버일 때 OS X Lion은 잠재적으로 외장형 디스크가 사용불가능할 때를 대비하여 로컬 디스크에 추가백업이 필요하다. 이 기능은 어느 곳에서든지 타임 머신의 과거 데이타를 복원할때 효과적이지만 디스크 공간을 확보할때는 심각한 디스크 공간의 손실이 된다.

주의: Time Machine 로컬 백업은 일반적으로 타임머신을 사용가능하게 설정하였을 대만 저장된다.

Time Machine Local Backup 기능 해제하기

해제하는 방법:

  • /어플리케이셔(Applications)/유틸리티(Utilities)에서 터미널(Terminal)을 실행한다.
  • 다음과 같이 커맨드를 입력한다.:
  • sudo tmutil disablelocal

  • 관리자 패스워드를 입력한다.

Time Machine 로컬백업 재설정

다음 단계는 위 단계와 동일하지만 터미널에서 다음과 같은 명령어를 입력하여 로컬백업을 가능하게 한다.
sudo tmutil enablelocal

주의할 점은 이 기능을 해제한 이후는 로컬백업이 더이상 존재하지 않으므로 타임머신에 뭔가 이슈가 있을 경우 복원을 못하는 경우가 발생할 수도 있다.  


참고 : 전체적인 디스크 공간 관리 방법 정리 


이외의 맥 사용법 : http://osx86.tistory.com/1116

:
Posted by Ritz®™

FTP서버 구동하기 


Terminal command: 

$sudo -s launchctl load -w /System/Library/LaunchDaemons/ftp.plist 

FTP서버 중지: 

sudo -s launchctl unload -w /System/Library/LaunchDaemons/ftp.plist 

:
Posted by Ritz®™