달력

1

« 2025/1 »

  • 1
  • 2
  • 3
  • 4
  • 5
  • 6
  • 7
  • 8
  • 9
  • 10
  • 11
  • 12
  • 13
  • 14
  • 15
  • 16
  • 17
  • 18
  • 19
  • 20
  • 21
  • 22
  • 23
  • 24
  • 25
  • 26
  • 27
  • 28
  • 29
  • 30
  • 31
①iBoot CD + Retail DVD 조합으로 설치하기
*만약 해킨 카스터마이징에 자신이 없다면 두번째 해킨배포본을 이용합니다. 

②iATKOS S3_V2 DVD 해킨배포본 이미지를 이용하여 설치합니다.
* 해킨배포본이긴 하지만, Extra 폴더를 이용하기 때문에 Retail 설치방식과 동일하며 때문에 소프트웨어 업데이트가 자유로운 것이 장점입니다.

전체 설치가이드는 다음글을 참고하세요.


다음은 사용자화 선택사항입니다.

> iATKOS S3 Main System [Pre-selected Default]

> Bootloader

>> AsereBLN v1.19 [Default]

>> PC_EFI v10.6

>> Slice

>> AnVAL Loader

>> Chameleon v2 RC5

>> Chameleon v2 RC4

> Bootloader Options

>> 32-bit boot

>> Graphics Enabler

>> -pci1

>> Ethernet

>> USB (USBBusFix; EHCIacquire; UHCIreset)

>> Quiet Boot

>> Legacy Logo

>> UUID [Selecting this breaks HDD multiboot options]

> Patches

>> /Extra directory [Default]

>> fakesmc [Default] V2.5 [MUST BE SELECTED]

>> Disabler [Default]

>> RTC (RTC [Default]; RTC(32bit))

>> Modified Kernels (qoopz 10.3.0; qoopz 10.2.0; PCJ kernel; Atom Kernel) : SSE3 를 지원하지 않을 경우 적당한 커널을 선택해야 합니다.

>> EVO Reboot [Default]

>> Sleep Enabler

>> USB

>> UUID

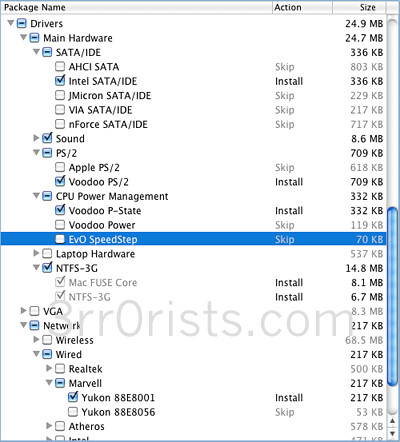
> Drivers

>> Main Hardware

>>> SATA/IDE (AHCI SATA; Intel SATA/IDE; JMicron SATA/IDE; VIA SATA/IDE (support for VIA, SiS, SI, ULI, Marvell and some nForce chipsets); nForce SATA/IDE)

>>> Sound (Voodoo HDA [Default]; Apple HDA 10.6.2 [Default])

>>> PS/2 (Apple PS/2; Voodoo PS/2) [I am assuming you have a PS/2 keyboard and mouse; if not, then ignore PS/2]

>>> CPU Power Management (Voodoo P-State; Voodoo Power; EvO Speedstep)

>>> Laptop Hardware (Battery; Card Reader; TSC Sync; ACPI Thermal (32bit)

>>> NTFS-3G (Mac FUSE Core; NTFS-3G [automatic sub-selection])

>> VGA

>>> nVidia

>>>> EFI String (DVI/DVI; DVI/VGA; VGA/DVI)

>>>> Enablers (NVEnabler; Natit)

>>> ATI

>>>> Enablers (EVO enabler; ATY-Init (32bit)

>>>> ATI 48xx

>>>> ATI Framebuffer

>>> Intel

>>>> EFI String

>>>> Natit (32bit)

>>>> GMA 950 (GMA 950 27A2 (32bit); GMA 950 27AE (32bit))

>>>> GMA X3100 (Framebuffer (32bit)

>> Network

>>> Wireless [Check if your WiFi card has a RTL8187 variant chipset, and then choose the correct driver]
>>>> Atheros

>>>> Atheros Corei7 fix

>>>> Broadcom

>>>> Ralink (RT257x; RT2500 (32bit); RT2870; RT2860 (32bit); RT256x (32bit))

>>>> Realtek (RTL8187 (32bit); RTL8187B (32bit); RTL8187L (32bit); RTL8187SE (32bit))

>>>> Zydas (32bit)

>>> Wired

>>>> Realtek (RTL8168; RTL8139)

>>>> Marvell (Yukon 88E8001; Yukon 88E8056)

>>>> Atheros (Attansic L1; Attansic L1E; Attansic L2 (32bit)

>>>> Intel (Intel Pro V100; Intel Gigabit)

>>>> Broadcom (BCM440x; BCM5755M (32bit); BCM5787M (32bit))

>>>> nForce

>>>> Via Rhine (32bit)
:
Posted by Ritz®™
2010. 9. 29. 17:35

MSI PR200에 해킨토시 설치하기 Hackintosh/NoteBook2010. 9. 29. 17:35


Screen: 1280x800 12.1",
CPU: Intel C2D T7300 2.0 Ghz,
Main board: MSI, intel P965GM chipset (ICH8),
Spec :

VGA: Intel X3100,
Ram: 2x1 Gb DDR2 667 Mhz,
HD: 250 Gb Sata 8Mb,
Wifi: Intel 4965AG,
LAN: RTL 8168/8111
Audio: ALC888 (only microphone and earphone input),
Toshiba bluetooth and ENE card reader.


전체적인 공통 설치가이드 : http://x86osx.textcube.com/notice/481

다음과 같이 설치이미지에 따른 설치방식이 세가지가 있습니다.

①iATKOS_5i

boot options : cpus=1 -v -x "Graphics Mode"="1280x800x16"
"1280x1024x32@75"

② Snow Leopard 10.6.3 Hazard

선택한 사용자화 옵션.
    10.6.1
    10.6.2
    chameleon rc4
    AppleHDA
    Laptop Support 캠이랑 트랙패드 문제로 두개만 빼고 전부 설치
    legacy_AHCI_SATA_Fix
    IOATAFamiliy_Fix
    SMBIOSResolver
그래픽드라이버 X3100은 구글링해서 추가 설치

myHack installer와 Snow Leopard 설범 10.6 리테일
:
Posted by Ritz®™
2010. 9. 28. 21:10

Sens R430에 해킨토시 설치하기 Hackintosh/NoteBook2010. 9. 28. 21:10

<SAMSUNG Sense R430 Spec>
CPU : T6600 2.2G
Graphic : Nvidia 310M ( (Working)
Lan : Marvell Yukon 88e804Y (Working)
Audio : Realtek ALC269 (Working)
Webcam : SCB-0340N (Working)
Wireless Lan : Atheros AR9285
 (Working)

iATKOS S3 Snow Leopard 10.6.3 
을 이용하여 설치합니다.
iATKOS S3 Snow Leopard 10.6.3 를 이용하면 Retail 설치방법과 유사하여 소프트웨어 업데이트를 하여도 타 해킨배포본에 비해 커널패닉이 발생하지 않는 장점이 있습니다.

<추가> Snow Leopard 10.6.1-10.6.2_SSE2_3_Intel_AMD 시리즈  일명 Hazard 10.6.2 배포본을 이용하여 설치하는 방법도 가능하다고 합니다.

사용자화 선택사항

-Chameleon RC4
-USB
-PS2
-Laptop 관련 선택

재부팅한 후 부팅이 되지 않으면 iBoot CD를 이용하여 부팅시도 합니다.

마무리는 역시나 Multibeast를 이용하여 마무리를 합니다.


:
Posted by Ritz®™
 준비물 : iboot 2.0 Boot CD  + Snow Leopard Retail DVD
           - 참고 : http://x86osx.textcube.com/593
아래 CD 이미지 중 하나를 다운로드 받아서 CD에 구워준다.  노트북의 그래픽 카드 칩셋에 따라 부팅 CD이미지 선택은 달라진다.
- Sony Vaio EB1S1R 모델인 경우, iBoot Supported CD이미지를 이용하면 설치성공한 사례가 있다. 하지만, 그래픽 카드 가속이 안되어(QE가 지원이 안됨.) com.apple.boot.plist화일을 에디팅하여 1366x768@60hz 해상도 까지 가능하다. LAN (Marvell Yukon 88E8059), Wi-Fi(Atheros AR9285), 그리고 sound(Realtek ACL269)를 잡기 힘들다.


개략적인 설치 가이드

1. iboot ati로 부팅하여 DVD롬 LED가 깜박거리는 것이 끝난 후 Boot CD를 빼내고 Retail Mac osx DVD를 넣은후, F5를 눌러주고 Install OS X DVD 를 선택하여 설치 과정으로 진입한다.
만약 회색 화면등이 나오면 VGA 케이블을 외부모니터에 연결하여 설치시도한다.
- 만약, cpu가 i3-330M processor 2.13 GHz 인 경우에는 부팅플래그를 "busratio=16 -x -f -v arch=x86_32"를 입력하여 부팅해야 한다.

2. 다음 과정은 공지사항의 설치가이드와 동일하다.


VPCF113FX 모델인 경우

준비물 : Snow Leopard Hazard 해킨 배포본 이미지
- Ultra ISO로 반드시 2배속 혹은 4배속으로 구워야 한다.
부팅플래그 : cpus=8, Busratio=12

사용자화 :
- voodoo PS2
- nvidia inject
- chameleon EFI 10.5 (dual boot with win7 works ok)

vga케일블을 이용하여 외부 monitor 에 연결하여 주고 PciRoot=1 을 OSX86 Tool을 이용하여 EFI Boot 에 넣어준다.
또한, OSX86 Tools을 이용하여 해상도 "1900x1080@60HZ"를 /Extra/com.apple.Boot.plist 에 넣어주었지만 가속화는 잡지 못할 것이다.

'Hackintosh > NoteBook' 카테고리의 다른 글

MSI PR200에 해킨토시 설치하기  (0) 2010.09.29
Sens R430에 해킨토시 설치하기  (0) 2010.09.28
Sens R480에 해킨토시 설치하기  (1) 2010.09.14
HP Mini 210 [Hackintosh].  (0) 2010.09.09
ThinkPad T60p  (0) 2010.08.11
:
Posted by Ritz®™


How To Install iAtkos S3 Snow Leopard

My Spesification :
- Board : Asus P5GZ-MX
- Processor : Core 2 Duo 6320 1.4 GHz
- Memory : 4 GB
- HDD : Seagate 160 GB ATA & Seagate 500 GB SATA
- Graphics Card : nVidia Geforce 9400 GT
- Sound & Network : ALC 883 and Marvell Yukon 88E8001 (Onboard)
- Modem : Sierra 885
- Monitor : BenQ G922HD

준비물
- iATKOS S3 Snow Leopard, get from here
- iATKOS S3 image 를 Ultra ISO 등을 이용하여 반드시 2 혹은 4배속으로  DVD 에 구워준다.

- iATKOS S3 image 를 USB에 복원할 수도 있으나 의미가 없으므로 걍 DVD에 구워주는 것이 속편하다.


Installation
1.  iATKOS S3 DVD 를 DVD 드라이버에 놓고 DVD로 부팅한다.
2. 설치메뉴가 나타나면 다음 과정을 수행한다.
3. 상단의 Utility 메뉴바에서 “Disk Utility” 를 선택하고 “Machintosh HD″로 이름을 주고 MAC Extended(Journaled)로 파티션한다.
4. disk utility 를 끝마치고 설치할 파티션인  “Machintosh HD″에 설치한다.
5. “Continue” 를 선택하고 “Costumize” 를 선택하여 다음과 같이 사용자화에서 선택한다 :

iAtkos S3 Snow Leopard
install iAtkos S3

6. 구성요소를 선택하고 난후, “Done” 을 누르고 “Install” 에 들어간다.

7. 설치시간은 대락 30-45 정도 걸린다.

8. 재부팅하여 Snow Leopard 로 부팅하여 계정을 만들어주고 반드시 암호를 "1234"등과 같이 설정하여야 다음 과정을 수행하기에 편하다

iATKOS S3 Snow Leopard 10.6.3

Update to 10.6.4

10.6.4 로 Update 하여준다 , following instruction here

:
Posted by Ritz®™
2010. 9. 14. 07:46

Sens R480에 해킨토시 설치하기 Hackintosh/NoteBook2010. 9. 14. 07:46

모델명 : Sens R480 PS5MA NoteBook
프로세서 : Intel i5 430M(2.66Ghz)
칩셋 : Intel HM55
그래픽 : nVIDIA GeForce 310M 512MB GDDR3
네트워크 :Atheros AR9285 Wireless


준비물 :

1. Snow_Leopard_10.6.1-10.6.2_SSE2_SSE3_Intel_AMD_by_Hazard이미지를 Ultra ISO를 이용 2-4배속으로 구워서 부팅한다.
2. 설치후 재부팅하기전에 바로  커널 mach_1031 교체
3. MacOSXUpdCombo10,6.4.pkg로 업그레이드
4. /S/L/E/NVInject.kext 제거 후,
GraphicsEnabler=y로 그래픽 카드 설정.


* Summary

커널 : Darwin 10.3.1 ->
부트로더 : PC_EFI v10.5
부트옵션 : GraphicsEnabler=y, EthernetBuiltIn=y, PciRoot=1
/Extra/Extensions/ kext 리스트 :
- AppleACPIPS2Nub.kext
- EvOreboot.kext
- fakesmc.kext
- IOPCIFamily.kext
- NullCPUPowerManagement.kext
- VoodooPS2Controller.kext

5.  


:
Posted by Ritz®™
2010. 9. 10. 17:58

XFX ATI HD 5870 1GB edition BP Hackintosh/Graphic Card2010. 9. 10. 17:58

Apple 사의 Mac Pro 와 iMac 을 HD 5xxx series 업그레이드한 이후로 Mac OS X 10.6.4 에서 이 그래픽 카드를 사용할 수 있게 되었다. 

이 방법은 XFX ATI HD 5870 1GB BP edition에서 테스트 하였다.


준비물:

  1. Mac OS X 10.6.4 이상 해킨토시
  2. ATI Drivers.
  3. The injector aty_init.kext provided by Netkas
  4.  kernel extensions을 설치하기 위한 Kext Utility 


 32 bit 로 운영되므로 i386 부트플래그를 주어야 한다.  다음과 같이 com.apple.Boot.plist에 등록해주어야 한다.: 

  <key> Kernel Flags </ key> 
<string>-x32 </ string>

혹은

  <key> arch </ key> 
<string> i386 </ string>


이전에 설치된 모든 injectors, 이를테면 NVenabler, 나 NVinject GraphicsEnabler 를 제거해야 한다. 이를테면 GraphicsEnabler 제거하거나 혹은 "No". 로 세팅해주어야 한다.

모든 kexts들은  / System / Library / Extensions (일반적으로 / S / L / E) 에 복사하면 된다. 간단하게 복사하여 주고 kext Utility를 한번 실행해 주면 끝난다. 퍼미션을 수정해주고 extensions 캐쉬를 재생성한다.(system 과 Chameleon 둘다). 

마지막으로 /Extra/com.apple.boot.plist 의 파일에서 GraphicsEnabler N (or no)를 설정해 준다.

이제 재부팅하면 된다. 

만약, Chameleon 의 configuration 화일을 수정하지 않았다면 32 bit로 부팅하면 된다.혹은 재부팅하여 "- x32"부팅 플래그를 주고 부팅한다.  부팅시작시에 "-v" 와 "-x32" 를 조합하여 부팅하면 시작시 여러가지 잡다한 로그를 볼수다. 그러하지 않을 경우 Kernel Panic 을 경험하게 될 것이다..

Thank you to Netkas for files, and the community Hackintosh for info that I caught right and left to get there.

:
Posted by Ritz®™
2010. 9. 9. 16:18

HP Mini 210 [Hackintosh]. Hackintosh/NoteBook2010. 9. 9. 16:18

준비물: Mac OS X Snow Leopard Disc or Image
1GB USB 메모리 스틱
8Gb 이상 USB 메모리 스틱
다운로드:
http://osx.mechdrew.com/downloads/NetbookCD_0.8.3.iso
http://neosmart.net/downloads/software/EasyBCD/EasyBCD%201.7.2.exe

Booting for install:

- Go into Disk Utility on your Mac. (Applications>Utilities>Disk Utility). Connect your 1 GB USB Stick. Click on the icon on the left of your USB drive. Click on erase. Use MAC OS X Extended Journaled. Once completed click on the restore tab. Click the image button. Navigate to the iso. Click ok. Drag your flash drive icon on the left to the destination field. Click Restore.

-Stick in your Snow Leopard DVD and your 8GB FlashDrive. Go into Disk Utility again. Click on the icon on the left of your USB drive. Click on erase. Use MAC OS X Extended Journaled. Once completed click on the restore tab. Drag the Snow Leopard DVD icon from the left onto the Source box. Drag your 8GB flash drive icon on the left to the destination field. Click Restore

- At the HP logo screen, hit F9 to get to the startup disk options, and choose your 1GB USB drive to boot from. (You need to put the 8GB usb stick in right after you select the 1GB drive to boot from.)

- Once the NetbookCD loads, you’ll get a list of available drives to boot from. Navigate using the keyboard arrows until you are highlited on the one that says Mac OS X Snow Leopard.

- Type “mach_kernel -v arch=x86_32″. Nothing will come up while your typing. Click the down arrow. Hit boot Verbose (-v). Some messages will appear about files being loaded, and then you should start seeing messages from the OS X kernel. It might take a few minutes for the whole thing to finish loading. To make sure it hasn’t locked up (and therefore you need to reboot and try again), wait for “ApplePS2Keyboard” to show that it’s loaded (you’ll see messages about it detecting a keyboard and a trackpad), and then try tapping the Caps Lock key; if it’s LED doesn’t turn on, it’s frozen and needs to be rebooted.

Installing Mac OS X

1. The Apple logo, then a spinning wheel, will appear

2. Once loaded, select your language and press Continue. (Press Enter on your keyboard if you can’t see the Continue button.)

3. Press Continue on the Welcome screen, then press Agree on the next screen.

4. Go to Menu Bar>Utilities>Disk Utility….

5. Select the icon for the internal drive.

6. Go to the Partition tab. Configure:

* Volume Scheme: 1 Partition

* Name: <Any name without a space in it.>

* Format: Mac OS Extended (Journaled)

* Options…: GUID Partition Table, press OK.

(If you are dual-booting do this instead)-

* Volume Scheme: 2 Partition

* Name 1 (This will be for Windows): <Any name without a space in it.>

* Format 1: FAT

* Name 2: <Any name without a space in it.>

* Format: Mac OS Extended (Journaled)

* Options…: GUID Partition Table, press OK.

7. Press Apply, then Partition. When it is finished, close Disk Utility.

8. Select your newly-formatted drive as the installation destination. (On 10.5 Leopard, you need to press Continue to get to the next screen.)

9. Press Done (10.5) or OK (10.6), then press Install. Installation ill take about 30 minutes.

10. Installation will probably get to the end and report that it has failed. This is normal, just press Restart. Once it is restarted you can unplug the 8GB USB stick.

First boot:

- Boot from the 1GB USB stick as was done under “Booting” above. When you get to the NetbookCD disk selection screen, choose the disk you installed OS X to (Should say somethinglike “Mac OS X Snow Leopard”) and enter “mach_kernel -v arch=x86_32″. And down arrow, boot verbose. It will boot off of the internal drive and bring up the OS X setup screen; the video won’t play because there isn’t an audio device as far as the system is concerned, yet.

- Once you get to the Finder Desktop, you should double-click the NetbookCD icon and then open the Tools folder. Inside you will find the NetbookInstaller 0.8.3 application. If a warning prompt shows up asking, “Are you sure you want to open it?” click Open. Select the following options:

Volume: <your internal drive>

Install Chameleon 2 NBI bootloader

Install General Extensions

- Press Install, enter your password and press OK.

- When installation is complete, close NetbookInstaller and any other programs you may have open and save all work (if necessary).

- Before rebooting, edit /Extra/com.apple.Boot.plist:

To do this open a Finder window. Go up to the go tab and hit go to folder. Type in “/Extra”.

Move this file to the desktop. Edit it as follows:

Find “<key>Kernel Flags</key>”; place “arch=x86_32 -v” into the “<string>” tag beneath it.

Hit File>Save. Drag it back to the directory it came from. (This is because it is a Write Protected Folder.) Authorize it with Password if nessesary.

- Reboot.

Other setup:

For audio:

-Google “VoodooHDA.kext and download it.

- Install VoodooHDA.kext into /Extra/AdditionalExtensions and then run UpdateExtra that is in that folder. Reboot and audio should work.

Sleep, Bluetooth, and Wireless aren’t working.

Windows Installation

- Insert Windows Install DVD

- Follow all the prompts. When it asks where to install to, find your disc that you formatted for Windows. Click format.

- Install Windows

- Once in Windows open up the application you downloaded called easyBCD.

- Add a Mac OS X entry. Add/Remove -> Add an Entry -> Mac -> Type = Generic x86 PC … click Add Entry and Save

- Reboot and you should see NST Mac OS X and Windows 7!

:
Posted by Ritz®™