달력

1

« 2025/1 »

  • 1
  • 2
  • 3
  • 4
  • 5
  • 6
  • 7
  • 8
  • 9
  • 10
  • 11
  • 12
  • 13
  • 14
  • 15
  • 16
  • 17
  • 18
  • 19
  • 20
  • 21
  • 22
  • 23
  • 24
  • 25
  • 26
  • 27
  • 28
  • 29
  • 30
  • 31
2010. 9. 8. 13:40

com.apple.Boot.plist 수정하기 Hackintosh/Chameleon2010. 9. 8. 13:40

com.apple.Boot.plist화일 위치는 /Extra 폴더와 /Library/Preferences/SystemConfiguration/com.apple.Boot.plist 로서 2군데에 위치한다.
먼저 /Extra 폴더의 com.apple.Boot.plist를 textedit를 이용하여 원하는 대로 수정을 한다.
그리고 터미널을 실행하여 다음과 같은 명령어를 이용하여 /Extra/com.apple.Boot.plist를 이용하여 /Library/Preferences/System Configuration/com.apple.Boot.plist 화일도 동일하게 변경하여 준다.

걍 간단하게 복사해주는 명령어입니다.


:
Posted by Ritz®™
5770;5870;5970, CPUI3-5-7 혹은 Core 2 Mac OS X Snow Retail 과 iBoot ATI5xxx-3 CD로 설치하기
타 메인보드는 각 메인보드에 맞는 설치법을 이용하시기 바랍니다.  다음은 P55A-UD3R 메인보드용 설치가이드입니다.  참고하세요. : GA-P55A-UD3R

다시 한번 말하지만, 이하 설치가이드는 GA-X58A-UD3R-2.0메인보드에 적합한 설치가이드입니다.  
당근 그래픽 카드 설치 방법은 다른글을 참고하세요.
http://x86osx.textcube.com/category/Compatibility/Graphic%20Card

이제 본론으로 들어가겠습니다.


준비물:


설치과정:

    1.) iBoot ATI 5xxx-3로 부팅한다.
    2.) OS X를 설치한다.
    3.) iBoot ATI 5xxx-3 재부팅한다.
    4.) iBoot ATI 5xxx-3 DVD를 제거한다.
    5.) MultiBeast 를 실행하지만, 설치하지 않고 대기한다.
    6.) Mac OS X v10.6.4 Update (Combo)를 설치하지만, 설치가 완벽하게 끝날때까지 재부팅하지 않는다.
    7.) Snow Leopard Graphics Update를 설치한다, 역시나 재부팅은 하지 않고 대기한다.
    8.) MultiBeast 를 다음과 같은 옵션을 선택하고 설치한다.
      - UserDSDT
      - Advanced Options -> Kexts -> Audio -> LegacyHDA -> ALC889
      - Advanced Options -> Kexts -> Disk -> JMicron36x (aka GSATA) -> JMicron36xeSATA or JMicron36xSATA depending on wether you want internal or external GSATA ports
      - Advanced Options -> Kexts -> Disk -> JMicron36x (aka GSATA) -> JMicron36xATA (Optional for ATA/IDE support only)
      - Advanced Options -> Kexts -> Graphics -> Enablers -> ATY_Init Vervet
      - Advanced Options -> Kexts -> Network -> Realtek Gigabit Ethernet -> Realtek RTL8169 Ethernet
      - Advanced Options -> com.apple.boot.plist -> 32-bit GraphicsEnabler=No
      - Advanced Options -> smbios.plist -> Mac Pro -> Core i7
    9.) MultiBeast 를 끝마치고 재부팅한다.
    :D


몇가지 제약사항:

    1.) ATY_Init 은 32-bit로만 현재 동작한다.
    2.) RTL8111E 카드를 위한 Realtek RTL8169 Ethernet driver 는 32-bit로만 동작하고 잠자기에서 깨우기는 지원이 되지 않는다.
    현재 이 드라이버는 32/64-bit 모드로 포팅중에 있으며 81111D 와 8111E 네트웍 카드를32/64-bit 모드로 지원할 것이고 현재 private beta 테스트중에 있다.


:
Posted by Ritz®™
2010. 9. 4. 14:02

Snow Leopard on Intel DP45SG Hackintosh/Mainboard2010. 9. 4. 14:02

준비물

1. Empire EFI http://prasys.co.cc/tag/empire-efi/,
2. Chameleon 2 RC4 r684 Installation Package
    - http://www.insanelymac.com/forum/index.php?showtopic=201850
3. 해킨 드라이버
    - NullCPUPowerManagement (32-/64-bit)
    http://www.kexts.com/view/16-nullcpupowerm...2--64-bit).html
    - OpenHaltRestart (32-/64-bit)
    http://www.kexts.com/view/18-openhaltresta...2--64-bit).html
    - FakeSMC 2.5
    http://netkas.org/?p=338
    - PlatformUUID (32-/64-bit)
    http://www.kexts.com/view/19-platformuuid_(32--64-bit).html
    - Intel82566MM (32-/64-bit)
    http://www.kexts.com/view/13-intel82566mm_(32--64-bit).html
    - Kext Utility v2.3
    http://www.insanelymac.com/forum/index.php?showtopic=140647


설치과정
전체 설치과정 참조. : x86osx : OS X Installation Guide -2

1. Empire EFI CD로 부팅한 다음, DVD램프가 깜박이는 것이 멈춘후, Snow Retail dvd넣고 F5를 누르면 MAC OSX Install DVD가 보일 것이다. 좌우측 화살표 키를 이용하여 선택하고 설치과정에 들어간다.

2. 재부팅하여 다시 Empire Efi CD를 이용하여 부팅한다.  

3. Chameleon 부트로더와 해킨 관련 kexts를 설치한다. (I have installed them in System/Library/Extensions not in /Extra/Extensions).

4. USB 장비를 위하여 /Extra/com.apple.Boot.plist 에 다음과 같은 항목을 추가한다.

<key>USBBusFix</key>
<string>Yes</string>


위 작업을 편리하게 하기 위해서는 Ritz님의 친구, roisoft 와 그의 팀들이 만든 Lizard 툴을 이용한다.

- Boot Options - Options - USBBusFix

:
Posted by Ritz®™
CS4를 사용하시는 분들은 어떠신가요?
CUDA가 포토샵을 사용할때 사용되는 지 여부를 매킨토쉬에서는 어떻게 확인할 수 있을까요?
물론 지포스 7600GT 카드는 지원을 못할 것이지만, 8000계열 사용하시는 분들이나 쿼드로 카드 사용하시는 분들의 체감은 어떠하신지 궁금하군요.


'Hackintosh > Graphic Card' 카테고리의 다른 글

Graphic Card  (0) 2010.10.19
XFX ATI HD 5870 1GB edition BP  (2) 2010.09.10
Radeonhd 5000 series is going to work  (2) 2010.07.03
fermi/gtx 480/gtx 470 드라이버 설정하기 - 해킨토  (0) 2010.07.01
ATI Graphic Card Driver  (0) 2010.04.10
:
Posted by Ritz®™
2010. 8. 20. 17:43

KakeWalk Hackintosh/해킨패키지2010. 8. 20. 17:43

메인보드종류가 일치하는 것이 있다면 KakeWalk를 이용해도 좋다.

Update : 12-24, 2012
- KakeWalk 4.5.0 이상 버전부터는 메뉴가 약간 달라졌지만 기능은 역시나 동일하다.
- Install to USB : Lion이상 버전의 DMG 이미지를 USB에 설치용으로 이미지 카피할 때 사용.
- install Kakewalk : HDD 혹은 USB에 부트로더 및 PC에서 부팅가능하게 시스템 구성화일을 설치할 때 사용.


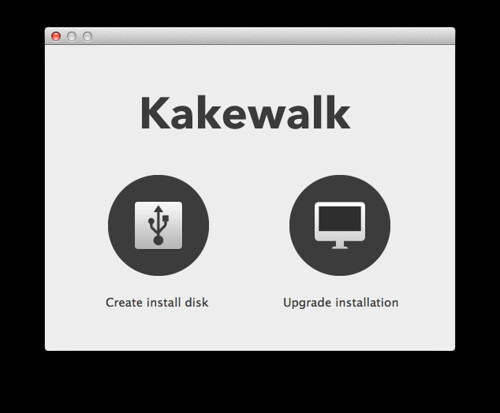
Kakewalk

I. 

1. Create Install Disk 는 Install ESD.dmg 등을 이용하여 설치용 USB 이미지를 만들 수 있다.

- 물론, 자신의 메인보드 종류를 정확하게 파악해야 한다.


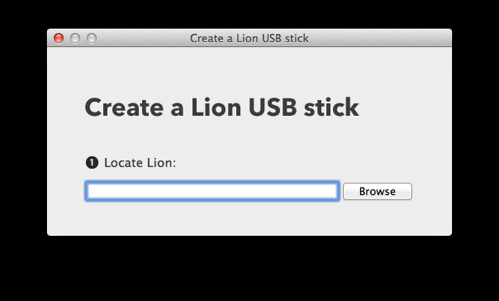
Kakewalk

- USB 장비를 선택한다.


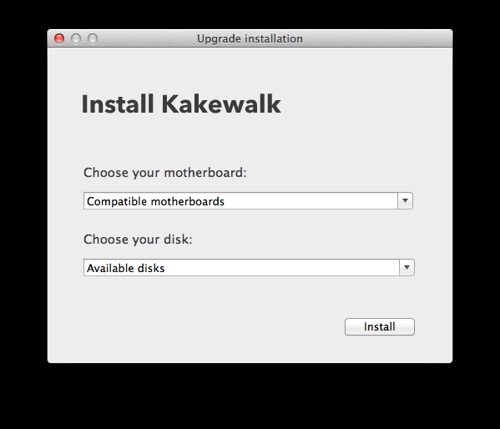
2. Upgrade Installation 메뉴는 1번에서 만들어진 설치용 USB를 이용하여 HDD에 설치한 다음에 사용한다.

- HDD에 직접 부트로더가 설치되어 HDD로 직접 부팅할 수 있게 /Extra 폴더등 부팅에 관련된 모든 파일을 자동생성하여 준다.


Kakewalk

- Compatible motherboards 를 클릭하여 메인보드 종류선택한다.

- Choose Your disks 를 눌러 1번의 USB를 이용하여 Mac OS X 가 설치된 HDD를 선택한다.

- Install을 눌러 부팅에 필요한 부트로더와 /Extra 폴더등을 자동으로  설치구성한다.


3. 이 모든 작업은 인터넷을 통하여 관련 파일을 다운로드 받으므로 반드시 인터넷이 연결되어 있어야 하고 다운로드 받는 시간이 충분히 주어져야 한다.


II. 
1. Booting CD 만들기


2. 메인보드 종류 선택
더블클릭하여 자신의 메인보드 종류를 선택한다.


지원 메인보드를 선택하여 주고 "Create" 를 눌러주면 바탕화면에 관련메인보드 부팅시디가 생성된다.
그 시디 이미지를 시디에 구워서 부팅하여 Retail DVD를 선택하여 부팅하는 형식으로 해킨설치하기에 간편하게 되어 있다.

3. ATI Graphic Driver  설치하기

4. 설치방법 및 과정
 
http://j.mp/fNkAsI
http://j.mp/fYMEYp
http://j.mp/i6lezU
 
5. Multibeast 로 마무리 하기

http://j.mp/pquSnG

6. 기타
http://j.mp/lsKy34


:
Posted by Ritz®™
2010. 8. 11. 10:41

ThinkPad T60p Hackintosh/NoteBook2010. 8. 11. 10:41

T60p 과 T61 시스템 디바이스가 유사하여 DSDT 및 기타 해킨 드라이버를 공유할 수 있을 것 같군요.
I. Spec
ThinkPad T60p
  • CPU: Intel Core 2 Duo 2.33GHz
  • RAM: 4GB
  • Video: ATI Mobility FireGL V5200 256MB, screen resolution is 1400x1050
  • Wireless: Atheros a/b/g/n

II. 준비물
  • CPU: Intel Core 2 Duo 2.33GHz
  • RAM: 4GB
  • Video: ATI Mobility FireGL V5200 256MB, screen resolution is 1400x1050
  • Wireless: Atheros a/b/g/n

III. BIOS configuration

Here's my BIOS configuration:
  • SATA is set to AHCI mode.
  • In Power settings Intel Speed Step is enabled with both AC and Battery set to Automatic.
  • Thermal settings are all set to Maximize Performance.
  • CPU Power Management is set to Automatic.
  • Display brightness is set to Normal.
  • And Memory Protection (under Security) is enabled.
  • Disabled InfraRed, Serial Port and COM port.

IV. Installation

Here's my BIOS configuration:
  • SATA is set to AHCI mode.
  • In Power settings Intel Speed Step is enabled with both AC and Battery set to Automatic.
  • Thermal settings are all set to Maximize Performance.
  • CPU Power Management is set to Automatic.
  • Display brightness is set to Normal.
  • And Memory Protection (under Security) is enabled.
  • Disabled InfraRed, Serial Port and COM port.

'Hackintosh > NoteBook' 카테고리의 다른 글

Sens R480에 해킨토시 설치하기  (1) 2010.09.14
HP Mini 210 [Hackintosh].  (0) 2010.09.09
Leopard ideneb 1.3 10.5.5 install in MSI EX600X  (0) 2010.08.10
Samsung Sens NT-R560/AS252 +  (0) 2010.07.11
Gateway NV5909H Laptop  (0) 2010.07.07
:
Posted by Ritz®™
2010. 8. 10. 22:38

Pentium 4 524 (3.06GHz) Hackintosh/Mainboard2010. 8. 10. 22:38

CPU: Intel Pentium 4 524 (3.06GHz) (64bit Intel HT CPU's have this type of support SSE2 SSE3 five at a socket 775 but my understanding is not, as yet, although its Core 2 dual-core ...) 

VGA: It honestly just because mine is not sponsored by the previous schemes have not found it kextet osx86 tool in bootflag transliteration could only be the resolution to 1280x1024 from felvarázsolni Unicore cuccrol Sis ... but something is better Smiley

UPDATE: 
Full Success Smiley It works perfectly .... 
If you would like someone else, although such configja what I wrote above, they tick off a Hazard disc (NOT RETAIL!) 

10.6.1 
10.6.2 
Chameleon RC3 PCEFI_10.5 
Legacy Kernel 10.2.0 
Graphics Enabler 
VoodooHDA 0.2.52 
HDAEnabler 
VoodooPower 
LegacyAppleRTC 
AHCI_SATA_Fix 
IOATA_Family_Fix 
SMBIOS Resolver 
Fonts 
Rosetta 
QuickTime7 
:
Posted by Ritz®™
I. Spec.(스펙)

Processor Support Intel� Merom 65nm & Penryn 45nm socket P mobile processor
Chipset Intel� PM965 + ICH8-M
Graphics & Video Module NVIDIA� 8400M-G 256MB on board
Main Memory DDR2 533/667 SO-DIMM x 2 slots,MAX: 4GB (with bios v1.10 updated)
Display 15.4" WXGA ( 1280 x 800 )
PC Cards Slot x1
Card Reader SD/MMC/MS/MS-Pro 4-in-1 Card Reader
Hard Disk Drive Supports SATA HDDSupports SATA HDD
Optical Drive Built-in Super-Multi Drive (supports DVD RAM)
LAN/Modem Realtek Gigabit LAN + 56K Modem
Wireless LAN Supports Intel� PCI-Express mini card 4965 & 3945
Bluetooth Built-in MS-6837D Bluetooth 2.0 + EDR USB Module
Rovson support No
Built-in CMOS Camera 1.3 Mega Pixels
TPM Not available
Security Feature None
I/O Ports • Express Card : 1 • Monitor ( VGA ) : 15 pin D-Sub x 1 • USB 2.0 : 4 • IEEE 1394 : 1 • MIC-in : 1 • Headphone out : 1 • RJ11 : 1 • RJ45 : 1 • TV-Out : S-Video x 1
Audio Realtek ALC 888H

II. used for custom install(사용자화 선택사항)

ICHx Fixed
JMicronATA
ACPI-FIX
Cpus=1 - Fix
Power Management
PowerOff Fix
Realtek ALC 888
Nvinject 0.2.1 256M
Application All - except ASU

III. After install boot with option:(부팅 옵션)

-v -f -cpus=1

for sound to work in System Preferences -> Sound -> Output -> select internal speakers

for video as you can see

Graphics by NVIDIA:

Chipset Model: Graphics by NVIDIA
Type: Display
Bus: PCIe
PCIe Lane Width: x16
VRAM (Total): 256 MB
Vendor: NVIDIA (0x10de)
Device ID: 0x0428
Revision ID: 0x00a1
ROM Revision: NVinject 0.2.1
Displays:
Display:
Resolution: 1280 x 800
Depth: 32-bit Color
Core Image: Hardware Accelerated
Main Display: Yes
Mirror: Off
Online: Yes
Quartz Extreme: Supported
Rotation: Supported
Display Connector:
Status: No display connected

IV. Exception(부팅 안될시 해볼만한 예외사항)

boot with DVD,then press F8 (DVD로 부팅후 F8을 누른다.)

at prompt just type -s then use those 2 commands:(싱글유저로 부팅후 다음과 같이 두가지명령어를입력한다. 물론, 각 명령어를 입력한 후 엔터키를 입력하여 준다.)
/sbin/fsck -fy
/sbin/mount -uw /

then type (마지막으로 아래와 같은 명령어를 입력하여 준다.)
exit
and graphical starts use disk utilities and i see my hard drive with all partition

'Hackintosh > NoteBook' 카테고리의 다른 글

HP Mini 210 [Hackintosh].  (0) 2010.09.09
ThinkPad T60p  (0) 2010.08.11
Samsung Sens NT-R560/AS252 +  (0) 2010.07.11
Gateway NV5909H Laptop  (0) 2010.07.07
R590-URA1K 에 해킨토시 설치하기  (0) 2010.07.03
:
Posted by Ritz®™