달력

1

« 2025/1 »

  • 1
  • 2
  • 3
  • 4
  • 5
  • 6
  • 7
  • 8
  • 9
  • 10
  • 11
  • 12
  • 13
  • 14
  • 15
  • 16
  • 17
  • 18
  • 19
  • 20
  • 21
  • 22
  • 23
  • 24
  • 25
  • 26
  • 27
  • 28
  • 29
  • 30
  • 31
2009. 2. 9. 07:37

10.5 BootCamp 드라이버 macOS/Leopard2009. 2. 9. 07:37

Finder에서 /Application/Utilities로 이동한다. 

콘트롤 키를 누른채  Boot Camp Assistant를  클릭하여 Show Package Contents 를 선택한다.

Contents/Resources에 dmg 화일을 클릭하여 디스크 이미지를 마운트한다.

Disk image 내의 USB메모리 스틱에 복사한다.  


'macOS > Leopard' 카테고리의 다른 글

Apple 키보드 매핑  (0) 2013.02.25
맥에서 백업하기  (0) 2011.02.13
root 계정 활성화 하기  (0) 2009.12.16
응용프로그램을 클릭한방으로 알아서 Update해보자 - AppFresh  (0) 2009.12.03
:
Posted by Ritz®™
This probably isn't Spotlight so much as one of the index plugins (mdimporters). 
Spotlight itself is very robust, however, all it takes is a single bad indexing plugin. 
MDS, basically, identifies a file type and loads in a list of plugins that are registered for that file type and executes a routine in the plugin to grab the metadata. 
If the plugin is improperly written, it can go haywire. 
What was the last application that you installed prior to it going crazy? 
Perhaps one of the last 2-3... Failing that, you can wipeout the metadata database for a Volume like so 
(from Terminal.app)
: sudo mdutil -E /Volumes/your_volume_here ... 

or '/' in place of '/Volumes/...' for the local disk. 
You can turn off metadata indexing for a volume entirely like so
: sudo mdutil -i off /Volumes/your_volume_here 

You may also want to see what index plugins are being used
: sudo lsof | grep mdimporter ... 

which might help you understand what's being used to index, and this
: sudo lsof | grep mdworker 

... will tell you what worker threads are running and the files they have open (some of which will be the files they are indexing).
:
Posted by Ritz®™
2009. 2. 8. 05:22

Spotlight is going rampant here. Hackintosh/Q&A2009. 2. 8. 05:22

Spotlight is going rampant here. 
The mds (metadata server, aka Spotlight) process is constantly accessing the disk and writing some data to it, filling it until there is no space left on the device. 
I cannot find out what file it is writing to. 
I've tried with fsevener which sadly didn't help. 
mds is also eating up all the CPU cycles it can get leaving my system fully loaded at all times. 
The mds process is also taking up inceasingly huge amounts of memory, causing permanent swapping of memory and bringing the system to a grinding halt. (Cache Hits go down below 1%, About 250.000 pageins happen per minute.) 
Memory Footprint is going up to several hundred MB or real RAM. 
$ vm_stat 
Mach Virtual Memory Statistics: (page size of 4096 bytes) 
Pages free: 53166. 
Pages active: 275736. 
Pages inactive: 135633. 
Pages wired down: 59698. 
"Translation faults": 10217862. 
Pages copy-on-write: 136166. 
Pages zero filled: 5983710. 
Pages reactivated: 96772. 
Pageins: 1236330. 
Pageouts: 77113. 
Object cache: 24391 hits of 1183451 lookups (2% hit rate) (This is 95 minutes after reboot. Only running: Finder, Terminal, LaunchBar, Safari, Mail) 
This bahaviour goes until the disk is full and I get a "low disk space" warning. 
Then mds crashes, the system frees up the (temporary?) files written by the process and also frees the RAM taken up by it. 
Resulting in even more swapping, as the system tries to page-in other processes now. 
Subseqently the system launches a new mds process and the game starts over. 
Things I've tried to remedy:


Rebuilt spotlight index several times. 
Including totally deleting the .Spotlight-V100 folder on local volumes. 
Doesn't help, takes about 16 to 20 hours to rebuild on my machine, so is not a thing one wants to just-try.


Reinstalled 10.5.5 Combo Update, doesn't help. 
Privileges are repaired.


Turn off spotlight completely: Does indeed stop the madness, but now I cannot find anything on my system. 
So this is not a solution at all.


I've tried to keep the index small by excluding more and more stuff in the privacy settings of the Spotlight PreferencePane. This doesn't solve the problem either.


My System:
PowerBook G4 1.5GHz
2GB RAM (Maximum) (Tested with ASD ok, Rember ok. Different RAM modules, also ok.)
160GB HD (5GB free) (SMART ok, Blockscan ok, Filesystem ok, File privileges ok)
Mac OS X 10.5.5 (9F33) including Security Update 2008/007 (no further updates available)

Any help or suggestions are welcome. I'm happy to provide any further details you may need.
Best regards
Pepi
:
Posted by Ritz®™
2009. 2. 8. 05:22

Safari 사용법 Hackintosh/Q&A2009. 2. 8. 05:22

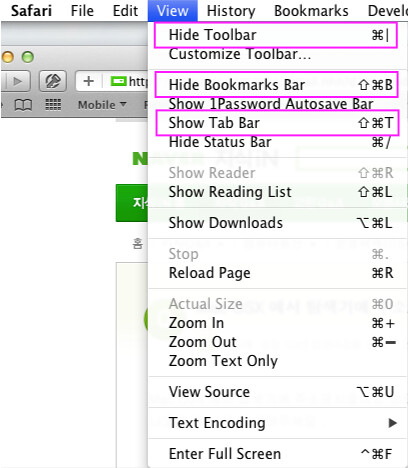
아래 그림과 같이 툴바, 북마크, 탭바 상태바등을 Hide/Show를 선택하여 보이거나 안보이게 할 수 있다.

safari01


:
Posted by Ritz®™
2009. 2. 6. 14:23

맥에서 인터넷 설정 잡아주기 Hackintosh/Tip2009. 2. 6. 14:23

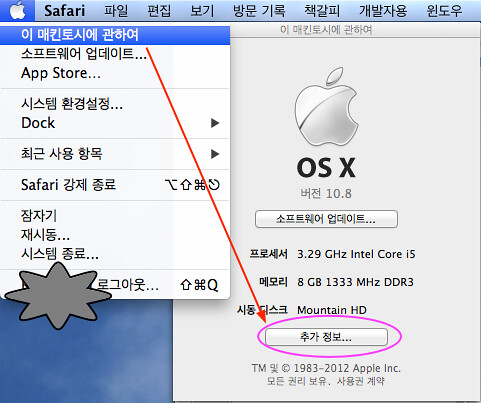
MAC OSX를 설치하고 사용하려고 하는데 네트웍(인터넷)이 안될 경우가 있다. 
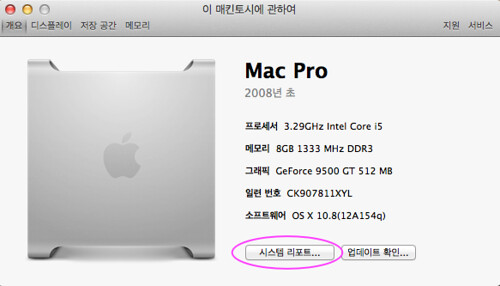
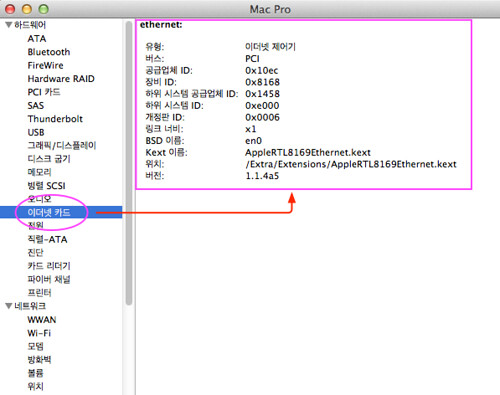
I. 우선 네트웍 드라이버가 로딩되었는지 확인한다.


AboutthisMac01


AboutthisMac02


AboutthisMac03


II. 인터넷 제공 회사의 맥인증 회피하는 방법

II-1. 맥 컴퓨터에 DNS 주소를 직접 입력하는 방법. 


아래 그림에서 라우터 주소, 즉, 공유기 주소가 192.168.10.1 이라는 것을 기억해 두자.


II-2. 공유기가 있을 경우 공유기에 접속하여 DNS 주소를 설정하는 방법
- 위에서 확인한 공유기 주소 http://192.168.10.1 에 Safari를 이용하여 접속한다.


III. 맥 OS X 네트웍 설정이 제대로 안잡히는 경우.

1. 이런 경우는 먼저 랜케이블이 제대로 연결이 되어 있는지를 확인한다. (LED 확인) 

2. 다음은 시스템 환경에서 다시 설정해 준다.  

3. 이도 저도 안된다면 다음과 같은 방법을 사용한다.          

- “-f -v -s”옵션을 주어 싱글유저 모드로 부팅하거나 혹은 터미널을 실행하여 다음 명령어를 실행한다.

- $/sbin/mount -uw /          

- $cd /Library/Preferences/SystemConfiguration          

- $mv preferences.plist preferences.plist.Bak          

- $mv com.apple.network.identification.plist com.apple.network.identification.plist.Bak << 우선은 이 부분은 적용하지 말자. 안될경우 다시 싱글유저부팅부터 다시 시작하여 이 단계를 적용한다.         

 - exit 


4.이렇게 적용하여 주면 시스템이 reset이 아닌 다중유저 모드로 부팅진행하면서 네트웍 설정을 자동으로 다시 잡아준다.   

물론, 이때 랜선은 연결하여 두는 것이 좋다.


:
Posted by Ritz®™
2009. 1. 29. 00:21

HP Mini 1013TU에 Leopard 설치하기 Hackintosh/NoteBook2009. 1. 29. 00:21


I. 준비사항

1. 10.5.5 로 설치하여 10.5.6 으로 업데이트 한다.
2. 10.5.5 보다 10.5.6 이 특이하게 1013TU에서는 더 안정적이다.
3. 다음 사항을 유의하여 준비한다.

update Mobo bios to latest F.05
- Ich fix
- ACPI fix
- cpus=1 fix
- remove firewire
- BCM 4312 를 활성화하기 어려움 고려.
- Macdrive for Windows S/W
- USB H.D.D.
- USB Memory Stick for Boot-132, kext를 미리미리 준비해 두는 것이 건강상 이롭다.
- single GUID partition 
- ACPIplatform and AHCI kext 
- wireless 가 가끔 작동하지 않는다.
- EFI and DSDT patch
- 10.5.6 update
- Touchpad 세팅
- 10.5.6 업데이트 후에는 touchpad, keyboard and GMA 950 driver를 설치해야 하므로 반드시 USB Mouse/Keyboard를 준비해야 한다.


1. 27aeAppleIntelGMA950.kext
27aeAppleIntelIntegratedFramebuffer.kext --> video driver. modified from 10.5.6. The "27ae".

2. AppleACPIPS2Nub.kext
ApplePS2Controller.kext --> PS2 driver.

3. AppleHDA.kext --> Audio driver. sound 드라이버 문제는 아직 해결 되지 않은 듯.

4. AppleSMBIOSEFI.kext --> This is an interesting kext which tells OSX your mini is MacBookAir. (I put it in just because the only real mac with PATA 1.8' HD is Air.) The serial number within is w1234567890. But you can modify it with HexEditor.

5. AppleYukon.kext
IO80211Family.kext --> Driver for wired and wireless ethernet. The IO80211Family is from 10.5.6.

6. ClamshellDisplay.kext
EHCISleepEnabler.kext
IOUSBFamily.kext --> They are the drivers for sleep. The IOUSBFamily was modified from 10.5.6.

7. VoodooBattery.kext
VoodooPower.kext --> They are battery meter and CPU powermanager (Enable step-speed to save battery life.) 
Maybe you will find that there is no ACPIPlatform. Yes! We can use the original 10.5.6 ACPIPlatform.kext without any modification. And you don't need "cpus=1" either. Function keys like "brightness control" "sleep(fn+f1)" both works.


한번 설치하고 나서 스크린 샷도 멋있는 게 없고 또한 내 손을 떠난 노트북이어서 기억을 더듬어 정리하여 두는게 적절할 것 같아서....
이거 처음 설치하느라 2일 정도 소비를 한 듯 싶군요.
다시 설치하더래도 똑같은 시간이 걸릴 듯.....
하지만, 한번 설치하고 나면 OSX 특성상 굉장히 안정적이라는거......

'Hackintosh > NoteBook' 카테고리의 다른 글

NC10  (0) 2009.04.16
NC10에 해킨토시 설치하기  (5) 2009.04.16
HP Mini 1001TU 와 OSX Leopard  (6) 2009.03.09
HP Mini 1013TU  (1) 2009.02.28
Fujitus P1620 미니 타블렛 노트북  (0) 2009.02.11
:
Posted by Ritz®™


먼저 DVD 굽는 방법은 그래픽하고 제가 올려둔게 있습니다.  참고하세요.
http://osx86.tistory.com/1022
설치 방법은 다음과 같이 요약할 수 있습니다.
1. AMD 시스템일 경우.(이미 설치팁은 읽어 보셨을텐데....좀 달리 보이게 하기 위해)

http://www.edusuin.com/ritz/?no=245&category=17

2. 이것도 이미 설치팁란에 있지만 이렇게 링크를 걸어서 보여드리면 쏙쏙 이해를 하실련지...
http://x86osx.com/bbs/view.php?id=osxtips&page=1&sn1=&divpage=1&sn=off&ss=on&sc=on&select_arrange=reg_update&desc=desc&no=143
혹은
http://www.edusuin.com/ritz/?no=234&category

3. 이것도 저것도 어려우시면 고스트 이미지 설치라도... 
http://x86osx.com/bbs/view.php?id=pds&page=1&sn1=&divpage=1&sn=off&ss=on&sc=on&keyword=%B0%ED%BD%BA%C6%AE&select_arrange=headnum&desc=asc&no=127

4. 마지막으로 정 이해하기 힘드시면 그냥 아시는 분에게 하드디스크 들고 가셔서 설치해달라고 하셔서 디스크만 달랑 가져다 붙여서 부팅하시는 방법도 있습니다만.....

이제 본론으로 들어가겠습니다.

* 다음 단계로 가기전에 반드시 MAC OSX 파티션이 primary/active되어 있는지 확인하셔야 합니다.  
* 또한 CMOS SETUP에서 반드시 AHCI 관련 설정을 하여 주어야 합니다.

이 부분이 안되어 있으면 다음과정이 전혀 무의미합니다.  왜냐하면 부팅 자체가 안되거든요.  ^ ^

1. 안전모드 부팅
1-1. -x 옵션 혹은 shift 키를 이용한 안전모드  / 해상도 변경 실패시 응용하면 좋겠죠?
f8키 눌러서 쉬프트키를 누른 상황에서 부팅시도를 해보세요.??안전모드(safe)인데 만약 안전모드로 부팅이 안되시면 다른 이미지(MyZar/Jas) 하셔야 할 듯.... 주의!!! safe 모라고 메시지가 나오기전까지는 쉬프트키를 꾸욱 누르고 있어야 합니다.
안전모드 되신다면 바로 com.apple.boot.plist 화일을 조정해보시구요.
"-x -v" 와 같이 혼합하여 사용하셔도 좋을 듯 합니다. 
* 안전 모드로 부팅 안 될 경우에는 거의 포기를 하셔야 한다고 보여집니다만, 혹시 CMOS SETUP 을 그동안 변경해 오셨다면 CMOS SETUP을 DEFAULT 값으로 재 설정하시고 부팅 시도해보세요.

2. 다음은 싱글모드 부팅방법.
-s 옵션 주시고 "-s -v"와 같이 혼합모드도 괜찮구요.

#mount -uw /
#cat /Library/Preferences/SystemConfiguration/com.apple.boot.plist 

com.apple.boot.plist 화일을 점검하시는 것두 한 방안입니다.
<?xml version="1.0" encoding="UTF-8"?>
<!DOCTYPE plist PUBLIC "-//Apple Computer//DTD PLIST 1.0//EN" "http://www.apple.com/DTDs/PropertyList-1.0.dtd">
<plist version="1.0">
<dict>
<key>Kernel</key>
<string>mach_kernel</string>
<key>Kernel Flags</key>
<string>rd=disk0s3</string>
<key>Boot Graphics</key>
<string>Yes</string>
<key>Timeout</key>
<string>15</string>
<key>Graphics Mode</key>
<string>"1280x1024x32@60"</string>

</dict>
</plist>

위에서 보시면 <string>rd=disk0s3</string> 이 나오는데, disk0s3 즉, 세번째 파티션이 만약 윈도우즈 xp라면 MAC OSX 로 선택하였다 할지라도 윈도우즈 XP부팅로더가 나올겁니다. 아니면, 저렇게 아예 맥파티션을 꽉 고정시켜 주시면 MAC OSX로 부팅될 겁니다. 

**  아주 중요!!!!  또한 패치수행이나 기타 시스템 화일 깨짐으로 생기는 부팅 불가능일 경우에도 DVD 로 부팅시도하면 부팅이 되는 경우가 있습니다.  DVD로 부팅할거냐라는 메시지가 나올때 당근 F8 누르시고 난 후, 옵션에서 하드디스크를 지정해 주면 하드디스크 구성으로 부팅이 됩니다.
옵션 예 ) -x -v rd=disk0s1, 여기에서 안전 모드로 부팅예를 들었지만 "-x"만 빼면 하드웨어에 구성되어진 대로 일반 부팅이 됩니다. 

3. 부팅시 옵션 주는 방법
3-1. 물론, F8 키를 누르신 후, 옵션을
mach_kernel -x -v -f "Graphics Mode"="1024x768x32" platform=X86PC rd=disk0s1
이렇게 옵션을 줘서 부팅시도를 하셔도 되구요. 암튼 도움이 되었으면 하는 바램입니다.


3-2. OSX가 XP보다 먼저 부팅될때는 시스템이 하드디스크를 액세스하여 OSX를 로딩할때 F8키를 누르셔서 XP로 부팅하신 다음, XP의 파티션 유틸리티에서 ACTIVE로 설정하시면 XP파티션이 주파티션이 되어 XP boot loader를 이용하실 수 있습니다.
이때, F8키를 누르는 타이밍을 잡기 어려우시다면 OSX설치 시디등을 넣어서 CD로 부팅할려면 마무키나 누르세요 라는 메시지가 나오고 꾸욱 참고 있다가 화면 전환이 되면 이때 F8키를 누르시면 타이밍을 잡기가 쉽습니다만....다른분들은 어떻게 하시는지......^ ^??물론, Timeout을 10초 정도 주면 편하겠지만...

4. 시스템 드라이버 관련 백업방법
이건 정말 금과옥조입니다.
http://x86osx.com/bbs/view.php?id=osxtips&page=2&sn1=&divpage=1&sn=off&ss=on&sc=on&select_arrange=headnum&desc=asc&no=85

5. 마지막으로 질답란에 글 올리는 방법
5-1. 자신의 시스템 사양을 명확하게 명시하여야 합니다.
예제는 다음과 같습니다.
##################################################################################
인텔 펜티엄4 프레스캇 511(2.6GHZ)
DDR2 삼성 512M
MSI 945P Neo2-F  메인보드
ATI Radeon X550 EVERTOP 256MB/1024x768@60/
삼성 S-ATA 80G 7200rpm P80SD
OSX 10.4.7 Myzar Update in JAS 10.4.6
##################################################################################
위 정도의 기본 정보도 안올려 주시고 질문 올리시면 답변해주실려는 분도 아픔이 많으실 겁니다.

5-2. 다음은 -v 옵션을 주었을때 에러메시지를 같이 올려주는 센스는 기본입니다.
이렇게 해도 문제점을 분석하기에는 여기 사이트에 들어오시는 고수분들도 어렵습니다만, 단순히 "설치팁란 글 다 읽어 보았는데 부팅이 안됩니다.  어떻게 할까요?"
이렇게 글을 올리셔서 해결책을 고수분이 알려주신다면 그 고수분은 거의 무당수준이 되어야 하겠지요?  ㅋ ㅋ 

'Hackintosh > Q&A' 카테고리의 다른 글

이미지가 마운트 안될때  (0) 2009.02.09
Spotlight so much as one of the index plugins (mdimporters)  (0) 2009.02.08
Spotlight is going rampant here.  (0) 2009.02.08
Safari 사용법  (0) 2009.02.08
chain booting error를 피하는 방법  (0) 2009.01.28
:
Posted by Ritz®™
2009. 1. 28. 23:33

chain booting error를 피하는 방법 Hackintosh/Q&A2009. 1. 28. 23:33

1. 가능한 XP와 MAC OSX를 물리적으로 다른 하드에 설치한다.
어쩔수 없이 하나의 하드디스크에 여러가지 운영체제를 설치하여야 한다면 다음과 같시 설치하는 것이 바람직하다.

파티션1 : Windows 설치 파티션 (Primary Partition) 
파티션2 : Mac OS X 설치 파티션 (Primary Partition) 
파티션3 : 기타 파티션 (Extend Partition), FAT32로 포맷해두면 MAC과 Windows에서 데이타 쓰고 읽기가 가능하여 데이타 공유가 편리하다.

2. OS 설치시에 OSX를 먼저 설치하고 다음 Windows를 설치하는 것이 좋다.

3. 중요한 것은 다음 두가지다.
- 파티션 순서
- 파티션 활성화
:
Posted by Ritz®™