달력

1

« 2025/1 »

  • 1
  • 2
  • 3
  • 4
  • 5
  • 6
  • 7
  • 8
  • 9
  • 10
  • 11
  • 12
  • 13
  • 14
  • 15
  • 16
  • 17
  • 18
  • 19
  • 20
  • 21
  • 22
  • 23
  • 24
  • 25
  • 26
  • 27
  • 28
  • 29
  • 30
  • 31


Update : https://cafe.naver.com/uefi/14871

HP Elitebook 8540p
배포본: Retail 순정 설치이미지를 좌측 USB포트에 외장형 하드디스크를 연결하여 부팅한후 Disk Utility이용, http://cafe.naver.com/uefi/3388
Version: Mountain Lion(10.8)
Related Web: Update: 10.13
https://cafe.naver.com/uefi/14871
Install: 1. CMOS SETUP
- 부팅시 ESC키를 누르고 F10을 누르면 BIOS 진입
- IDE에서 AHCI 모드 설정
- 이때, F9를 누르면 USB등 부팅디스크 선택가능
HDD >> AHCI설정.


System Spec:

HP Elitebook 8540p
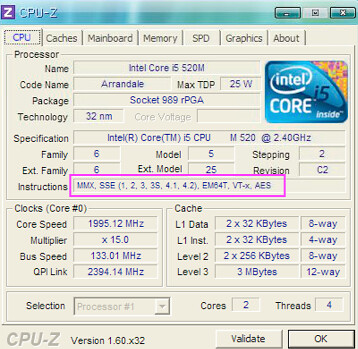
Intel® Core™ i5-520M(2.4GHz, 3MB L3 캐시)
Mobile Intel® QM57 Express Chipset
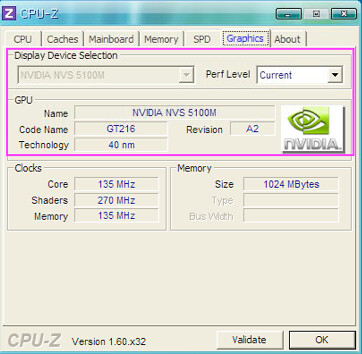
NVIDIA NVS 5100 그래픽(1GB GDDR3 전용 비디오 메모리 포함)
4GB 1,333MHz DDR3 SDRAM
SATA ll SSD 128GB
SATA II (7200rpm) : 500GB
USB 2.0 3개,USB 3.0 2개,디스플레이 포트 1개,1394a 1개,eSATA 1개
Intel 기가비트 네트워크 연결(10/100/1000 NIC)
Intel Centrino® Advanced-N 6200 (2x2) 802.11a/b/g/n
Bluetooth® 2.1 무선 기술을 적용한 HP 통합 모듈
2MP 웹캠
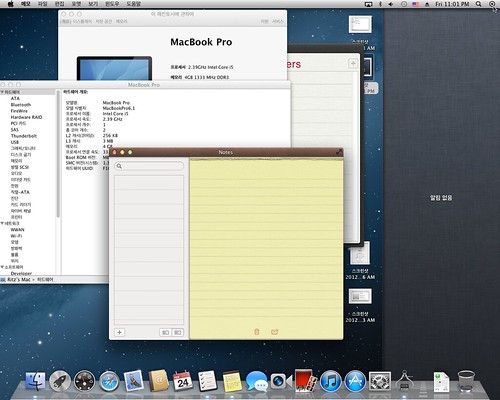
EliteBook 8540p
EliteBook 8540p
EliteBook 8540p

Mountain Lion


video 3D
battery
sound
volume controls
DVD

XP용 드라이버
http://h20565.www2.hp.com/portal/site/hpsc/template.PAGE/public/psi/swdHome/?javax.portlet.endCacheTok=com.vignette.cachetoken&sp4ts.oid=4096169&javax.portlet.begCacheTok=com.vignette.cachetoken&javax.portlet.tpst=62d565a4b5634a4ab8c8fa22b053ce01&javax.portlet.prp_62d565a4b5634a4ab8c8fa22b053ce01=wsrp-navigationalState%3Dlang%253Dko%257Ccc%253DKR%257CprodNameId%253D4096169%257CprodSeriesId%253D4097214%257CswLang%253D26%257CswEnvOID%253D1093%257Caction%253DlistDriver&ac.admitted=1332166841608.876444892.492883150


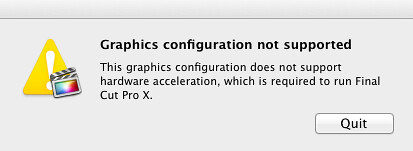
But, Final Cut Pro X didn't work atm,
I should be back Snow Leopard(10.6.8), Damn
"Graphic configuration not supported."
I think I need crack. :D

Yea, it need Final Cut Studio not X.

Final Cut Pro X


'Hackintosh > NoteBook' 카테고리의 다른 글

Asus G53JW  (0) 2012.04.12
ThinkPad E420  (3) 2012.04.03
해킨토시 Lion 설치 가이드 HP Probook for 4230s, 4330s, 4430s, 4530s, and 4730s.  (5) 2012.01.28
Dell Studio 1749 + Retail 10.6.3 DVD  (0) 2012.01.19
HP hdx18-1108tx  (0) 2011.09.18
:
Posted by uno-ani
2012. 2. 21. 17:13

Mac OS X 복구 또는 재설치하는 방법 Hackintosh/Tip2012. 2. 21. 17:13

Update : Lion이상 버전부터는  Lion DiskMaker를 이용하여 USB비상설치용을 이용하는 것이 좋다.
 

복구 또는 재설치하는 방법

- 재설치하기 전에 공장초기화하는 방법 : http://osx86.tistory.com/389

준비물 : 
    - USB Memory Stick. : http://osx86.tistory.com/1284
    - Retail DVD 이미지(DMG 이미지 혹은 ISO 이미지, Torrent사이트등에서 쉽게 구할 수 있으며 반드시 Retail 이미지여야 한다.)

1. 맥북이나 아이맥에서 디스크 유틸리티에서 복구 파티션 혹은 Retail DVD이미지를 이용하여 USB에 복원한다.
    - Lion에서 비상용 복구 USB 만들기 : http://osx86.tistory.com/1247

2. 맥북에어나 아이맥에 USB를 꽂고 전원을 넣는다.

3. 옵션키을 누르고 부팅할 파티션이 나올때까지 대기한다.

4. 부팅 파티션이 메뉴에 보이면 Install DVD 파티션을 선택한다.
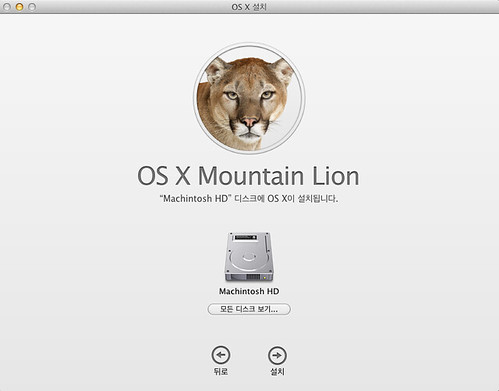
   - MountainLion

5. 계속을 누르고 위 상단 메뉴에서 디스크 유틸리티를 실행한다.
    - 이때 디스크 유틸리티에서 디스크 권한 복원을 실행하여 다시 Machintosh HD로 재부팅한다.  
    - 부팅이 안되면 다시 2번과정부터 반복하고 다음 6번 과정으로 넘어 간다.

6. 기존 Machintosh HD 파티션을 지우기로 지웁니다.  이때 Mac OS X(저널링)으로 포맷한다.

7. 디스크 유틸리티를 끝마치면 다시 설치과정으로 진입하고 설치계속 한다.

8. 설치하고 재부팅하여 마지막 세팅작업까지 마무리 한다.

9. 참고 : http://osx86.tistory.com/1116

:
Posted by uno-ani

참고 : http://osx86.tistory.com/1332

안전모드 (to Safe Boot)로 부팅하기:

  1. Mac 이 다운되었는지 확인한다.
  2. 전원버튼을 눌러 맥을 시동한다.
  3. 시동음이 들리는 것과 즉시, Shift key를 지긋이 계~~~에속 눌러준다. Shift 키는 가능한 시동음이 들림과 동시에 눌러야 하지만 시동음 전에 누르면 의미없다.
  4. 애플아이콘이 보이면 Shift 키는 놓아주고 진행중인 바를 보게 될 것이다.

Mac OS X v10.4 이후 Mac OS X v10.6.8 버전등에서는 안전모드(Safe Boot)라는 로긴 윈도우를 보게 될 것이다. 

안전모드(Safe Mode)를 벗어나기 위해서는 재부팅하여 주면 된다.

추가 정보

추가: 만약 키보드를 사용하여 안전모드(Safe Boot)이 안된다면

만약 어떤 이유로 키보드를 이용해서 안전모드 부팅이 안된다면 그리고 이미 컴퓨터에 원격로그인이 되어 있다면 다음 방법을 이용할 수 있다.

  1. 원격 Terminal 이나 혹은 SSH를 이용하였을 경우 다음방법이 가능하다.
  2. 다음명령어를 Terminal 에서 실행한다.:

    sudo nvram boot-args="-x"

    (만약, 부트로그를 볼 수 있는 Verbose 모드로 부팅하고 싶다면sudo nvram boot-args="-x -v"
     
  1. 안전모드(Safe Boot)로 부팅한 후에 일반적인 부팅방식으로 변경하고자 할때에는 다음 명령을 Terminal에서 실행할 수 있다:

    sudo nvram boot-args=""


:
Posted by uno-ani
2012. 2. 14. 09:24

Hackintosh, without Mac Hackintosh/Install2012. 2. 14. 09:24


I haven't tried installing it yet because the files are still copying. I'll update this thread as soon as possible. :)
Update: Forgot the "Extra.rar" part. Pretty important, since it crashes without it. Somehow my USB Drive got fucked and now I need to re-do everything again. Shit. Well, tomorrow I'll let you know if it works.

Hai guise.

I got interasded into installing OS X onto a PC. Especially since people said it was impossible without having a Mac. These two (linked) tutorials for example:
http://lifehacker.co...start-to-finish
http://lifehacker.co...acking-required

Well, it should be possible. For as far, I haven't encountered anything really impossible. Just extremely hard. Now comes the tutorial of how to prepare a Mac OS X Snow Leopard installation USB drive without using a Mac.

First, you will need these things. Get them or download them and put them in an easy to access place.
- a computer capable of USB booting running Windows
- a Mac OS X Snow Leopard upgrade/installation disk
- an USB drive AT LEAST 8GBs big (because the disk image is 8GBs big)


That'll be the hardware you need. Now for the software. Install it and save the files to somewhere handy.
Software/programs:
- MacDrive. This program is needed because it makes it possible to do pretty anything.
MBRFix. This utility will provide functionality not found in Windows. Download it from the site and keep it somewhere handy.
dd for Windows. This utility will provide functionality not found in Windows. Keep it somewhere easy accessible.


Files:
Chameleon. This will provide some neccesary files. Download the latest thing, extract it to a folder and keep it somewhere where you can get to it easily.
PC EFI. It's a BIOS replacement for the installer to load. Otherwise, it will simply crash upon loading.
Extra.rar. Some neccesary files. Won't work without it.


Now you have gathered the needed stuff, let's get to work!

Insert your USB Drive. Awesome. Now go to Computer, right-click on your USB Drive, and choose "Mac Format". [MF.png] Now you will have to choose to modify the volume. Select it on the list and click on format. You will need to select "HFS+ Case Sensitive" for it to work. Let it format.

Now you have formatted your USB Drive with the correct file system, you will need to make it bootable. Let's go manual.

First of all, we will need to know your drive ID. We don't want to mess up your Wondows MBR, do we? To do this, fire up cmd from [Windows + R] by typing cmd in the dialog. A cmd window will appear. Type in DISKPART. Et voilla, the DISKPART program will start inside CMD. Now, type in "LIST DISK". You will see a list of physical disks. Write down the number of your USB Drive. We will need this.

Fire up MBRFix.exe through cmd.exe. To do this, open the folder with MBRFix.exe and drag and drop the file into cmd. The path to the MBRFix.exe will appear. Good job! Now type the following into it, filling in the [..] with the corrosponding files or locations. (Without the []s ofcourse)
/drive [Drive number you wrote down] restorembr [path to boot0 file]

The boot0 file I'm talking here refers to the boot0 you had to download earlier. It's from the chameleon archive in the i386 folder. Select it in its folder and drag and drop the boot0 file into the cmd prompt after removing [path to boot0 file]. The file path should appear. Press enter. Press Enter once again (for confirmation) Now you can only hope you have done it correctly, because no messages will inform you of what you just did. What you hopefully just did, is copying the file "boot0", which is 512bytes big, into the MBR. You just modified the Master Boot Record of your USB drive and it's going to help you loading the OSX installer.

Next up, get dd.exe into cmd the same way you did with FixMbr.exe. Copy and paste this line:
if=[location of boot1h file] of=\\.\[Drive letter]:

What this does, is copying the boot1h file to the VBR, Volume Boot Record. The "if" means input file, the "of" means output file. But here we want to edit the drive itself. Once again, remove the [location of boot1h file] and drag and drop the file into cmd with the cmd cursor after the "if=". For the of=, you just need to chnage [Drive letter] to your drive letter. For example, if your USB Stick is E:, replace [Drive letter] with "e". Now press enter. If you have done it correctly, it will say 
2+0 records in
2+0 records out
and a message that it succeeded.
DONE! At least, with the hardest part. This took me many more hours of searching and such.

Now we want to get our files onto the USB Drive. Insert your Mac OS X Snow Leopard install DVD. You will see something like Bootcamp or something, instead of OSX installation files. Not the thing you want. Go to Computer, and right click on your drive. Select "Show Mac Files". Also, do select "Mac File Names" and choose "Backup / File transfer". Why? Because if we don't, things tend to fuck up. Now go Folder options and disable hiding of hidden files and system files. This is important too, Windows hides important system files to stop you from tampering with them. Also, seeing desktop.ini on your desktop is ugly. Now you can open the drive by double clicking it. Now you will see a lot of files. [DVD.png] You can copy them directly onto your USB Drive. 

Now you will need to extract the Extra.rar you just downloaded. Extract them directly onto the USB Drive.

One more thing... The file you downloaded, boot.gz2. Extract it and copy the boot file onto your USB drive. Just copy it. No need for registering and such. You're finished! Magnificent!

Now reboot, select your USB Stick to boot, and install it! This part should be pretty simple. It should load up with an Apple logo, and not crash instantly. It may take a while, loading from USB drives has never been fast. (At least, here). Good luck you all :)

Windows Developer Preview WDK (x86 and x64)
  You can use the DEBUG.
 A: \> the DEBUG
 - A 100
 MOV AX, 201
 MOV BX, 200
 MOV CX, 1 
 MOV the DX, 80
 INT 13
 INT 3
 ^ C,
 -G = 100 (Master Boot Record to read into memory starting 200H)
 -D, 3B0 3FF (display the partition table and found the boot logo "55" instead of "80H" or "00H")
 00 trillion 00-00 00 00 00 00 00 55 01
 01 00 04 0F 33 4F 33 00-00 00 CD the FE 00 00 00 00 
 FF-00, the F3 of F0 00 01 50 05 0F 00 30 91 0B 00 00 00
 00 trillion 00-00 00 00 00 00 00 00 00
 00 00 00 00 00 00 00 00-00 00 00 00 00 00 55 of AA
 -E 3BE 80 (to be the boot logo changed to 80)
 -E-102 3 (modified to compile a small program, the first statement)
 -G = 100 (the modified master boot record is written to the hard disk) 
:
Posted by uno-ani
2012. 2. 9. 13:30

4870x2 Hackintosh/Graphic Card2012. 2. 9. 13:30

10.7.2용 그래픽 카드 드라이버
http://www.mediafire.com/?5u7xtwrduu5d7bv

10.7.3용 그래픽 카드 드라이버

설치방법
First time GraphicsEnabler=No,Download QE_CI Exotic patch Lion_10.7.3_(11D50) add 0x94411002 in ATIRadeonX2000.kext and ATI4800Controller.kext

Install it with Kext Utility,repair permissions and reboot with GraphicsEnabler=Yes.


:
Posted by uno-ani
2012. 2. 3. 17:40

해킨토시 - GTX 550 Ti Hackintosh/Graphic Card2012. 2. 3. 17:40

Lion으로 Mac OS X 가 출시되면서 ATI계열의 그래픽 카드에 비해 Geforce 계열 그래픽 카드가 많은 어려움이 있다.
10.7 GM 버전에서는 다행히도 GTX 550 Ti 가 잡힌다.

I. GTX 550 Ti 제품인 경우 레퍼런스 모델과 비레퍼런스 모델이 있다.
- 레퍼런스 모델인 경우 간단하게 Device-ID만 /System/Library/Extensions/NVDAGF100Hal.kext 에 넣어주면 된다.
- ATY_Init.kext 는 /System/Library/Extensions/ 에 설치한다.

II. 비레퍼런스 모델인 경우에는 드라이버 설치가 필요하다.
일단, 10.7 GM버전까지 설치사용가능한 방법이다.
 
http://www.mediafire.com/?i4i927xb00025ft

1. kext 드라이버는 s/l/e 에 설치한다.
/System/Library/Extensions/ 

2. device-properties 값을 넣어준다.
/Extra/org.chameleon.Boot.plist  

III. GFX-String 이용
 GFX-String방법
즉, Graphic Mode 와 device-properties 값만 넣어주는 방법이다.
    <key>EthernetBuiltIn</key>
    <string>Yes</string>
    <key>GenerateCStates</key>
    <string>Yes</string>
    <key>GeneratePStates</key>
    <string>Yes</string>
    <key>Graphics Mode</key>
    <string></string>

    <key>Kernel</key>
    <string>mach_kernel</string>
    <key>Kernel Flags</key>
    <string>npci=0x2000 darkwake=0</string>
    <key>Legacy Logo</key>
    <string>Yes</string>
    <key>Timeout</key>
    <string>2</string>
    <key>UseKernelCache</key>
    <string>Yes</string>
    <key>device-properties</key>
    <string>700200000100000001000000640200000d00000002010c00d041030a000000000101060000010101060000007fff04001e00000072006f006d002d007200650076006900730069006f006e000000300000006e5669646961204765666f72636520475458203535305469204f70656e474c20456e67696e65205b4546495d22000000400030002c006400650076006900630065005f00740079007000650000000b000000646973706c6179100000004e00560043004100500000001800000004000000000003000c00000000000007000000000e0000006e0061006d00650000000b000000646973706c617914000000400030002c006e0061006d0065000000120000004e5644412c446973706c61792d41100000006d006f00640065006c0000001c0000006e5669646961204765666f726365204754582035353054690e0000004e00560050004d000000200000000100000000000000000000000000000000000000000000000000000014000000400031002c006e0061006d0065000000120000004e5644412c446973706c61792d4220000000400031002c0063006f006d00700061007400690062006c00650000000e0000004e5644412c4e564d6163220000005600520041004d002c0074006f00740061006c00730069007a0065000000080000000000004020000000400030002c0063006f006d00700061007400690062006c00650000000e0000004e5644412c4e564d616322000000400031002c006400650076006900630065005f00740079007000650000000b000000646973706c61791c0000006400650076006900630065005f00740079007000650000000f0000004e5644412c506172656e74</string>

IV. ....
:
Posted by Ritz®™


그림이 안보인다면 클릭하여 꼼꼼하게 설정하여 준다.

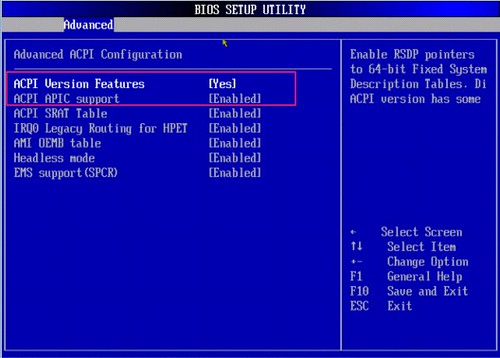
1. ACPI 설정
BIOSAdvancedAdvACPI

- ACPI 사용으로설정

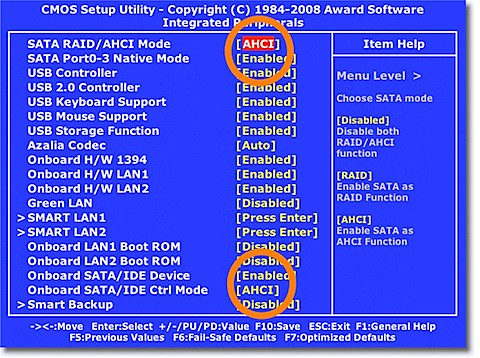
2. AHCI 설정
Boot CD
- HDD는 AHCI 모드로 설정

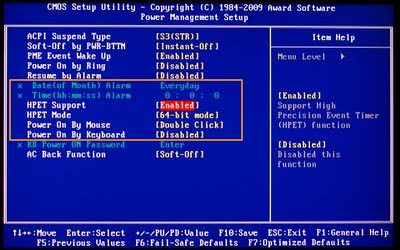
3. HPET 설정
bios_settings11

- ACPI는 S3(STR)로 설정
- HPET는 "Enabled"로 설정
- HPET모드는 "64-bit mode"로 설정

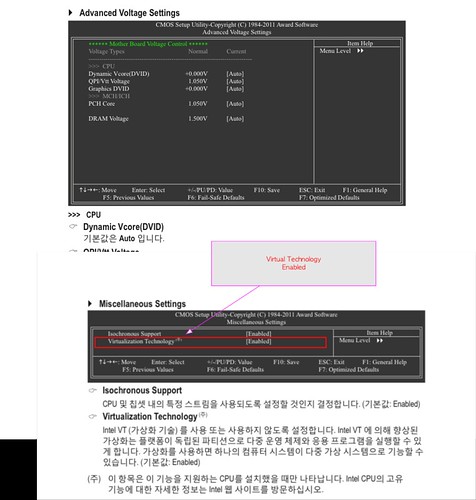
4. Virtual Technology 설정

VirtualTechonology


- Virtual Technology는 "Enabled"로 설정

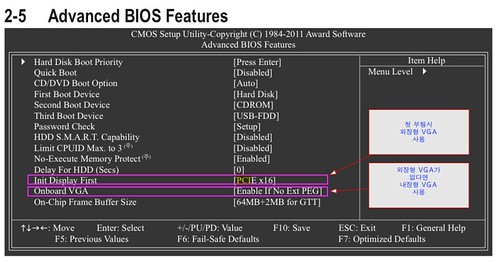
5. VGA 설정

VGA

기본적으로 외장형 VGA를 사용하게 설정된다.

:
Posted by Ritz®™
CPU :Core i3 CPU 2310m, vanilla 64 bit kernel (Core i5 / i7 포함)
Graphic : Intel HD3000- Full QE/CI (SMBIOS 세팅 MacbookPro8,1)
Atheros 9285- 동작
4 G RAM
Audio - AppleHDA!
트랙패드와 키보드 - 기본적인 제스처 동작
DVD 
잠자기 - 작동
불루투스- 재부팅 과 잠자기 제외한 동작됨.
랜 - 작동
HDMI 와 VGA: Full resolution & HDMI audio

Lion USB 와 unibeast 를 이용하여 설치

준비물 
  • 설치용 Mac OS X Lion.app 화일
  • 첨부된 화일
  • Unibeast 최신버전
  • USB 키보드
  • OS X 설치과정에 진입하기 위하여 Lion/Snow Leopard 혹은 Leopard 시스템이나 Vmware/Native 해킨토시가 있는 것이 좋다. 추가 : http://osx86.tistory.com/1302
  • 8G 이상 USB 메모리 스틱.

1. Mac where Install Mac OS X Lion.app 화일이 있는 곳으로 간다. 만약 어플리케이션 폴더로 보이지 않는 다면 다음 단계를 진행하지만 어플리케이션 폴더로 보인다면 2단계로 간다.

-Install Mac OS X Lion.app 폴더에서 우측마우스 클릭하여 Show Package Contents를 클릭한다.
-"Contents/Shared Support" 로 가서 InstallESD.dmg파일을 클릭하여 마운트 한다.

2. 8G USB 메모리 스틱을 넣고 Disk Utility를 실행한다.  MBR 파티션맵으로 파티션하고 Mac OS X Extended (Journaled)로 포맷한다. 이름은 Installer로 준다.

3. Disk Utility를 마치고 Unibeast를 실행하여 8G USB에 설치한다.   설치하는 동안 "Retail App Store Install"과 "Laptop Support"를 선택하고 다시 8G USB를 선택하여 설치한다.

4. HP Probook Installer 를 8G USB 메모리스틱에 복사하여 준다.

5. 이제 랩탑에 내장형 GPU HD 3000 이외에 GPU가 있다면 BIOS SETUP에서 disable 시킨다. 만약 부팅이 안된다면 BIOS세팅을 Default로 재세팅하고 추가 GPU가 있다면 다시 disabled로 설정한다.

6. 8G USB를 연결하고 부팅한다.

7. 부팅이 시작되면 esc키를 눌러주고 F9를 누른다.  그리고 USB 메모리 스틱을 선택하여 부팅하고 Installer를 선택하여 enter를 입력하여 설치화면으로 진입한다. 
 - http://osx86.tistory.com/1026 , 설치과정동안 디스크유틸리티를 실행하여 디스크 파티션을 설정, 설치하는 과정이 설명되는데 파티션명을 영문으로 "Machintosh HD"로 설정하여 설치해주는 것이 좋다.
 - http://osx86.tistory.com/1030, 이번에는 "Machintosh HD"를 선택하여 계정 세팅을 하는데, 가끔 한글계정으로 로긴이 안되는 불상사를 막기위하여 가능한 한글계정보다는 영문으로 설정하여 주는 것이 좋다.  또한 USB키보드가 필요할 수 있으니 USB키보드를 연결하여 사용하는 것을 권한다.

8. 일반적인 셋업과정이 끝나면 데스크탑을 보게 될 것이고 Installer라고 명명된 8G USB 메모리 스틱을 열고 HP Probook Installer를 바탕화면으로 드래그앤 드랍으로 복사하여 준다.

9. Installer를 클릭, 실행하여 아래 항목을 선택한다.:
- 설치한 OS X 버전 선택
- Chimera 부트로더 선택
- DSDT 항목 아래 자신의 BIOS를 선택
- i5 혹은 i7 CPU 선택

10. 이제 8G USB 메모리 스틱을 빼고 하드디스크로 직접 부팅해 본다.

11. 시스템 환경 설정을 열고 네트워크를 선택실행하여 wifi가 추가되어 있다면 활성화(activate)를 적용(apply)한다. 


Software Updates:

간단하게 한번에 업그레이드를 진행한다.  한번더 Lion을 설치하였고 HP Probook Installer를 실행하여 모든게 정상적으로 동작하고 있어야 한다.  이제 Apple사에서 직접 combo update를 직접 다운로드 받아서 진행한다. 

10.7.1- 
- 간단하게 Apple사에서 다운로드하고 업데이트한다. http://support.apple.com/kb/DL1437 
- 이제 HP Probook Installer를 실행하여 OS X 버전을 선택하여 설치한다.  이제 재부팅한다.

10.7.2- 
- Standalone 버전이나 혹은 Combo 버전을 다운로드하여 설치한다.
- 이제 HP Probook Installer 를 실행하고 OS X 버전을 선택하여 설치한다.  재부팅한다.


Attachments:
File comment: Version 3.1.1
 HP Probook Installer.zip [22.51 MiB] 
Downloaded 691 times 

_________________
Dell Inspiron 6000, Leopard(10.5.8)

HP Probook 4530s Lion(10.7.2) 설치가이드
- http://www.tonymacx86.com/viewtopic.php?f=259&t=41546

HP Probook 4530s Snow Leopard(10.6.?) 설치가이드 
- http://www.tonymacx86.com/viewtopic.php?f=259&t=41547&start=10


이 글이 도움이 되었다면 아래 추천 꾸욱 눌러 주세요.


'Hackintosh > NoteBook' 카테고리의 다른 글

ThinkPad E420  (3) 2012.04.03
해킨토시 Mountain Lion설치 - HP Elitebook 8540P / W  (9) 2012.02.23
Dell Studio 1749 + Retail 10.6.3 DVD  (0) 2012.01.19
HP hdx18-1108tx  (0) 2011.09.18
Samsung R580 해킨토시 설치하기  (0) 2011.07.24
:
Posted by uno-ani