달력

1

« 2025/1 »

  • 1
  • 2
  • 3
  • 4
  • 5
  • 6
  • 7
  • 8
  • 9
  • 10
  • 11
  • 12
  • 13
  • 14
  • 15
  • 16
  • 17
  • 18
  • 19
  • 20
  • 21
  • 22
  • 23
  • 24
  • 25
  • 26
  • 27
  • 28
  • 29
  • 30
  • 31
2009. 12. 18. 13:42

USB Boot issue with Chameleon 2.0-RC2~RC4 Hackintosh/Chameleon2009. 12. 18. 13:42

Chameleon 2.0-RC2~RC4

Symptom:

There were some issue, chameleon installed in USB.


Com.apple.Boot.plist:

Check /Extra/com.apple.Boot.plist and /Library/Preferences/SystemConfigurations/com.apple.Boot.plist


Solution:

1. Instsll Chameleon to H.D.D not USB.

2. Modified com.apple.Boot.plist. Remove " <key>USBBusFix</key>" contents.

3. If your Nvidia Graphic card nor working, you should install nvidia.rom file in /Extra folder.


Boot Log.:

Dec 15 13:40:34 localhost kernel[0]: USBF:       1.181   AppleUSBUHCI[0xffffff8049523000]::start unable to initialize UIM
Dec 15 13:40:34 localhost kernel[0]: USBF:      1.182   AppleUSBUHCI[0xffffff8049526000]::start unable to initialize UIM
Dec 15 13:40:34 localhost kernel[0]: com.apple.AppleFSCompressionTypeZlib load succeeded
Dec 15 13:40:34 localhost kernel[0]: AppleIntelCPUPowerManagementClient: ready
Dec 15 13:40:34 localhost kernel[0]: FireWire runtime power conservation disabled. (2)
Dec 15 13:40:34 localhost kernel[0]: USBF:      1.742   AppleUSBEHCI[0xffffff8009b61000]: unable to get filterInterruptEventSource
Dec 15 13:40:34 localhost kernel[0]: USBF:      1.744   AppleUSBEHCI[0xffffff8009b61000]::UIMInitialize - Error occurred (0xe00002be)
Dec 15 13:40:34 localhost kernel[0]: USBF:      1.750   AppleUSBEHCI[0xffffff8009b61000]::start unable to initialize UIM
Dec 15 13:40:34 localhost kernel[0]: Got boot device = IOService:/AppleACPIPlatformExpert/PCI0@0/AppleACPIPCI/IDE0@1F,2/AppleAHCI/PRT4@4/IOAHCIDevice@0/AppleAHCIDiskDriver/IOAHCIBlockStorageDevice/IOBlockStorageDriver/WDC WD1600BEVS-22RST0 Media/IOGUIDPartitionScheme/Untitled 1@2
Dec 15 13:40:34 localhost kernel[0]: BSD root: disk1s2, major 14, minor 5
Dec 15 13:40:34 localhost kernel[0]: ApplePS2Trackpad: Synaptics TouchPad v7.0
Dec 15 13:40:34 localhost kernel[0]: FireWire (OHCI) VendorID 1180 ID 832 PCI now active, GUID 384fc000297355e1; max speed s400.
Dec 15 13:40:34 localhost kernel[0]: Kernel is LP64
Dec 15 13:40:34 localhost kernel[0]: AppleIntelCPUPowerManagement: initialization complete
Dec 15 13:40:34 localhost kernel[0]: USBF:      6.345   AppleUSBUHCI[0xffffff804951d000]::start unable to initialize UIM
Dec 15 13:40:34 localhost kernel[0]: USBF:      6.418   AppleUSBUHCI[0xffffff8049434000]::start unable to initialize UIM
Dec 15 13:40:35 localhost kernel[0]: systemShutdown false
Dec 15 21:40:00 Ujens-MacBook-Pro kernel[0]: ERROR: FireWire unable to determine security-mode; defaulting to full-secure.
Dec 15 21:40:03 Ujens-MacBook-Pro kernel[0]: Waiting for DSMOS...
Dec 15 21:40:03 Ujens-MacBook-Pro kernel[0]: NVDANV50HAL loaded and registered.
Dec 15 21:40:03 Ujens-MacBook-Pro kernel[0]: Sound assertion "0 != setupHostInterrupt ()" failed in "/SourceCache/AppleHDA/AppleHDA-179.1.4/AppleHDAController/AppleHDAController.cpp" at line 312 goto Exit
com.apple.Boot.plist
<?xml version="1.0" encoding="UTF-8"?>
<!DOCTYPE plist PUBLIC "-//Apple//DTD PLIST 1.0//EN" "http://www.apple.com/DTDs/PropertyList-1.0.dtd">
<plist version="1.0">
<dict>
        <key>Boot Banner</key>
        <string>No</string>
        <key>Default Partition</key>
        <string>hd(1,1)</string>
        <key>Graphics Mode</key>
        <string>1920x1200x32</string>
        <key>GraphicsEnabler</key>
        <string>Yes</string>
        <key>Kernel</key>
        <string>mach_kernel</string>
        <key>Kernel Flags</key>
        <string></string>
        <key>PciRoot</key>
        <string>0</string>
        <key>Timeout</key>
        <string>3</string>
        <key>USBBusFix</key>
        <string>Yes</string>
        <key>VBIOS</key>
        <string>No</string>
</dict>
</plist>
Modified com.apple.Boot.plist 
<?xml version="1.0" encoding="UTF-8"?>
<!DOCTYPE plist PUBLIC "-//Apple//DTD PLIST 1.0//EN" "http://www.apple.com/DTDs/PropertyList-1.0.dtd">
<plist version="1.0">
<dict>
        <key>Kernel</key>
        <string>mach_kernel</string>
        <key>Kernel Flags</key>
        <string>-pci0</string>
        <key>Timeout</key>
        <string>8</string>
        <key>GraphicsEnabler</key>
        <string>y</string> 
</dict>
</plist>

<?xml version="1.0" encoding="UTF-8"?>

<!DOCTYPE plist PUBLIC "-//Apple//DTD PLIST 1.0//EN" "http://www.apple.com/DTDs/PropertyList-1.0.dtd">

<plist version="1.0">

<dict>

<key>DSDT</key>

<string>/Extra/DSDT.aml</string>

<key>Default Partition</key>

<string>hd(1,2)</string>

<key>Graphics Mode</key>

<string>1280x960x32@60Hz</string>

<key>GraphicsEnabler</key>

<string>y</string>

<key>Kernel</key>

<string>mach_kernel</string>

<key>Kernel Flags</key>

<string>-x32</string>

<key>Legacy Logo</key>

<string>yes</string>

<key>SMBIOS</key>

<string>/Extra/smbios.plist</string>

<key>Timeout</key>

<string>5</string>

<key>VideoROM</key>

<string>nVidia.rom</string>

</dict>

</plist>

기타 도움이 될 만한 글들 :


:
Posted by Ritz®™
2009. 12. 17. 19:17

Beta Universal 46xx install package Hackintosh/Graphic Card2009. 12. 17. 19:17

First of all, thanks q64ceo,

우선, HD 46XX Mobility는 죽어도 안잡힙니다.  괜한 시간낭비하지 마세요.
q64ceo comment:

Here it is.

SNOW LEOPARD ONLY. You still need to download
PC-EFI 10.5 and add "GraphicsEnabler=Y" to com.apple.Boot.plist

Please keep listing your Device ID's in this thread


Known cards that work:

Asus EAH4650 (VGA works best, to use HDMI or DVI, both cables must be plugged in at the same time


Attached File(s)

Updated December 17 2009: Released version .3 beta


❶ if you boot and get a black screen, try a different output, i/e VGA or DVI or HDMI.
❷ If that doesnt work, boot with the -x flag at the darwin prompt and remove the ATI4600Controller and ATIRadeon200X kexts

1. 만약 검은 화면을 만나시게 된다면, 다른 포트에 연결하여 보세요. 이를테면 VGA/DVI 혹은 HDMI 포트에 연결하세요.
2. 만약 그래도 동작하지 않는다면 "-x" 혹은 "-x -f"부팅옵션을 주어 안전모드로 부팅한후에 ATI4600Controller 와 ATIRadeon200X kexts 두 화일을 제거한 후에 재부팅하여 보세요.
3. 이 화일은 Snow Leopard에서만 적용될 수 있으며 Chameleon RC-2이상 과 PC-EFI 10.5 를 적용한 후에 "GraphicsEnabler=Y"com.apple.Boot.plist 에 적용한 다음, 재부팅하여 확인할 수 있습니다.
4. 피드백을 남기실때는 업체명, device id와 결과를 알려주시면 개발하는데 많은 도움이 될 수 있습니다.

기타 도움이 될 만한 글들.:

설치하기전에 먼저 확인해야할 사항 구글링 5종세트 
메인보드별 설치방법
 370만원대의 OSX 를 내PC에 설치하는 방법  
 x86osx : Partition 설정하는 방법
 x86osx : 부팅안될시 추가 조치 방안-Ver 02


:
Posted by Ritz®™

iPC 10.5.6 PPF5 FINAL

System Spec:

CPU : Intel Core2 Duo P8700 (2.53GHz)
메모리 : DDR2 2GB
그래픽 : nVidia GeForce 9600M GT
15인치와이드, 320GB, DVD-Multi, 6셀배터리, HDMI, 802.11n,


사용자화 선택사항


- ICH-Fix
- Wireless 카드(Broadcom) 드라이버

추가 적용해야할 사항 - Retail로 전환후 10.5.8 Combo Update로 마무리

- Chameleon 2.0-RC4
- com.apple.Boot.plist
- DSDT.aml
- Trackpad.prefPane.zip
- Driver Pacakag
- 그래픽카드(9600m GT)설정 << ❶ Chameleon 2.0-RC3 이용하여 설정, ❷ nvidia.rom 이용하여 설정, ❸ dsdt.aml로 설정, ❹ GFX-String으로 설정
- 사운드카드(IDT 92HD71B7 HDA AUDIO) 드라이버
- uuid의 실질적인 적용으로 리얼맥화시켜 iTunes 완벽대처

RealMac UUID:

Hardware UUID: 00000000-0000-1000-8000-000A95C2E73F
00:0a:95:c2:e7:3f (en0)

Hardware UUID: 00000000-0000-1000-8000-001451634A83
00:14:51:63:4a:83 (en0)

Hardware UUID: 00000000-0000-1000-8000-00145166A1E7
00:14:51:66:a1:e7 (en0)

iMac7,1: 00000000-0000-1000-8000-001B639AD7D4


기타 도움이 될 만한 글들.:

설치하기전에 먼저 확인해야할 사항 구글링 5종세트 
메인보드별 설치방법
 370만원대의 OSX 를 내PC에 설치하는 방법  
 x86osx : Partition 설정하는 방법
 x86osx : 부팅안될시 추가 조치 방안-Ver 02


'Hackintosh > NoteBook' 카테고리의 다른 글

SAMSUNG SENS NT R510에 해킨토시 설치하기  (0) 2010.02.05
후지쯔 P7010  (0) 2010.01.31
Samsung Q210-FS02  (0) 2009.12.15
Sony Vaio CR11z, CR21z, CR31z with ATI X2300 and Snow Leopard  (0) 2009.12.07
DELL M1210 OS X SETUP  (0) 2009.12.06
:
Posted by Ritz®™
2009. 12. 15. 17:26

Samsung Q210-FS02 Hackintosh/NoteBook2009. 12. 15. 17:26

제품 상세정보:C2D R8400 CMT2, 2.26 GHz, 3 Mb cache
M / b PM45, ICH9M
RAM 2 +1 Gb DDR-2 667 Mhz
GeForce 9200M GS, 256 Mb DDR-3,
12.1 ", 1280x800x32
250 Gb HDD SATA
DVD-RW SATA
Ethernet Marvell Ykon 88E8055
Wi-Fi Atheros 5007EG
Audio ICH9M Intel HDA (ALC262)


- Chameleon 2.0-RC4
- com.apple.Boot.plist
- DSDT.aml
- Trackpad.prefPane.zip
- Driver Pacakage


Open a terminal and enter commands
  sudo-s
Password
cd /
chown-R root: wheel DSDT.aml
chmod-R 755 DSDT.aml
exit

Reboot!

기타 도움이 될 만한 글들.:

설치하기전에 먼저 확인해야할 사항 구글링 5종세트 
메인보드별 설치방법
 370만원대의 OSX 를 내PC에 설치하는 방법  
 x86osx : Partition 설정하는 방법
 x86osx : 부팅안될시 추가 조치 방안-Ver 02


'Hackintosh > NoteBook' 카테고리의 다른 글

후지쯔 P7010  (0) 2010.01.31
OS X Install Guide in HP DV5-1207, DV4도 칩셋 동일  (0) 2009.12.16
Sony Vaio CR11z, CR21z, CR31z with ATI X2300 and Snow Leopard  (0) 2009.12.07
DELL M1210 OS X SETUP  (0) 2009.12.06
HP 2133 with OSX?  (0) 2009.11.22
:
Posted by Ritz®™
2009. 12. 8. 12:58

The way of mount EFI Partition Hackintosh/Tip2009. 12. 8. 12:58

#sudo -s
#mkdir /Volumes/EFI
#mount_hfs /dev/diskXs1  /Volumes/EFI
#killall Finder

and you can see EFI partition in finder.

:
Posted by Ritz®™
2009. 12. 8. 09:06

Leopard 로그인이 안될 때 Hackintosh/Q&A2009. 12. 8. 09:06

로그인 화면은 나오지만 로그인 안되고 안전모드(-f -v -s) 부팅으로 시도를 하여도 로그인 안될 경우


가. 첫번째 시도.

먼저 싱글유저(-f -v -s)로 부팅시도를 하여 다음과 같은 명령어를 입력한다.

$mount -uw /
$launchctl load /System/Library/LaunchDaemons/com.apple.DirectoryServices.plist
$ls /Users
$dscl . -delete /Users/username AuthenticationAuthority
$passwd username
New password:
$exit

위와 같이 패스워드를 변경하고 진행하면 다시 부팅이 되면서 로그인 시도를 한다.
그래도 안되면 다음 단계를 진행한다.


나. 두번째 시도.
  1. 싱글모드로 부팅하여 다음과 같이 system.log를 확인한다.
  2. /sbin/fsck -fy
  3. tail -20 /var/log/system.log
  4. more /var/log/system.log
  5. system.log를 확인하면 다음과 같이 유사한 에러로그가 있을 것이다.


loginwindow[281]: Login authorization failed (-60008)!

loginwindow[281]: AuthorizationRef doesn't have a username (<LoginAuthRefMgr: 0x44b60>)
loginwindow[281]: exiting to console


2-1.

mount -uw /
cd /var/db/
mv .AppleSetupDone .AppleSetupDone.bad

위의 명령어를 주어 다시 재부팅한다.
위의 명령어를 주면 설정모드로 부팅이 된다.
하지만, 기존의 계정은 어떻게 해야 할까?
아직 진행중이다.


다. 세번째 시도
이렇게 하여도 안된다면
- sudo /etc/postfix/post-install create-missing
* 2-1 번과 3번은 순서를 달리하여도 됨.

라. 네번째 시도
위의 시도들이 다 실패하였다면 세팅관련 db과 문제 있을 것이다.
이를확인하는 방법은 부팅이 잘 되는 정상적인 MAC 파티션이나 설치 DVD로 부팅하여 디스크 유틸리티에서 문제있는 하드디스크의 권한점검이나 복구를 시도하면 에러가 발생이 되며 복구가 안될 것이다.

이런 경우는 다음과 같이 관련 세팅을 처음부터 하여 주는 방법이 있다.
1. 싱글 유저로 부팅한다.
2. /sbin/mount -uw /
3. cd /var/db4.
4. mv .AppleSetupDone .AppleSetupDone.Bak
5. exit

위 명령어를 주면 사용자 설정부터 다시 시작한다.


마. 위의 시도들이 모두 실패하였다면 리테일 dvd를 이용하여 재설치하여 주는 방법 밖에 없다.


'Hackintosh > Q&A' 카테고리의 다른 글

부팅 문제  (0) 2010.03.15
DivX Decoder.component Error  (0) 2010.03.14
syslogd 프로세스 폭주 이슈  (0) 2009.11.13
UUID for host. Error: 35  (0) 2009.04.27
Adobe After Effect Issue with fcs2 without Upgrade  (0) 2009.04.25
:
Posted by Ritz®™
2009. 12. 8. 08:01

Setup Geforce 8xxx-9xxx GT Hackintosh/Graphic Card2009. 12. 8. 08:01

You can get your 8600GT including 8XXX-9XXX series video card working using one of following methods in Snow Leopard.
➊ - Patch DSDT with the video
➋ - Add device (EFI) string to com.apple.Boot.plist
➌ - Chameleon's current auto injection of video / network works if your hardware is identified on PCIroot0 (you can check this in IORegistryExplorer). If your hardware is on PCIroot1 then you might have to use Netkas' PC EFI v10.n. Add GraphicsEnabler=Yes to your com.apple.Boot.plist for Chameleon 2.0-rc3 to inject the device properties.

➍.- After upgarding to 10.6.2, it sometimes did not work EFI String.

- remove nVidia kexts then install 10.6.1 nVidia kexts.

- or remove EFI String in com.apple.Boot.plist and Add GraphicsEnabler=Yes to your com.apple.Boot.plist then add your device-id in Geforce.kext, NVD*

- 10.6.1 NVDAResman.kext (6.0.6) and NVDANV50Hal.kext (6.0.6) in here. installing them in the /Extra/Extensions folder, with a properly configured boot cache will solve the issue. There is no need to install the kexts in /System/Library/Extensions, as the /Extra/Extensions folder will work.

- several 9800 Gt 1024 MB or 512 MB works just fine in 10.6.2 with ATY_init.kext enabler.


* Leopard 10.5.6 이상인 경우에는 위 과정 생략하고 아래과정부터 진행하세요.


Following is one of them for EFI string to com.apple.Boot.plist


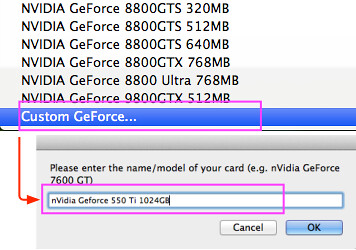
1. Start OSx86 Tools then click Add EFI Strings/Boot Flag

2. Click GFX String


3. Click Choose.

4. Select your Graphic Card


GFX-String

5.


6.


7.


8. Copy and Paste com.boot.Apple.plist file from /Darwin to /Library/Preferences/SystemConfiguration/


:
Posted by Ritz®™


Source : http://www.osx86.es/?p=804

( ES)
Here you leave an application addressed to the holders of CR11Z Sony Vaiocomputers, CR21Z and CR31Z with ATI X2300 using Snow Leopard.

Download : http://j.mp/afwTW0  

Using this application you can have:
Audio, OpenGL accelerated graphics and resolution 1280 × 800,
DSDT corrected for Snow, Speedstep, battery management, trackpad and keyboard.

The application contains context-sensitive help on every button and menu help.

It also comes with "Read me first."

In comments about this article I leave the "Read me first."

Download link following the link to the forum.

21/11/09

Rehubicado battery driver to the folder "Drivers" because of random kernel panics.

Optimized file DSDT.aml (Now supports 4gb of RAM).

22/11/09

Added on Hack "Firewire power conservation" in the DSDT.

(EN)

Versión There is no application for this right now.

Join the forum discussion on this post - (9) Posts

2 Responses to "Vaio EvOBootboX edition."

  1. admin Says:

    EvOVaioBootboX

    Quickstart:

    Choose the RC3 Chameleon bootloader and the system partition where to install.
    Install extra folder.
    Install the drivers for Sony Vaio.
    Reboot.

    Tutorial slow:

    "What is EvOVaioBootboX?
    It is a program that allows you to store / install drivers and bootloaders,
    See it as a toolbox for your hack.

    Before you begin:

    -The application requires to function properly for the following:
    -The user must have administrator permissions (default if the installation is correct).
    "They can have spaces in the name of:
    Bootloaders storage folders / system disks / drivers.

    "The concept is as follows:

    The application focuses on 4 things:

    Storage and installation of bootloaders.
    "" Extra folder.
    "" Of your custom drivers.
    Installing drivers / repair permissions.

    1. Section remove drivers.
    "It's a quick way to delete a driver if you know his name, just select the partition where
    resident / System / Library / Extensions and click "OK" (It will recreate the boot caches after).
    "If the driver lies in the extra of that partition, select the
    extra box. (After deleting the driver file will be recreated within extensions.mkext / Extra).

    2.Sección bootloaders.
    In this section you can add and install bootloaders.

    How to add a bootloader?
    -Click on the bottom of the application on the button "Import bootloader" will open a folder
    contained within the program, there already exist several bootloaders (from team chameleon and
    to Netko). In this folder is where you can put your bootloaders into folders without spaces in the name and
    only with the file "boot" inside. (The application contains the rest of the binaries needed to install
    the boot.)
    "You have to press" refresh "after import / delete.

    How to install a bootloader:
    "First you should locate the disk and partition you want to install the bootloader, click in
    Utilities Osx> "HD info"
    -Located partition and we could say something like:

    SNOW Apple_HFS 200.0 GB disk0s2

    "In this case," disk0s2 "is what we seek:
    disk0 is the disk where you install
    s2 is partition
    "SNOW" is the name of the volume.

    "With that information and we can select disk, partition and volume to install the bootloader.

    EFI TOOL:
    "It's a small tool to format the EFI partition and so it can install drivers and bootloaders
    boot.
    -Note: In Snow Leopard, the EFI partition will be visible (always) after format (on Leopard was
    hidden (always) formatted once.)

    3.Drivers/permisos.

    "This section is devoted to the installation of drivers.
    -First select the target partition and extra if it's installed in / Extra / Extensions.
    -Install the drivers one by one dragging on the square icon.
    -The application caches, repair permissions and recreate the boot.
    "The button" rep permissions "repair the / System / Library / Extensions
    "The button" touch extensions "recreates the boot caches (but not the / Extra / Extensions.mkext)
    "The button" / Extra / Extensions.mkext create "creates the file in the selected partition.
    "The button" Extra / Extensions "open that folder.
    "The button" Extensions "open system / Library / Extensions.

    4.Utilidades OSx.
    -HD info
    Display information on disk utility.
    -EFI tool
    Allows to format the EFI partition

    5.Carpeta extra.
    -Create extra folder with the necessary content in the selected partition.
    "If you want to change the contents of extra (in the application is a selection of content standart)
    only you must click on the button "Import extra" and you can change what you need inside.
    "You have to press" refresh "after import / delete.

    6.Drivers.

    -Install the drivers contained within the program in the selected partition.
    "If you want to change the contents of drivers.
    Contents of drivers:
    Ati drivers for opengl.
    VoodooHDA for Audio.
    only you must click on the button "Import Drivers" and you can add more drivers inside.
    "You have to press" refresh "after import / delete.

    7.Archivos hidden.
    Displays or hides files normally not visible operating system.

    On the Help menu, you can find the help and "about EvOVaioBootboX" where you can update or uninstall.

  2. ritzcarltn Says:

    Good Job!

Leave a Reply

You must be logged in to post a comment.


'Hackintosh > NoteBook' 카테고리의 다른 글

OS X Install Guide in HP DV5-1207, DV4도 칩셋 동일  (0) 2009.12.16
Samsung Q210-FS02  (0) 2009.12.15
DELL M1210 OS X SETUP  (0) 2009.12.06
HP 2133 with OSX?  (0) 2009.11.22
HP CQ40  (0) 2009.11.05
:
Posted by Ritz®™