달력

5

« 2024/5 »

  • 1
  • 2
  • 3
  • 4
  • 5
  • 6
  • 7
  • 8
  • 9
  • 10
  • 11
  • 12
  • 13
  • 14
  • 15
  • 16
  • 17
  • 18
  • 19
  • 20
  • 21
  • 22
  • 23
  • 24
  • 25
  • 26
  • 27
  • 28
  • 29
  • 30
  • 31

Update : http://cafe.naver.com/uefi/5370


Lenovo W510 with the following specs:

Processor: Intel Core i7-720QM Processor (6M Cache, 1.60 GHz)
Operating system: Genuine Windows 7 Professional 64
Operating system language: Genuine Windows 7 Professional 32 US English
Display Panel: 15.6" HD+ Anti-Glare Display with LED Backlight and WWAN Antenna
System Graphics: NVIDIA Quadro FX 880M Graphics with 1GB DDR3 memory
Color Sensor: Color Sensor
Total memory: 4 GB PC3-10600 DDR3 SDRAM 1333MHz SODIMM Memory (1 DIMM)
Keyboard: Keyboard US English
Finger Print Reader: UltraNav (TrackPoint and TouchPad) with Fingerprint Reader
Camera: Camera, 2.0 MP
Hard Drive: 128 GB Solid State Drive, Serial ATA
Optical device: Multi Recorder Optical Drive (12.7mm)
System expansion slots: Express Card Slot & 5 in 1 Card Reader & Smart Card Slot
Battery: 9 cell 2.8Ah Li-Ion Battery - Dual Mode
Power cord: Country Pack North America with Line cord & 135W AC adapter
Bluetooth: Bluetooth w/ antenna
Integrated WiFi wireless LAN adapters: Intel Centrino Ultimate-N 6300 (3x3 AGN)

참고 : http://www.insanelymac.com/forum/index.php?showtopic=228330 , 

         http://forum.thinkpads.com/viewtopic.php?f=32&t=87175&sid=db295f96b94320f5cf4ea4c668fc65e4


준비물 : 64MB 이상되는 USB Memory Stick 하나와 내/외장 하드디스크 만으로 설치를 해본다.

- Paragon HDD manager

- SelfImage

- TransMac : USB Memory Stick 의 /Extra, /Extra/Extensions/ 와 설치된 OS X 파티션의 /System/Library/Extensions/ 폴더에 필요한 작업을 할때, 필요한 Tool

- 64MB 이상 USB Memory Stick : Retail DVD Image 가 복원된 파티션을 로딩하기 위한 부팅디스크 역할

- 10.6.2 이상 Retail DVD Image : 설치하기 위한 HDD 3번째 파티션에 복원해 줄 이미지 화일

- Everest : dsdt.aml 을 패치하여 주기 위한 Tool


I. 사전 셋업 작업

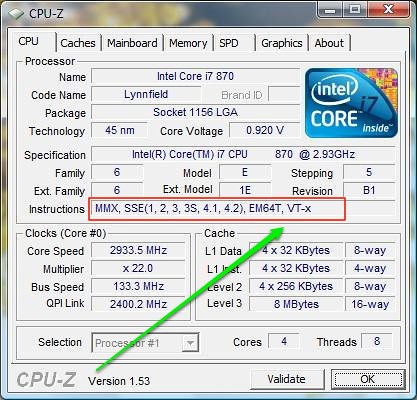
기본적으로 우선 Win 7을 AHCI 모드로 세팅하여 주고 난 후 CMOS에서 하드디스크 관련 세팅을 AHCI로 설정하여 준다. 이미 AHCI 모드로 설정이 되어 Windows을 사용중이라면 이 작업은 Skip한다.
다음 작업 이미지 참고 : http://j.mp/fGuxmG  

I-1. 파티션 작업

노트북이라 하드디스크가 하나에 Windows 7이 설치되어 있으므로 Paragon HDD manager 를 이용하여 Windows 7 설치된 파티션을 다음과 같이 조정한다.

- 1개의 파티션을 3개로 만든다.

- 2번째 파티션은 OS X 가 최종 설치될 파티션, 1,3 번을 제외한 OS X 를 위한 파티션, 가능한 100G 이상 설정.

- 3번째 파티션은 OS X Retail DVD Image가 복원될 파티션, 따라서, 8G 정도 여유로 설정.


I-2. Retail DVD 이미지를 3번째 파티션에 복원하는 작업

-우선 OS X Retail DVD 이미지를 7zip을 이용하여 압축을 풀어준다.

-0.hfs 라는 파일이 만들어지면 SelfImage를 이용하여 3번째 파티션에 복원하여 준다.

-TransMac을 이용하여 Retail 이미지가 복원된 파티션에 MBR 패치를 적용하여 준다.


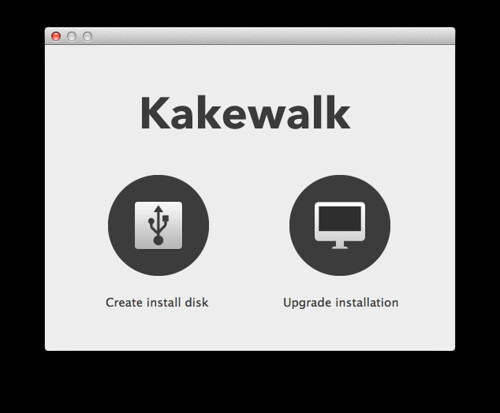
I-3. 부팅을 위한 USB Memory Stick 작업

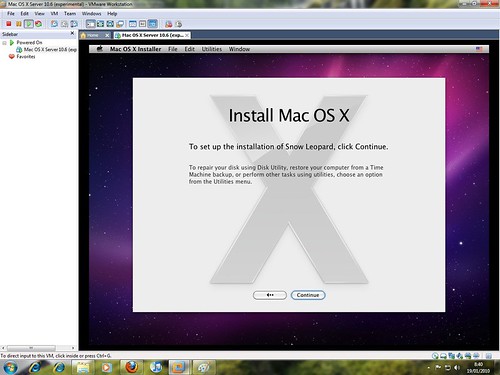
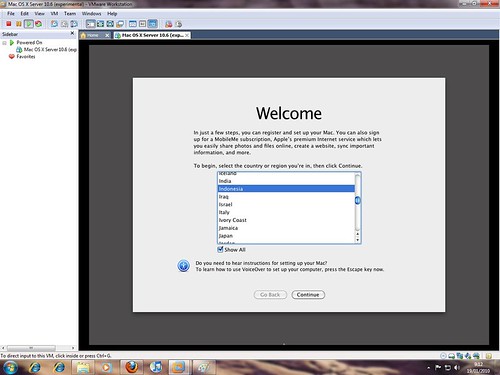
이 작업은 만약  Snow Leopard(OS X) 를 VMWare 7 을 이용하여 설치하기 를 이용하여 이미 설치가 되어 있다면 아래 하단의 과정은 무시하고 VMWare 의 OS X 에서 이 작업을 하여주면 상당히 편리하다.

- SelfImage를 이용하여 부팅되게 만들어진 USB Memory Stick이미지를 USB Memory Stick에 복원하여 준다.

- 이때 필요하면 USB Memory Stick의 Extra 폴더 아래에 필요한 화일을 TransMac을 이용하여 dsdt.aml, kext등을 추가 하여 준다.

-또한, /Extra/com.apple.Boot.plist 등도 수정하여 준다.


II. 설치작업

I-3에서 준비한 USB Memory stick으로 부팅하고 I-2에서 복원한 이미지 OS X Intall DVD를 선택하여 부팅하여 준다.


III. 기타추가작업

III-1. 사운드 카드는 VoodooHDA.kext를 이용하여 설정한다.

III-2. 불루투스 등 장비동작 여부 확인.

III-3. 소프트웨어 업데이트를 이용하여 10.6.6 으로 버전 업그레이드를 실행한다.

III-4. Everest를 이용하여 acpi table을 추출하고 패치하여 dsdt.aml화일을 만들어 /Extra/폴더에 넣어준다.

III-5. USB 3.0을 위해 

LaCie USB 3.0 Driver for Mac OS®  드라이버를 Kext Helper 로 설치하여 준다.  

III-5. Paragon HDD Manager를 이용하여 필요하다면 3번째 파티션을 제거하고 OS X 파티션을 늘려준다.  이때, 가끔 설치된 OS X 파티션화일이 깨지는 경우가 있으니 Paragon HDD Manger를 이용할때는 항상 주의하여야 한다. 


:
Posted by uno-ani


iBoot Boot CD + Multibeast:


다음 방법은 G31, P45칩셋 마더보드와 최근 나오는 시스템의 대부분에 공통적으로 적용할 수 있는 설치 방법으로 이미 알려진 메인보드인 경우 ahci만 설정해주고 설치할 수 있는 전세계적으로가장 많이 사용되는 설치방법이다.

당근 대충 읽으면 전혀 도움이 되질 않는다. ^^

이 방법은 최초 설치시에도 도움이 되긴 하지만, 기존의 부트로드가 제대로 동작이 되지 않았을 경우, 비상시 부팅용으로도 사용할 수 있다. 8G USB를 이용한 비상용으로 준비되지 않았을 경우에 이들 부팅 CD를 이용하면 좋다.


GA-P55A

Boot CD

< 설치 준비물 >


I. Snow Leopard (10.6.X) 설치


I-1부팅CD

다음 부팅CD는 UltraISO나 Nero등으로 가능한 2혹은 4배속 으로 CD로 구워준비한다. 이 CD는 부팅용으로 이용할 것이다.

iboot01

Install DVD


- ➀기가바이트 보드 시리즈인 경우: Rebel EFI CD :http://osx86.tistory.com/634

- ➁ Empire EFI CD 이미지

- ➂ iBootCD 이미지 :p55 칩셋 성공률 100%

- ➃ KakeWalk CD 이미지

- ➄ Boot-132 CD 이미지 - Intel 시스템만 사용 가능

- ➅ EmpireEFI4AMD_SB600_support_added.iso  - AMD CPU

- ➆ NetbookCD_0.8.3 - NetBook 용 부팅시디 ( http://www.mediafire.com/file/g2bj9x208n3gb2s/NetbookCD_0.8.3.iso)

- ➇ 기타 BootCD 이미지

- 이 부팅CD를 대체할 수 있는 방법이 USB 2G 이상 메모리 스틱을 이용한 usbit Tool을 이용하는 방법입니다. 즉, 부팅CD로 부팅하는 것이 아니라 2G 이상 메모리 스틱으로 부팅하여 아래 Retail DVD이미지를 이용하는 것이지요.

* DSDT 데이타 : http://www.tonymacx86.com/dsdt.php


I-2. Retail DVD 이미지

다음 Retail DVD이미지는 보통 DMG화일 형식이고 윈도우즈에서는 확인할 수 없습니다.

- DVD를 이용하실 경우에는 Ultra ISO등을 이용하여 반드시 2혹은 4배속으로 DVD에 구워준다.

- USB 스틱 메모리 스틱(8G 이상) 이나 외장형 USB HDD인 경우  TransMAC을 이용하여 외장형 USB HDD나 혹은 USB 스틱 메모리 스틱(8G 이상)에 풀어줍니다.

Snow Leopard Retail SingleLayer ( Mac OS X Snow Leopard Retail : Single Layer ) : http://x86osx.textcube.com/105


II. Leopard(10.5.x) 설치

II-1. Boot-132 CD


II-2 Retail DVD 이미지

Leopard Retail DVD 이미지: http://x86osx.textcube.com/105


<설치 과정>


설치과정은 다음 두 글을 참고하여 주세요.

OS X Installation Guide -2

http://x86osx.textcube.com/383


III. 환영 동영상까지 보고 setup한 후 다음 과정


하드디스크로 직접 부팅하기 위한 부트로더설치

- http://x86osx.textcube.com/503

- http://x86osx.textcube.com/425


* 부트로더설치가 어려우면 걍 ☛Multibeast를 이용 아래 그림과 같이 easybeast와 Chameleon설치로 마무리


Boot CD


참고 dsdt.aml 데이타베이스

부팅용 usb 이미지


IV. setup후 Graphic Card 설정및 기타 랜카드등의 설정과정


그래픽 카드 설정하기

http://j.mp/bGvSvv


랜카드 드라이버 설치

http://x86osx.textcube.com/7


V. ATI Graphic Card 용 부팅시디 추가 예정


ATI 4870, 5XXX 시리즈 부팅시디는 위기타 BootCD 이미지 를 참고하세요.


VI. 부팅시디 + 8G USB 메모리 스틱을 이용하는 방법이 제일 간편한 방법이고 설치후에 USB 메모리스틱에 부트로더와 해킨 드라이버를 설치하여 USB로 바로 부팅하여 설치 및 기타 유지보수할 수 있도록 준비해 두는 것이 좋습니다.

iBoot


'Hackintosh > iBoot CD' 카테고리의 다른 글

Intel P55/HM55 Chipset Laptop  (3) 2010.04.30
:
Posted by Ritz®™

시스템 준비사항 :

VMware 7 on windows XP, Vista, or Windows 7
Mac Os X 10.6 Retail DVD
VT-x 지원되는 Intel CPU(아래그림과 같이 CPU-Z로 확인했을때 이 기능이 없으면 설치되지 않는다. 걍 조용히 포기하거나 시피유를 변경하고 도전하는 것이 좋다.)

* Vmware 상에서는 그래픽 가속이 지원이 안되므로 그래픽 카드 설정은 조용히 포기하는 것이 정신건강상 좋다. 물론, iLife/iWork 뿐만 아니라 게임이나 동영상 감상등은 포기하는 것이 좋다. 다만, iPhone 개발용으로는 사용이 가능하다. 결국은, Native 설치로 전환하게 된다. 물론, USB에 설치이미지를 복원하여 설치가능하게 준비하는 과정을 수행할 수 있는 보조수단으로 활용하면 Native 설치가 간단해진다.

http://x86osx.textcube.com/390

이제 Vmware에 본격적으로 설치해보자 :

vmware

Snow Leopard VMDK 화일

darwin_snow.iso 화일

VMware image 와 darwin_snow.iso 다운로드 : here (Rapidshare mirror 1) , here (Mediafire mirror 2) 혹은here (Megaupload mirror 3) (Rapidshare Mirror #4 – thanks iGuru)

준비물:

1. vmware 7 을 윈도우즈에 설치한다. 그리고 위에 링크되어 있는 파일을 하드디스크에 다운로드 한다.
2. 텍스트 에디트로 Mac OS X Server 10.6 (experimental).vmx 파일을 다음과 같이 수정한다.
변경 :: smc.present = “TRUE” —>> smc.present = “FALSE”
(Shutdown/Restart시 fakesmc.kext 에 의한 커널패닉 방지 )

3. VMware 를 실행하고 vmx file (Mac OS X Server 10.6 (experimental).vmx)을 로딩한다.
4. Guest OS configuration 필요에 따라 수정한다. (memory, CPU, Network, ect)
5. darwin_snow.iso 파일을 cdrom media로 설정해준다.
6. 설정을 저장한다.

설치

1. Snow Leopard Guest OS를 실행한다.
2. 재빨리 F8 키를 누른다.
3. 이제 부트메뉴에서 Boot DVD 를 선택하여 Snow Leopard Retail DVD 이미지가 들어있는 cdrom으로팅한다.

4. 다시 F8 을 눌러 -v 라는 boot argument를 입력하면 다양한 로그메시지들이 보이고난 후 다음과 같이 설치과정으로 들어간다.

vmware

5. Snow Leopard 설치과정으로 진입하고 필요에 따라 사용자화를 선택하여 설치하고 재부팅한다.

Post Installation
1. cdrom을 선택하여 darwin_snow.iso로 부팅하고 이제 설치된 Snow Leopard 설치 마무리 과정을 시작한다.
2. 사용자 등록(registration form)을 보게 될 것이지만, 혹여 커널패닉(KP)이 발생하였다면 재부팅을 해본다.

vmware

3. 사용자 등록(registration form)을 마치면 이제 VMware상에서 Snow Leopard 를 맛볼 수 있다.

4. 좌측 상단 사과마크 하단 메뉴의 "Sofware Update"를 이용하거나 혹은 매뉴얼로 업데이트를 할 수 있다.

5. VMware tools (darwin_snow.iso내에 있다)을 설치한다. [때때로 cdrom을 다시 연결하여 주어야 한다.]

6. sound driver (include in download link above)를 설치한다.


7. 이제 VMware상에서 Snow Leopard를 실행할 수는 있지만 그래픽 가속기능을 지원하지 않아서 간단한 게임이나 영화 조차도 보질 못한다. 물론 키노트 같은 화려한 프리젠테이션은 꿈도 꾸질 못할 것이고 USB나 FireWire 같은 기타장비들의 인식등 자잘한 문제가 끊임없이 발생한다. 답없다. 

Chameleon 부트로더를 이용하여 멀티부팅을 한다던가 하는 방법은 Native설치에서나 가능한 방법이다.  

이제부터 본격적인 Native 설치방법을 도전해 보자.

http://osx86.tistory.com/1334


:
Posted by Ritz®™
2010. 8. 20. 17:43

KakeWalk Hackintosh/해킨패키지2010. 8. 20. 17:43

메인보드종류가 일치하는 것이 있다면 KakeWalk를 이용해도 좋다.

Update : 12-24, 2012
- KakeWalk 4.5.0 이상 버전부터는 메뉴가 약간 달라졌지만 기능은 역시나 동일하다.
- Install to USB : Lion이상 버전의 DMG 이미지를 USB에 설치용으로 이미지 카피할 때 사용.
- install Kakewalk : HDD 혹은 USB에 부트로더 및 PC에서 부팅가능하게 시스템 구성화일을 설치할 때 사용.


Kakewalk

I. 

1. Create Install Disk 는 Install ESD.dmg 등을 이용하여 설치용 USB 이미지를 만들 수 있다.

- 물론, 자신의 메인보드 종류를 정확하게 파악해야 한다.


Kakewalk

- USB 장비를 선택한다.


2. Upgrade Installation 메뉴는 1번에서 만들어진 설치용 USB를 이용하여 HDD에 설치한 다음에 사용한다.

- HDD에 직접 부트로더가 설치되어 HDD로 직접 부팅할 수 있게 /Extra 폴더등 부팅에 관련된 모든 파일을 자동생성하여 준다.


Kakewalk

- Compatible motherboards 를 클릭하여 메인보드 종류선택한다.

- Choose Your disks 를 눌러 1번의 USB를 이용하여 Mac OS X 가 설치된 HDD를 선택한다.

- Install을 눌러 부팅에 필요한 부트로더와 /Extra 폴더등을 자동으로  설치구성한다.


3. 이 모든 작업은 인터넷을 통하여 관련 파일을 다운로드 받으므로 반드시 인터넷이 연결되어 있어야 하고 다운로드 받는 시간이 충분히 주어져야 한다.


II. 
1. Booting CD 만들기


2. 메인보드 종류 선택
더블클릭하여 자신의 메인보드 종류를 선택한다.


지원 메인보드를 선택하여 주고 "Create" 를 눌러주면 바탕화면에 관련메인보드 부팅시디가 생성된다.
그 시디 이미지를 시디에 구워서 부팅하여 Retail DVD를 선택하여 부팅하는 형식으로 해킨설치하기에 간편하게 되어 있다.

3. ATI Graphic Driver  설치하기

4. 설치방법 및 과정
 
http://j.mp/fNkAsI
http://j.mp/fYMEYp
http://j.mp/i6lezU
 
5. Multibeast 로 마무리 하기

http://j.mp/pquSnG

6. 기타
http://j.mp/lsKy34


:
Posted by Ritz®™
2010. 4. 13. 23:43

사용자화? Hackintosh/Mainboard2010. 4. 13. 23:43

:
Posted by Ritz®™


설치하고 현재 Mac OS X10.6.1 로 업그레이드하여 사용중이다. (전체 설치시간은 대략 23 분 정도 걸린다.).
몇 개의 이슈를 해결하고 난 후, 현재 GA-965P-DS3 메인보드를 이용중이다. smile.gif 
설치방법:

HW Config
I. 메인보드: GA-965P-DS3:

- Chipset: Intel P965+ ICH8
- LAN: Marvel (AppleYukon2.kext)
- Audio: Realtek ALC883 (AppleHDA.kext)
- S-ATA2: JMicron JMB363 (AppleVIAATA.kext)
- VGA NVidia Geforce 8800GT 256 MB
II. Disk: 320GB Samsung HD753LJ SATA2 7200 Rpm
III. CPU: Intel Core 2 Duo E6300 @1.86 Ghz
IV. RAM: 2 GB DDR2 PC6400 800Mhz Patriot
V. Video: ATI X1600Pro PCI-Express (0x1002 0x71C2)

Bios Settings GA-965P-DS3 mobo
I. SATA2 Disk connected to Purple port & SATA DVD connected to Yellow Port
II. SATA AHCI: Enable SATA Native mode: Disable
III. SATA IDE Dev: Enable SATA IDE Crtl Mode : IDE
IV. CPUID limit: Disable No-Exec MEM protect: Enable Virtualization: Enable
V. Power Mgt HPET: Enable ACPI: S3(STR)
V. HPET Mode: 64 bit.ProcedureI. 8G USBII. Boot ThinkIII. Snow Leopard 10432 Retail DVD Image.IV.
Install Guide : http://x86osx.textcube.com/383


:
Posted by Ritz®™
2009. 12. 6. 14:53

DELL M1210 OS X SETUP Hackintosh/NoteBook2009. 12. 6. 14:53

First of all, Thanks joshms83 and others,

Original Posts is in here

This guide references an image of setup files which I have made available here:

DELL M1210 OS X SETUP IMAGE: http://www.mediafire.com/?jmwxxyo1tht (MediaFire)

Note: The following is also provided as a nicely formatted read-me within the DELL M1210.dmg file attached to this post. The DELL M1210.dmg file also contains all of the patches/kexts/apps you need to follow the steps outlined below.

To help any desperate googlers:

Keywords: dell M1210 osx86 Geforce 7400 go External Monitor Dual Monitor Enable QE/QI Bluetooth Sigmatel 9221 Vanilla 9.0.6 10.5.6

rev. March, 2009.

The files included in this image were used to successfully configure a DELL M1210 Laptop using iDeneb v1.4 10.5.6 distribution and Vanilla 9.6.0 kernel. That is not to say however, that all or any of these files won't work for other configurations...

I've provided a summary of installation options used to get OSx86 running on a properly journaled partition, as well as a series of final install/patch steps to follow once you are successfully booted into OS X.

These files and instructions are simply a collection of other people's work organized and consolidated into a package that is (hopefully) easy to use and follow. I've attempted to provide credit to as many of those people as possible, but I may have missed some given this stuff was collected over several weeks of trial-and-error.

References:
http://www.insanelymac.com/forum/index.php?showtopic=41775 (M1210 Dual Boot Guide)
http://www.insanelymac.com/forum/index.php?showtopic=97966 (Dell Post Installer)

DELL M1210:
- Intel Centrino Duo T7200 @ 2Ghz
- 4GB DDR SDram @ 667Mhz
- NVidia Geforce 7400 Go (64Mb/192Mb)
- Sigmatel 9221 Audio
- Dell Bluetooth 355 2.0 +EDR (Broadcom)
- Dell 1390 (Broadcom) Wireless B/G

Resulting Working Feature Set:
This is a list of hardware/features that your system will support at the end of this process.
- Dual Cores (No need for cpus=1)
- GeForce 7400 QE/QI Enabled, Hardware Acceleration, Internal + External (Dual) Display
- Sigmatel 9221 Audio (Not Choppy)
- Internal Microphone
- Full Bluetooth Support
- Full USB Support
- Full Firewire Support
- Full Airport Wireless Support
- Full Laptop/Battery Support
- Full Intel Speedstep Support
- 5-in-1 Card Reader Support
- System will properly Sleep / Wake.
- Support for Apple Software Update

Issues:
- Intel 3945 A/B/G Wireless card is not supported (as of March 3rd 2009). You must replace it with a Dell 1390 card from Ebay (EASY - approx. $12)
- Shutdown command does not fully shutdown the system. I have identified this to be an issue with the Sigmatel 9221 audio patch and nothing else.
- Internal monitor does not properly recover when the system puts the display to sleep as a result of energy preferences (full system sleep works fine).
- Memory bank/DIMM_B is reporting a speed of 0 MHz. The system however, is reporting all 4GB of RAM.
- Logitech Quickcam (PID:0x08c6) is detected as a USB device by the system profiler, but is not yet supported.
Quickcam Drivers under development @ http://webcam-osx.sourceforge.net/cameras/index.php

Untested:
- ExpressCard Slot


OSx86 - iDeneb v1.4 10.5.6:
Vanilla 9.6.0 Kernel (Default)

Patches (Ready)
Chipset
- ICHx Fixed

Network / Ethernet
- AppleBC440x

Fix
- cpus=1 fix (Temporary)
- BatterManager
- Power_Off Fix

Video / NVidia
-NVKush (Temporary)

Apps
- ASU
- BetterZip
- OSx86 Tools
- Transmission

(OPTIONAL) NTFS Read/Write Support:
Note: While this step is listed as optional, if you are installing any of the provided patches directly from an NTFS partition, it is highly advised that you install full Read/Write support for NTFS drives before proceeding. It is also ideal for dual boot scenarios where you would like full control of your xp/vista partition from within OS X.

1. Install MacFUSE 2.0.3 (Mount and install from the .dmg file provided in the root of this setup image)
2. Install NTFS-3G (Mount and install from the .dmg file provided in the root of this setup image)

*Restart*

Patch Sigmatel Audio:
This step is required for OSX to fully support your Sigmatel 9221 audio and microphone.

1. Install AppleHDAPatcher (Copy AppleHDAPatcher v1.12 app provided in the root of his setup image into your Applications folder)
2. Apply Sigmatel9221 HDA Patch (Drag Sigmatel9221.txt provided in the root of this setup image onto the installed AppleHDAPatcher icon. (takes a while to run))

*Restart*

Install Modified NVinjectGO Extension:
The NVinjectGO v0.2.0 extension provided in this setup image has been modified to provide full QE/Hardware Acceleration/Dual Display support for the GeForce7400 Go. Graphics memory will read 512MB in system profiler, but this does not appear to have any adverse effects on system performance.

Note: "Mirror" mode will not work. Also, attempting to use the [Fn] + [F8] key combination (display mode toggle) will halt the system.

1. Delete NVKush.kext (Drag file to Trash - System/Library/Extensions/NVKush.kext )
2. Launch OSx86 Tools (Applications/iDeneb App/OSx86 Tools)
3. (OSx86 Tools) Install NVinjectGO.kext (Provided in this setup image (modified v0.2.0))
4. (OSx86 Tools) Enable Quartz GL
5. (OSx86 Tools) Run System Maintenance (Set Extensions Permissions, Clear Extensions Cache -> Run Tasks)

*Restart*

Enable Support for Both Cores:
This step will allow us to remove the "cpus=1" and "-f " kernel boot flags from apple.com.Boot.plist enabling and synchronizing both cores. Removing "cpus=1" enables both cores. Removing "-f" appears to correct kernel panic upon resume from sleep.

1. Launch OSx86 Tools (Applications/iDeneb App/OSx86 Tools)
2. (OSx86 Tools) Install Kernel ("mach_kernel" provided in this setup image under "/mach_kernel [DELL M1210] [Vanilla 9.6.0] [Dual Core]/mach_kernel")
3. (OSx86 Tools) Run System Maintenance (Repair Permissions, Set Extensions Permissions, Clear Extensions Cache -> Run Tasks)

*Restart*

4. Install pList Edit Pro (Mount and install from the .dmg file located on this setup image)
5. Open com.apple.Boot.plist (Library/Preferences/com.apple.Boot.plist)
6. Remove "cpus=1 -f" from kernel flags (Under <Kernel> change "<string>cpus=1 -f</string>" to "<string></string>")

*Restart*

If you system boots up normal, with no jittery mouse or sound, you are running properly with dual core support. While you shouldn't experience any problems, in the event that do, you can restart again, press any key during the darwin boot countdown and provide "cpus=1 -f" flags to boot back into stable system and undo the changes to your com.apple.Boot.plist file.


Install 5-in-1 Card Reader Support:
This kext installs support for the 5-in-1 card reader. I have used it to successfully mount a 4GB SD Card.

1. Launch OSx86 Tools (Applications/iDeneb App/OSx86Tools)
2. Install IOSDHCIBlockDevice.kext (Located in the 5-in-1 Card Reader directory included with this setup image)
3. Run System Maintenance (Set Extension Permissions, Clear Extensions Cache -> Run Tasks)

*Restart*

(OPTIONAL) Install Apple Software Update Support:
Notes originally provided with this mention needing chameleon 1.0.11 installed or higher prior to installing this feature. I did not try to update without this feature, but I did successfully patch my OS X installation using Apple Software Update after installing it.

1. Launch OSx86 Tools (Applications/iDeneb App/OSx86 Tools)
2. Install AppleDecrypt.kext (Located in the Apple Updater Support directory included with this setup image)
2. Install Disabler.kext (Located in the Apple Updater Support directory included with this setup image)
3. Run System Maintenance (Set Extension Permissions, Clear Extensions Cache -> Run Tasks)

*Restart*


(OPTIONAL) Install Intel Speedstep Extension:
I'm 50% sure that Speedstep is working without this step. Applying this step however, does not have any adverse effect on system performance, and allows you to visually confirm speedstep functionality via the included SpeedStep GUI application.

1. Launch OSx86 Tools (Applications/iDeneb App/OSx86 Tools)
2. Install IntelEnhancedSpeedStep.kext (Located in the SpeedStep Support directory included with this setup image)
3. Run System Maintenance (Set Extension Permissions, Clear Extensions Cache -> Run Tasks)
4. Install SpeedStep Application (Drag the SpeedStep included with this setup image into your Applications folder)

*Restart*

5. Launch SpeedStep Application (Run the installed SpeedStep app from your Applications folder to confirm working SpeedStep)

If you experience any problems (Kernel Panic, etc...) after installing IntelEnhancedSpeedStep.kext, press any key during the darwin boot countdown and provide the boot flag "-x". This will boot you into OS X "Safe Boot" and allow you to uninstall IntelEnhancedSpeedStep.kext from your system/library/extensions folder (by dragging it into the trash).

(OPTIONAL) Install Clamshell Display:
This step installs an extension that will put the system to sleep when you close the lid. It works 100%, but I'm not sure how I feel about it - so I marked it optional.

1. Launch OSx86 Tools (Applications/iDeneb App/OSx86Tools)
2. Install ClamshellDisplay.kext (Located in the Clamshell Display directory included with this setup image)
3. Run System Maintenance (Set Extension Permissions, Clear Extensions Cache -> Run Tasks)

*Restart*

If you decide you don't like this. You can remove it by dragging the ClamshellDisplay.kext file located in your System/Library/Extensions folder into the trash and restarting.


At this point you should have a pretty functional OS X setup.

Dual Boot Preferences/Notes:

- You can assign a more windows like behavior to your [CTRL] and [ALT] keys by swapping their key functions in System Preferences.
(Located under System Preferences -> Keyboard and Mouse -> Keyboard -> Modifier Keys)

- If you are using a bluetooth keyboard and mouse, they can be configured to work in both Vista and OS X without the need to constantly re-pair them:
1. "Connect" (not "Pair") to your device in vista (I use BlueSoleil v6 Bluetooth Stack).
2. In OS X, set up/connect your mouse using the "mouse" option (as you normally would) within bluetooth preferences.
3. In OS X, set up/connect to your keyboard using the "Any Device" option.
4. On the device locater screen, click "Passkey Options" and select "Do not use a passkey"
5. Proceed with the connection... select "use this as a remote control for my computer"
6. Future connection requests from your keyboard should be automatically accepted by OS X.

Note: I performed this with a Logitech MX5000 keyboard and Logitech MX1000 mouse (both bluetooth).


DELL M1210 OS X SETUP IMAGE: http://www.mediafire.com/?jmwxxyo1tht (MediaFire)


'Hackintosh > NoteBook' 카테고리의 다른 글

Samsung Q210-FS02  (0) 2009.12.15
Sony Vaio CR11z, CR21z, CR31z with ATI X2300 and Snow Leopard  (0) 2009.12.07
HP 2133 with OSX?  (0) 2009.11.22
HP CQ40  (0) 2009.11.05
Toshiba Satellite A300-1N8  (0) 2009.10.29
:
Posted by Ritz®™
2009. 10. 26. 11:20

Partition 설정하는 방법 Hackintosh/Install2009. 10. 26. 11:20


가능하면 두개의 하드디스크를 이용하여 하나에 OSX, 다른 디스크에는 Windows XP 이렇게 설치하여 주는 것이 좋습니다.

OS X가 설치될 파티션은 반드시 주파티션(Primary)이어야 합니다.


아, 물론 노트북같이 어쩔수 없는 상황에서 하드 디스크 하나에 윈도우즈와 OSX 파티션을 구성하여 주는데 이렇게 구성하면 OS X에서 지원하는 GPT+GUID파티션을 이용할 수 없고 MBR(Master Boot Record, 아래 두번째 그림 참조)방식을 이용할 수 밖에 없습니다.

또한, 윈도우즈와 데이타를 공유하기 위해서는 10.6.5 이상을 설치하여 주고 아래링크와 같이 exFat 파티션을 만들어 주면 윈도우즈 7과 데이타 공유하기가 용이합니다.

http://x86osx.textcube.com/654

http://x86osx.textcube.com/713

만약, 맥에서 만든 exFAT파티션을 윈도우즈에서 인식을 하지 못한다면 윈도우즈에서 다시 exFAT로 포맷을 하면 맥에서도 인식이 가능합니다.

기존의 FAT32는 여러가지 제약사항이 많이 있었지만 ExFAT파티션부터 이러한 제약사항이 해결되어 맥과 윈도우즈 공유를 위해서는 ExFAT 파티션을 궎장합니다.


OSX 용량은 최소 10G, Adobe, iWork, iLife등을 설치할려면 최소 120G 이상 최대 1TB 로 여유있게 할당해주는 것이 여러가지 어플리케이션을 설치하는 데 편합니다.

만약, 1TB이상의 파티션에 OS X를 설치하려면 여러가지 작업을 해주어야 하므로 처음 설치하시는 분에게는 권장하지 않습니다.

또한, 하드디스크용량이 1TB이상 되는 상황에서도 OS X가 제대로 설치가 되지 않을 것입니다. 특히, 2TB 하드디스크에서는 OS X 설치는 되지만, 해킨토시 부팅은 불가능합니다.

전문가에게 상의하는 것이 좋습니다.


하드디스크 하나로 파티션을 나누어 윈도우즈와 멀티부팅을 계획하고 있다면 GUID 파티션은 사용하지를 못하고 MBR 파티션을 사용할 수 밖에 없으며 향후 이미지를 마운트하여 직접 설치할 때에 약간의 수정을 해 주어야 하는 불편함이 있습니다.

아, 근래에 출시된 Win7은 GPT 파티션을 지원해줍니다.

물론, 파티션은 내장형 하드디스크나 외장형 USB/FireWire 하드디스크든 윈도우즈나 맥파티션이나 Primary Active 설정이 기본입니다.  확장 파티션 뭐 이렇게 만들어서 시간낭비하지 마시기 바랍니다.


1. 우선 DVD등을 이용하여 설치과정에 진입한 상황이거나 맥으로 부팅된 상황에서 상단 메뉴의 UTILITY 메뉴나 응용프로그램 > 유틸리티 > Disk Utility를 이용합니다.


여기에서 파티션명을 한글로 주는 경우가 있는데 걍 영어로 주는게 좋습니다.  이유는 스스로 알아보시길,,,  T T

http://x86osx.textcube.com/105


아래 그림을 보면 GUID 와 MBR(Master Boot Record) 파티션을 선택할 수 있다.  하나의 하드디스크에서 두개 이상의 OS를 설치하는 경우, 이를테면 한 파티션에 OSX, 다음 파티션에는 Windows XP 이렇게 설치하는 경우 어쩔 수 없이 MBR을 선택해야 합니다.  또한, 해킨토시 설치후 윈도우즈 파티션을 활성화해야하는 필요성이 반드시 생기니 윈도우즈 복구 시디를 준비하여 주십시요.

2. 만약 윈도우즈에서 Acronics Disk Utility 같은 응용프로그램으로 shage OS swap파티션 구성을 하였거나 MBR파티션에서 기존 파티션 구조를 유지하면서 설치할 파티션만 OSX  확장 파티션으로 구성하고 싶다면 다음 그림과 같이 지우기 기능을 이용하여 파티션을 재설정하여 줍니다.


:
Posted by Ritz®™