달력

1

« 2025/1 »

  • 1
  • 2
  • 3
  • 4
  • 5
  • 6
  • 7
  • 8
  • 9
  • 10
  • 11
  • 12
  • 13
  • 14
  • 15
  • 16
  • 17
  • 18
  • 19
  • 20
  • 21
  • 22
  • 23
  • 24
  • 25
  • 26
  • 27
  • 28
  • 29
  • 30
  • 31


설치 이미지 : iDeneb 10.5.7

1. CMOS SETUP 설정
-  AHCI옵션을 Manual
-  바로 아래 옵션 Enable

설치과정 참고 : Installation Guide

2. 사용자화

커널 : 바닐라 9.7
부트로더 : 카멜레온2, DTDS 패치
칩셋 : iCHx
그래픽 : NVdarwin 512MB
오디오 : Voodoo HDA
패치 : Voodoo PS2
랜, 무선랜 : 선택X

설치 후, 재부팅시, 반드시 CMOS SETUP에서  EDB를 Enable 로 설정하고 부팅

'Hackintosh > NoteBook' 카테고리의 다른 글

Dell Stdio XPS 1640 해킨토시 설치하  (0) 2010.05.06
HP Pavilion dv7  (0) 2010.05.05
후지쯔 P7010  (0) 2010.01.31
OS X Install Guide in HP DV5-1207, DV4도 칩셋 동일  (0) 2009.12.16
Samsung Q210-FS02  (0) 2009.12.15
:
Posted by Ritz®™
ASUS P7P55D 메인보드에 해킨토시 설치하는 방법입니다.

1. 먼저 다음 두가지 cd 이미지를 다운로드 받습니다.

- ❶ http://j.mp/bm0Cer 
- ❷ Snow Leopard Retail DVD, *
- UltraISO로 2배속이나 혹은 4배속으로 설정하여 DVD로 구워줍니다.
- 부팅시에 "-v busratio=20 cpus=1" 옵션을 이용하여 ❶시디로 부팅합니다.
- ❶시디 로딩이 끝난후, ❷시디로 교체하여 줍니다.
- F5키를 누르고 ❷시디 "Install OS X DVD"를 선택하여 줍니다.
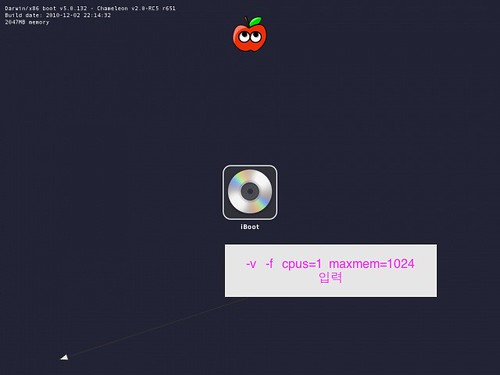
- 아래 그림에서 부팅옵션을 "-v busratio=20 cpus=1" 를 입력하여주고 엔터를 칩니다.
설치과정 보기
iboot01

연동장비 결과 비참

ensemble by apogee
s70xs yahama
dp firewire 800 3-port pcle (siig)
one usb by apogee
FXPansion BFD DRUM

- 설치한후에 재부팅후 스노우 레오파드를 인스톨 시킨 하드를 선택하신 후
-v maxmem=4096 으로 부팅하여 기본 설정을 진행합니다.

- Chameleon 과 10.6.2 combo Update룰 설치합니다.
- 부팅시에 “-f -v -s”옵션을 주어 싱글유저 모드로 부팅한 후, 'exit" 커맨드를 입력하여 정상부팅합니다.
* Kext Help7을 이용하여 랜 드라이버 설치하여 주기
* 공유기 DMZ 서버 설정하기


2. Study

http://www.apple.com/support/snowleopard/
#############################################################

검색신공 배양하기 구글링 6종 세트

1. 시스템 스펙/상황 파악하기
http://j.mp/58hmuA

2. 추가 조치 방안 및 질문하는 방법
http://j.mp/6Jui2v

3. 해킨 설치 이미지의 종류
http://j.mp/5bKbXc

4. 특정 패키지 혹은 드라이버만 골라 설치하기
http://j.mp/7oKbwJ


5. 관련시스템 설치이력 찾기(제품 모델명이 “GA-EP45” 시리즈인 경우)
http://j.mp/7d8gfp

6. p55-ud3r i5 750 보드에 4850 일 경우- 밥떠먹여주기 프로젝트팁

http://j.mp/8DfTQv
:
Posted by Ritz®™
2010. 1. 10. 11:02

ECS P43T-A2에 해킨토쉬 설치하기 Hackintosh/Mainboard2010. 1. 10. 11:02


ECS P43T-A2에 해킨토시 설치하기.

준비물

iPC OSX 10.5.6 Universal DVD
Hardware:

* BIOS date : May 18th,09
* CPU : Intel Core 2 Duo E7300 2.66GHz
* RAM : 4GB DDR2
* Video: GeForce 9800GT 512MB
* AHCI enabled, JMicron enabled
* SATA DVD & HDD drives


Installation.
- 설치가이드 : http://j.mp/dAvLHX
* iPC OSX 10.5.6 Universal, 10.5.7 Software Update(www.apple.com), iDeneb Delta Upgrade KIT v10.5.8
* Vanilla kernel (기본적으로 선택)
* boot option: cpus=1 -v
* drivers : ICH10 SATA support, JMicronATA for JMicron IDE, Realtek 1000(ethernet).
o Note: video 혹은 audio drivers 는 여기에서 선택하지 않는다.  작동하지 않으므로.
* fixes: ACPI fix, UUID error fix, AppleSMBIOS-27 rev3 667MHz (RAM speed 선택).


설치시 사용자화 선택사항.

* iPC OSX 10.5.6 Universal CD를 이용하여 먼저 설치하고 10.5.7 Software Update(www.apple.com)를 애플사에서 다운로드하여 10.5.7로 업그레이드한 다음, iDeneb Delta Upgrade KIT v10.5.8 을 이용하여 10.5.8로 업그레이드 합니다.

* Vanilla kernel (default), 즉, 사용자화에서 커널은 따로이 선택하지 않습니다.
* boot option: cpus=1 -v, 부팅시에 부트 옵션을 주어 부팅합니다.
* drivers : ICH10 SATA support, JMicronATA for JMicron IDE, Realtek 1000(ethernet). 사용자화에서 선택하여 줄 항목입니다.
o Note: don’t choose any video or audio drivers here - doesn’t work. 비디오나 오디오 관련 드라이버는 선택하지 마세요.
* fixes: ACPI fix, UUID error fix, AppleSMBIOS-27 rev3 667MHz (my RAM speed - choose yours!). 역시 사용자화에서 선택해야할 항목입니다.


:
Posted by Ritz®™

Requirement : Chameleon 2.0-RC2~RC4

Symptom:

1. Install Chameleon 2.0.RC2 ~ 4.

2. ati_9442_1002.rom in /Extra/

3. Modify com.apple.boot.plist


com.apple.Boot.Plist(without kernel flags like UUID !) *

<?xml version="1.0" encoding="UTF-8"?>
<!DOCTYPE plist PUBLIC "-//Apple//DTD PLIST 1.0//EN" "http://www.apple.com/DTDs/PropertyList-1.0.dtd">
<plist version="1.0">
<dict>
<key>Graphics Mode</key>
<string>1920x1080x32</string>
<key>Kernel</key>
<string>mach_kernel</string>
<key>Kernel Flags</key>
<string>arch=i386</string>
<key>Timeout</key>
<string>2</string>
<key>GraphicsEnabler</key>
<string>Yes</string>
<key>EthernetEnabler</key>
<string>Yes</string>
</dict>
</plist>


/Extra/Store_Kexts/:

-EvoEnabler.kext in S/L/E or /Extra/Store_Kexts/_For_System
-LegacyATI4800Controller.kext in /Extra/Store_Kexts


10.6.2 Working:

1. Good Luck!


:
Posted by Ritz®™
2009. 12. 14. 13:36

중고 해킨시스템 etc2009. 12. 14. 13:36


제품 상세정보:공지 : 글 작성전 반드시 카테고리를 선택 해주세요

1. 제품 및 제조사명 (물품명,제조사등 자세히) :

기기는 다음과 같습니다. :
i7 린필드 860
삼성 2기가 램 2개 10600, DDR3
기가바이트 p55m-ud4
xfx 라데온 4870 1기가
wd 벨로시랩터 150기가
ODD 삼성 dvd multi
케이스 IN WIN W585 화이트 HD AUDIO ABroad (맥이랑 비슷한 느낌이 나는 깨끗한 앱니다)
Heroichi HEC-Rapter 500WP
APPLE 무선 MB167KH/A (키모드)

+
애플 무선 마우슨 (구형)
+ 블루투스 동글


2. 거래 원하는 가격 (경매행위 금지) : 1,100,000원
3. 거래의 형태 (직거래,택배,기타) : 직거래
4. 구입시기(판매의 경우) :  3개월 정도 되었습니다. (키보드는 1년 된거 같습니다)
5. 거래 물품의 상태 (A~F등급, A:최상 C:보통 F:최하) :  A


모 사이트 "팝니다"란에 보니 이런 중고 물품이 오늘 올라왔습니다.
가격도 그렇고 괜찮은 사양이라는 생각이 드는데 비슷한 제품으로 확질러 버려?하는 생각이 듭니다.
아래 중고해킨토시 검색을 눌러 시스템을 거래하는 것은 거래 당사자에게 책임이 있습니다.

'etc' 카테고리의 다른 글

Invitation gift for christmas season !!  (0) 2009.12.15
P4 타이거 중고 해킨시스템  (0) 2009.12.14
유입로그를 보니  (0) 2009.11.02
MAC 으로의 이주  (0) 2009.07.14
Operating System Interface Design Between 1981-2009  (0) 2009.06.09
:
Posted by Ritz®™
2009. 12. 8. 09:06

Leopard 로그인이 안될 때 Hackintosh/Q&A2009. 12. 8. 09:06

로그인 화면은 나오지만 로그인 안되고 안전모드(-f -v -s) 부팅으로 시도를 하여도 로그인 안될 경우


가. 첫번째 시도.

먼저 싱글유저(-f -v -s)로 부팅시도를 하여 다음과 같은 명령어를 입력한다.

$mount -uw /
$launchctl load /System/Library/LaunchDaemons/com.apple.DirectoryServices.plist
$ls /Users
$dscl . -delete /Users/username AuthenticationAuthority
$passwd username
New password:
$exit

위와 같이 패스워드를 변경하고 진행하면 다시 부팅이 되면서 로그인 시도를 한다.
그래도 안되면 다음 단계를 진행한다.


나. 두번째 시도.
  1. 싱글모드로 부팅하여 다음과 같이 system.log를 확인한다.
  2. /sbin/fsck -fy
  3. tail -20 /var/log/system.log
  4. more /var/log/system.log
  5. system.log를 확인하면 다음과 같이 유사한 에러로그가 있을 것이다.


loginwindow[281]: Login authorization failed (-60008)!

loginwindow[281]: AuthorizationRef doesn't have a username (<LoginAuthRefMgr: 0x44b60>)
loginwindow[281]: exiting to console


2-1.

mount -uw /
cd /var/db/
mv .AppleSetupDone .AppleSetupDone.bad

위의 명령어를 주어 다시 재부팅한다.
위의 명령어를 주면 설정모드로 부팅이 된다.
하지만, 기존의 계정은 어떻게 해야 할까?
아직 진행중이다.


다. 세번째 시도
이렇게 하여도 안된다면
- sudo /etc/postfix/post-install create-missing
* 2-1 번과 3번은 순서를 달리하여도 됨.

라. 네번째 시도
위의 시도들이 다 실패하였다면 세팅관련 db과 문제 있을 것이다.
이를확인하는 방법은 부팅이 잘 되는 정상적인 MAC 파티션이나 설치 DVD로 부팅하여 디스크 유틸리티에서 문제있는 하드디스크의 권한점검이나 복구를 시도하면 에러가 발생이 되며 복구가 안될 것이다.

이런 경우는 다음과 같이 관련 세팅을 처음부터 하여 주는 방법이 있다.
1. 싱글 유저로 부팅한다.
2. /sbin/mount -uw /
3. cd /var/db4.
4. mv .AppleSetupDone .AppleSetupDone.Bak
5. exit

위 명령어를 주면 사용자 설정부터 다시 시작한다.


마. 위의 시도들이 모두 실패하였다면 리테일 dvd를 이용하여 재설치하여 주는 방법 밖에 없다.


'Hackintosh > Q&A' 카테고리의 다른 글

부팅 문제  (0) 2010.03.15
DivX Decoder.component Error  (0) 2010.03.14
syslogd 프로세스 폭주 이슈  (0) 2009.11.13
UUID for host. Error: 35  (0) 2009.04.27
Adobe After Effect Issue with fcs2 without Upgrade  (0) 2009.04.25
:
Posted by Ritz®™
2009. 12. 8. 08:01

Setup Geforce 8xxx-9xxx GT Hackintosh/Graphic Card2009. 12. 8. 08:01

You can get your 8600GT including 8XXX-9XXX series video card working using one of following methods in Snow Leopard.
➊ - Patch DSDT with the video
➋ - Add device (EFI) string to com.apple.Boot.plist
➌ - Chameleon's current auto injection of video / network works if your hardware is identified on PCIroot0 (you can check this in IORegistryExplorer). If your hardware is on PCIroot1 then you might have to use Netkas' PC EFI v10.n. Add GraphicsEnabler=Yes to your com.apple.Boot.plist for Chameleon 2.0-rc3 to inject the device properties.

➍.- After upgarding to 10.6.2, it sometimes did not work EFI String.

- remove nVidia kexts then install 10.6.1 nVidia kexts.

- or remove EFI String in com.apple.Boot.plist and Add GraphicsEnabler=Yes to your com.apple.Boot.plist then add your device-id in Geforce.kext, NVD*

- 10.6.1 NVDAResman.kext (6.0.6) and NVDANV50Hal.kext (6.0.6) in here. installing them in the /Extra/Extensions folder, with a properly configured boot cache will solve the issue. There is no need to install the kexts in /System/Library/Extensions, as the /Extra/Extensions folder will work.

- several 9800 Gt 1024 MB or 512 MB works just fine in 10.6.2 with ATY_init.kext enabler.


* Leopard 10.5.6 이상인 경우에는 위 과정 생략하고 아래과정부터 진행하세요.


Following is one of them for EFI string to com.apple.Boot.plist


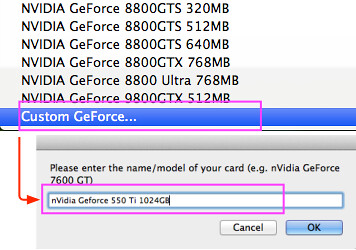
1. Start OSx86 Tools then click Add EFI Strings/Boot Flag

2. Click GFX String


3. Click Choose.

4. Select your Graphic Card


GFX-String

5.


6.


7.


8. Copy and Paste com.boot.Apple.plist file from /Darwin to /Library/Preferences/SystemConfiguration/

:
Posted by Ritz®™


Source : http://www.osx86.es/?p=804

( ES)
Here you leave an application addressed to the holders of CR11Z Sony Vaiocomputers, CR21Z and CR31Z with ATI X2300 using Snow Leopard.

Download : http://j.mp/afwTW0  

Using this application you can have:
Audio, OpenGL accelerated graphics and resolution 1280 × 800,
DSDT corrected for Snow, Speedstep, battery management, trackpad and keyboard.

The application contains context-sensitive help on every button and menu help.

It also comes with "Read me first."

In comments about this article I leave the "Read me first."

Download link following the link to the forum.

21/11/09

Rehubicado battery driver to the folder "Drivers" because of random kernel panics.

Optimized file DSDT.aml (Now supports 4gb of RAM).

22/11/09

Added on Hack "Firewire power conservation" in the DSDT.

(EN)

Versión There is no application for this right now.

Join the forum discussion on this post - (9) Posts

2 Responses to "Vaio EvOBootboX edition."

  1. admin Says:

    EvOVaioBootboX

    Quickstart:

    Choose the RC3 Chameleon bootloader and the system partition where to install.
    Install extra folder.
    Install the drivers for Sony Vaio.
    Reboot.

    Tutorial slow:

    "What is EvOVaioBootboX?
    It is a program that allows you to store / install drivers and bootloaders,
    See it as a toolbox for your hack.

    Before you begin:

    -The application requires to function properly for the following:
    -The user must have administrator permissions (default if the installation is correct).
    "They can have spaces in the name of:
    Bootloaders storage folders / system disks / drivers.

    "The concept is as follows:

    The application focuses on 4 things:

    Storage and installation of bootloaders.
    "" Extra folder.
    "" Of your custom drivers.
    Installing drivers / repair permissions.

    1. Section remove drivers.
    "It's a quick way to delete a driver if you know his name, just select the partition where
    resident / System / Library / Extensions and click "OK" (It will recreate the boot caches after).
    "If the driver lies in the extra of that partition, select the
    extra box. (After deleting the driver file will be recreated within extensions.mkext / Extra).

    2.Sección bootloaders.
    In this section you can add and install bootloaders.

    How to add a bootloader?
    -Click on the bottom of the application on the button "Import bootloader" will open a folder
    contained within the program, there already exist several bootloaders (from team chameleon and
    to Netko). In this folder is where you can put your bootloaders into folders without spaces in the name and
    only with the file "boot" inside. (The application contains the rest of the binaries needed to install
    the boot.)
    "You have to press" refresh "after import / delete.

    How to install a bootloader:
    "First you should locate the disk and partition you want to install the bootloader, click in
    Utilities Osx> "HD info"
    -Located partition and we could say something like:

    SNOW Apple_HFS 200.0 GB disk0s2

    "In this case," disk0s2 "is what we seek:
    disk0 is the disk where you install
    s2 is partition
    "SNOW" is the name of the volume.

    "With that information and we can select disk, partition and volume to install the bootloader.

    EFI TOOL:
    "It's a small tool to format the EFI partition and so it can install drivers and bootloaders
    boot.
    -Note: In Snow Leopard, the EFI partition will be visible (always) after format (on Leopard was
    hidden (always) formatted once.)

    3.Drivers/permisos.

    "This section is devoted to the installation of drivers.
    -First select the target partition and extra if it's installed in / Extra / Extensions.
    -Install the drivers one by one dragging on the square icon.
    -The application caches, repair permissions and recreate the boot.
    "The button" rep permissions "repair the / System / Library / Extensions
    "The button" touch extensions "recreates the boot caches (but not the / Extra / Extensions.mkext)
    "The button" / Extra / Extensions.mkext create "creates the file in the selected partition.
    "The button" Extra / Extensions "open that folder.
    "The button" Extensions "open system / Library / Extensions.

    4.Utilidades OSx.
    -HD info
    Display information on disk utility.
    -EFI tool
    Allows to format the EFI partition

    5.Carpeta extra.
    -Create extra folder with the necessary content in the selected partition.
    "If you want to change the contents of extra (in the application is a selection of content standart)
    only you must click on the button "Import extra" and you can change what you need inside.
    "You have to press" refresh "after import / delete.

    6.Drivers.

    -Install the drivers contained within the program in the selected partition.
    "If you want to change the contents of drivers.
    Contents of drivers:
    Ati drivers for opengl.
    VoodooHDA for Audio.
    only you must click on the button "Import Drivers" and you can add more drivers inside.
    "You have to press" refresh "after import / delete.

    7.Archivos hidden.
    Displays or hides files normally not visible operating system.

    On the Help menu, you can find the help and "about EvOVaioBootboX" where you can update or uninstall.

  2. ritzcarltn Says:

    Good Job!

Leave a Reply

You must be logged in to post a comment.


'Hackintosh > NoteBook' 카테고리의 다른 글

OS X Install Guide in HP DV5-1207, DV4도 칩셋 동일  (0) 2009.12.16
Samsung Q210-FS02  (0) 2009.12.15
DELL M1210 OS X SETUP  (0) 2009.12.06
HP 2133 with OSX?  (0) 2009.11.22
HP CQ40  (0) 2009.11.05
:
Posted by Ritz®™