달력

11

« 2024/11 »

  • 1
  • 2
  • 3
  • 4
  • 5
  • 6
  • 7
  • 8
  • 9
  • 10
  • 11
  • 12
  • 13
  • 14
  • 15
  • 16
  • 17
  • 18
  • 19
  • 20
  • 21
  • 22
  • 23
  • 24
  • 25
  • 26
  • 27
  • 28
  • 29
  • 30
2009. 10. 24. 19:09

Gigabyte GA-MA770-DS3 AMD Motherboard Hackintosh/AMD2009. 10. 24. 19:09


1.Kalyway 10.5.2 w/ patch 와 Leo4Allv4.1 이미지는 실패.

2. Kalyway 10.5.2 설치 성공, 그러나 usb 키보드와 마우스를 사용해야 하는 제약사항이 있습니다.

3. sata DVD drive 와 sata HDD 그리고 CMOS SETUP에서 "AHCI"로 세팅하여 iPC 10.5.6 PPF5로 설치성공.

4. 설치가이드

- 사용자화에서 SB chipsets을 사용가능하게 하는 'VIA' 칩셋 선택

- ALC888 사운드 드라이버 선택.

- R1000 ethernet 드라이버 선택.

- 사용하고 있는 그래픽 카드 드라이버 선택.

- 재부팅시 부팅옵션 "-x"부트 플래그를 이용하여 안전모드로 부팅하여 netkas.org에서 universal nvidia ati injector/enabler를 검색하여 설치하여 준다.


'Hackintosh > AMD' 카테고리의 다른 글

sapphire r9-270x dual-x oc d5 2gb with 10.9.2  (0) 2014.02.26
MSI 770-C45에 해킨토시 설치하기  (0) 2012.03.01
Asrock A780GM  (0) 2009.10.26
GA-MA78GM-US2H IDE  (0) 2009.10.23
Phenom II, M3A78-EM, Ati 4850: Leopard install success.  (0) 2009.05.05
:
Posted by Ritz®™
2009. 10. 24. 18:57

Permissions & KEXT Caches Hackintosh/Tip2009. 10. 24. 18:57

Mac OS X를 사용하면서 가장 문제점이 될 수 있는 것이 잘못된 권한이나 부적절한 kext cache 를 생성하는 것입니다.

항상 필요한 것은 아니지만, extensions을 수정/추가하거나 새로운 kexts가 추가되는 새로운 소프트웨어를 설치하였을때, 디스크유틸리티에서 권한복구를 하여주거나 kext caches를 새로이 만들어주는 것이 필요합니다.

물론, x86osx : Leopard driver 설치 방법 에서와 같이 kext helper를 이용하는 것이 편리한 방법이긴 하지만, 여기에서는 터미널을 이용하는 방법으로 다음과 같은 명령어를 주어 매뉴얼로 수행할 수도 있습니다.:


$ sudo chown -R 0:0 /System/Library/Extensions

$ sudo find /System/Library/Extensions -type f -exec chmod 644 {} \;

$ sudo find /System/Library/Extensions -type d -exec chmod 755 {} \;

$ sudo kextcache -v 1 -a i386 -a x86_64 -m /System/Library/Caches/com.apple.kext.caches/Startup/Extensions.mkext /System/Library/Extensions


다음은 "Extra"폴더를 권한복구하여 준다.:

$ sudo chown -R 0:0 /Extra

$ sudo find /Extra -type f -exec chmod 644 {} \;

$ sudo find /Extra -type d -exec chmod 755 {} \;

$ sudo kextcache -v 1 -a i386 -a x86_64 -m /Extra/Extensions.mkext /Extra/CustomExtensions


이제 시스템을 재부팅하면 된다.

만약, 다른 하드디스크나 파티션의 권한복구해 줘야 할 필요성이 있을때는 그 경로를 유념하여 사용하면 된다.

NOTE: /S/L/E 권한은 755 이고 그 안의 파일들은 644 임에 유념해야 한다.

IMPORTANT: Place any extensions that you would normally put in Extra/Extensions into Extra/CustomExtensions. This solves several bugs people have been experiencing while using Extra/Extensions in Snow Leopard with the Chameleon RC1 & PC EFI 10.1 bootloader. If you currently have extensions in Extra/Extensions simply move them to Extra/CustomExtensions before running the above commands or using the script below.

If you’ve tried using the manual method listed above to fix permissions but you are still having problems – or you just want to speed things up – I have written the following script which automates the process.

스크립터 다운로드: pfix v1.2

더블클릭하여 이 스크립터를 수행하거나 다음과 같은 커맨드를 이용하여 이 스크립터를 수행할 수 있다.

“sudo /path/to/pfix”

만약 “command not found” 혹은 “Permission denied” 라는 에러메시지가 나오면 다음과 같은 커맨드를 이용하여 스크립터 권한을 수정하여 주어야 한다.

“sudo chmod 755 /path/to/pfix”

Note: Place extensions that would normally run in Extra/Extensions into Extra/CustomExtensions for this script to work. (this solves some bugs people have been having with using Extra/Extensions in Snow Leopard).

IMPORTANT: This script is intended to be used for correcting permissions and building kext caches on Snow Leopard ONLY! Do not use this script to repair permissions on Leopard or Tiger! Also do not use on a real MAC [it is for hackintosh only].


:
Posted by Ritz®™
2009. 10. 23. 19:37

myHack Installer 3.1 Hackintosh/해킨패키지2009. 10. 23. 19:37


Update : 해킨토시 설치 요약 정..

Update (2012-Jun-11)


설치전 준비: http://osx86.tistory.com/1302

준비물:

http://myhack.sojugarden.com/guide/

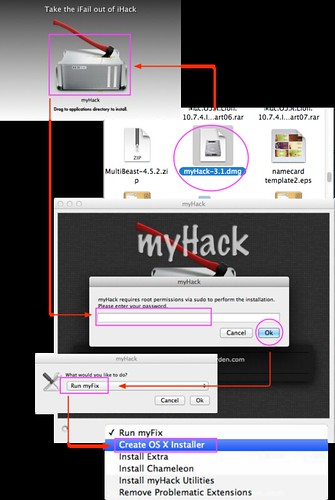
아래 그림과 같이 Lion(10.7)/Mountain Lion(10.8) DMG 설치 이미지를 이용하여 간단하게 Lion(10.7)/Mountain Lion(10.8) 설치용 USB 로 만들 수 있다.

제대로 안보인다면 클릭하여 그림을 클릭하여 꼼꼼하게 확인한다. 

MyHackInstaller

- Create OS X Installer    : Lion(10.7)/Mountain Lion Retail(10.8) DMG 이미지를 USB에 설치가능하게 이미지 카피를 해 준다.

- Install Extra                 : 일반 PC에 설치가능하게 /Extra 폴더를 구성해 준다.

- Install Chameleon        : Chameleon 부트로더를 설치해 준다. 


들어가며: By Conti,

myHack 설치 패키지는 retail OS X 10.6 “Snow Leopard”를 PC에 설치하기 위해 만들어 졌다.

설치과정을 아주 많이 간단하게 하여 시간을 줄일 수 있도록 설계되었지만 OS X 10.6 을 PC에 설치하는 데 원클릭 한방 솔루션은 아니다.

이 가이드는 snow leopard가 PC에 동작하는 방법을 설명하기 위한 것이 아니라 snow Leopard를 빨리 그리고 쉽게 myHack 설치 패키지를 이용하여 설치를 단순화 하는 방법을 설명한다. 해킨토쉬 개념을 포함하고 있지만 kexts, permissions, efi, gfx strings, dsdt, etc 등의 단순화를 제약하지는 않는다.


Basic Requirements:

- OS X 10.6 “Snow Leopard” Retail DVD/DMG

- myHack Installer 1.0 RC4

- “vanilla” OS X kernel이 동작되고 있는 맥 시스템

- 다음과 같은 하드웨어(제약 사항은 아님)

Processor: Intel Core 2 Duo, Core 2 Quad, Core i7

  • Chipset: Intel (G33, P35, X58, etc) w/ ICHx South-bridge.
  • At least 1GB of memory. (2GB 이상)
  • USB 키보드 와 마우스.
  • 가능한 Nvidia 8xxx, 9xxx or 2xx 시리즈 그래픽 카드.
  • 10GB 이상의 여유공간이 있는 하드디스크. (20GB 이상 추천).
  • USB 외장형 하드디스크 혹은 8G 이상의 USB 메모리 스틱.
  • 또한, OSX 10.4 이상의 리얼맥이나 해킨토쉬(USB 설치 디바이스를 준비하기 위해 필요.)

Note: myHack 설치 패키지 1.0 rc4는 AMD&Intel i5 프로세서를 위해 “chocolate” kernel을 옵션을 포함하고 있다.

하지만, 많은 위에 언급되지 않은 시스템들은 검증이 불충분하지 않으므로 직접 리스크를 안고 테스트를 해보시는 수밖에 없다. 이를테면, ATI 그래픽 카드 같은 경우도 마찬가지이다.


Section 1 : 기본 설치 가이드

단계 1 – USB Drive 준비

- 디스크 유틸리티에서 MBR 혹은 GUID 파티션을 만들어 포맷을 한다. (개인적으로는 legacy 시스템을 위해 MBR를 더 선호한다. )

- Retail OS X Install DVD 나 이미지를 USB 메모리스틱 혹은 USB외장형 하드디스크에 복원한다.

- myHack installer를 USB 메모리스틱 혹은 USB 외장형 하드디스크에 설치한다.

- 여기에서 필요한 kexts, gfx strings, injectors, dsdt 등등을 USB 드라이버에 추가한다. 만약, kext를 추가하였거나 수정하였다면 당근 권한을 복구하고 Extensinons.mkext 재생성해야 한다.

이제 설치를 테스트할 준비가 되었다.

알려진 이슈:

1) 극단적으로 중요: 재삼 확언하건데 컴퓨터의 내장 하드디스크의 root 파티션에서 installer 를 돌리는 것이 아니라 USB 드라이버에 설치하는 것이다.

I can not possibly stress how important it is that you ensure you are installing to the USB drive and NOT the root partition of the computer you have run the installer on. The root partition is selected by default. 만약 Chameleon Bootloader를 REAL Apple 컴퓨터에 설치한다면 이는 시스템을 망가뜨리는 결과를 가져오게 될 것이다.

2) com.apple.Boot.plist파일에 gfx 스트링이 없거나 그래픽 카드 enabler/injector 없이는 framebuffer 로딩시에 커널패닉을 경험하게 될 것이다. 이 문제를 방지하기 위해 FramebufferDisabler.kext를 만들어서 넣어두기는 하였지만, 만약 그것을 선택하지 않는다면 역시나 커널패닉을 경험하게 될 수 있음을 기억하여 주기 바란다.

3) 몇몇 그래픽 카드는 VESA 모드에서 정상동작하지 않는다. 커널패닉 대신 간단하게 블랭크 스크린을 보게 될 것이다.

만약 이런일이 일어난다면 적합한 gfx string 을 /Extra/com.apple.Boot.plist 화일에 넣어주거나 그래픽카드에 적합한 enabler/injector를 사용하여야 한다. myHack Installer 1.0 RC3는 customize 옵션에 GraphicsEnabler 옵션을 추가하였다. 이 옵션은 GraphicsEnabler = Y string을 가지고 있는 기존 com.apple.Boot.plist화일을 덮어 쓸 것이다. 이것은 몇몇 ATI 그래픽 카드와 대부분의 Nvidia 그래픽 카드의 그래픽 가속을 가능하게 할 것이다.

주의: 만약 그래픽 enabler 옵션이 적절하게 동작하지 않는다면 카멜레온 부트프람프트에서 -pci0 를 입력해 보기를 권고한다.


단계 2 – BIOS Setup

아래 그림과 같이 AHCI로 설정한다.  또한, HPET를 64 bit로 설정하는 것이 적절하다.


단계 3 – Installation

모든 것이 시스템에 맞게 적절하게 구성되어졌다면 USB 디바이스를 이용하여 부팅이 될 것이고 OS X installer 모드가 환영할 것이다.


일반적인 설치과정을 진행한다.

주의: 만약 USB드라이브 이외의 설치할 하드디스크를 선택할 수 없거나 하드디스크가 보이지 않는 다면 BIOS SETUP에서 SATA 디바이스가 AHCI모드로 설정되어 있는지 확인한다. 만약, CMOS설정에 AHCI설정이 없다면 대신에 일반적인 IDE방식의 하드디스크나 ICHx 칩셋이 픽스된 AppleIntelPIIXATA.kext & IOATAFamily.kext를 설치하여 재시도하여 본다.

설치가 끝난 후 재부팅한다.

주의: 만약, 설치가 거의 끝날 무렵 nstallation failed라는 에러메시지가 보일지라도 무시한다. 이 에러메시지는 Installer가 타겟 파티션을 “bless”하지 못해서 일어나고 시스템이 부팅가능하지 못할때 발생한다.

단계 4 – 첫 부팅

재부팅시에 USB디바이스의 chameleon bootloader 와 kexts를 로딩하는 USB디바로 부팅하면 OSX installer를 실행할 것이다. 새로이 설치된 Snow Leopard system을 로딩할려면 boot prompt에서 Snow Leopard가 새로이 설치된 하드디스크를 선택해야 한다.

계속 실행하면 초기 구성을 실행하게 될 것이다. 만약 기존의 설치된 Leopard가 있다면 유틸리티의 migration assistant를 이용하여 마이그레이션 할 수도 있지만, 여전히 많은 응용프로그램이 Snow Leopard와의 호환에 문제점이 있으므로 충분히 고려하여 결정하면 된다.

단계 5 – Post Install

데스크탑에서 finder가 실행된 후, USB 디바이스를 열면 "단계 1"에서 설치했었던 myHack installer v1.0 RC4 가 USB의 최상단(/ )폴더에 있을 것이다. 이제 USB에 있는 myHack installer를 실행하게 되면 이번에는 snow leopard 하드디스크 partition에 설치할 것이다. 반드시 단계1에서 설치할 때 선택했었던 옵션과 동일하게 옵션을 선택해야 한다. kexts, gfx strings, injectors, dsdt, 등등이 snow leopard 하드디스크 partition에 제대로 설치되었는지 확인한다.

Note: 다시 한번 만약 kexts를 수정하거나 추가하였다면 권한 수정을 해주어야 하고 Extensinons.mkext 를 반드시 재생성해야 한다.

이제, USB디바이스 없이 재부팅할 준비가 되었다. USB디바이스를 추출하고 시스템을 재부팅하여 Snow Leopard가 설치된 하드디스크로 부팅한다.

Congratulations! 제대로 부팅이 되었다면 Snow Leopard 가 설치된 시스템을 운영할 수 있다.


Section 2: Advanced Installation Instructions

This section will eventually focus on dsdt generation & patching, gfx strings, injectors, audio, additional kexts, general troubleshooting, etc…

For now look elsewhere.

Section 3: Credits

I’d like to personally thank the following people for making this all possible and for all the help they have personally given to myself and others:

(in alphabetical order)

apocolipse, aschar, chrome, Conti, fassl, Galaxy, Kabyl, lastExile, modbin, Mushishi, nawcom, netkas, p|astikman, prasys, stellarola, XyZ

Additionally thanks go out to the Voodoo Team, everyone who has worked on the Chameleon bootloader, and everyone else who has contributed to the hackint0sh scene!

Section 4: Changelog

2009/10/17 - Revision 3 – Guide updated to include relevant myHack Installer RC4 information. Edited basic requirements, added graphics card recommendations and some information about non-vanilla installs. Expanded and improved Basic Installation Instructions.

2009/09/28 – Revision 2 – Guide updated to include relevant myHack Installer RC3 information. Corrected some typos. Restructured and expanded Basic Installation Instructions. Some place holders added for planned additions.

2009/09/22 – Revision 1 – Initial Post


'Hackintosh > 해킨패키지' 카테고리의 다른 글

UniBeast: Mac OS X Lion 이상 부팅가능한 USB 드라이버 만드는 방법  (3) 2013.03.17
Multibeast  (0) 2011.03.07
KakeWalk  (0) 2010.08.20
myHack Installer 1.0 RC4 Released  (0) 2009.10.23
:
Posted by Ritz®™

IDE DVD-ROM 이 IATKOS 설치이미지가 지원하지 못하는 JMB363 controller에 후킹하기 때문에 에러 메시지가 발생한다.

SATA DVD-ROM 혹은 SATA 를 IDE/ATAPI converter를 이용하여 연결한다.

Promise Ultra133 TX2 같은 IDE 애드론 카드를 이용하면 이와 비슷한 역활을 하기 때문에 이용하는 방법도 좋다.

iATKOS 설치 DVDJMB363에 연결된 하드드라이버나 혹은 ICH9 Controller 1의 두개의 하드 연결중 하나에 이를테면 SATA 1 이나 2에 설치한다.
안타깝게도 Atheros NIC 는 동작하지 않으므로 저렴한 RTL8139 랜카드를 하나 구한다.

설치한 후에 ICH9 Controller 2 와 사운드카드 ALC883을 동작시키기 위해 다음과 같은 작업을 한다.


ICH9 SATA (Vendor: 8086, Device ID: 2921 [Controller 1] & 2926 [Controller 2])

————————————

1. terminal을 실행하고 다음과 같은 순서로 커맨드를 입력한다.


# sudo su

# nano /System/Library/Extensions/IOATAFamily.kext/Contents/PlugIns/AppleIntelPIIXATA.kext/Contents/Info.plist

Remove ” 0x29268086” from the line:

<string>0x29218086 0x29268086</string>

to make it look like this:

<string>0x29218086</string>

Save and exit nano (Ctrl+o Ctrl+x).


# nano /System/Library/Extensions/AppleVIAATA.kext/Contents/Info.plist

Add “0x29268086 ” to the line:

<string>0x2363197B 0x31491106 0x00e310de 0x005410de 0x005510de</string>

to make it look like this:

<string>0x29268086 0x2363197B 0x31491106 0x00e310de 0x005410de 0x005510de</string>

Save and exit nano (Ctrl+o Ctrl+x).


# rm /System/Library/Extensions.mkext
# rm /System/Library/Extensions/Caches/com.apple.kext.info

# kextcache -k /System/Library/Extensions/


2. 재부팅한다.
3. BIOS에서 Intel ATA 를 Enhanced/IDE 로 JMicron 을 IDE 로 세팅해준다.


Realtek HD Audio ALC883 (Vendor: 10ec, Device ID: 0883)

————————————

1. 다음툴들을 다운로드한다.

- AppleHDAPatcherv1.20.zip here: http://forum.insanelymac.com/index.php?showtopic=32859

- 883_Asus_P5KC_codec_dump.txt here: http://forum.insanelymac.com/index.php?s=&…st&p=547910

2. 드래그 앤 드랍으로 883_Asus_P5KC_codec_dump.txt 을 AppleHDAPatcherv1.20 에 넣어 다음 진행하는 순서대로 진행한다.

3. 재부팅한다.

'Hackintosh > Mainboard' 카테고리의 다른 글

GA-EP45-UD3L  (0) 2009.10.21
Asus P5P43TD Pro  (0) 2009.10.21
GA-EX58-UD3R  (0) 2009.07.08
dsdt magic  (0) 2009.07.06
Iwill P4HT2 구형 메인보드에 OSX 를 설치하다.  (0) 2009.06.07
:
Posted by Ritz®™

눈범을 설치한 후 부팅후에 "mdworker"와 관련된 커널패닉 현상을 겪어시는 분들은 이 유틸리티를 한번 사용해 보시기 바랍니다.

http://rapidshare.com/files/236461716/KextUtility.v2.3.2.full.Snow.Leo.x64.ready.by.cVad .dmg.zip


:
Posted by Ritz®™

Boot think는 Boot camp와 아주 유사한 부트로더군요..

한번 사용하여 보세요.


On the boot think


1, like Apple's Boot camp interface


2, a custom icon


1, suitable for the target
Apple installed in the PC system , And and operating system to Windows XP, Vista, Windows7or Linux, such as coexistence, at the same time want to experience the perfect start to guide the process of Mac and enjoy the flavor of the original Apple.

2, Boot-Think what
Boot think is installed on your computer in general the original Mac OS's a multi-system guidance tools on the computer and to facilitate the coexistence of multiple system start-up options.

3, Why should we use the Boot-think
Boot think is designed to let the PC is more convenient to start the original Mac OS system, so also in the design style as much as possible of the original Mac to inherit the graphical interface to start the effect. Boot think, after all, is designed as an ordinary PC, it also enhances the performance of the Windows system boot support.

4, a description of the problem
a, Boot think only provide the original Mac OS on the guidance, but specific to a computer can install the original Mac OS systems, can refer tohttp://wiki.osx86project.org/wiki/index.php/HCL_10. 5.6


b, Boot think although it is to guide the design of the original system, but the same version ofMac OS support systems break guide


c, Boot think 1.1.0 is currently only supports HFS + format in the primary partition to install


5, Boot-Think Functional Description

Function


Remarks


Support GUID and MBR partition

Support the hidden EFI partition installation
Can be installed in the EFI partition GUIDformat
To support the hard disk, U disk to install
Recommended in the U disk
Supporting documents to guide
The need to manually create the WindowsStart menu under
Hard disk operating systems and more and more guide
To support the XP, Vista, Win7, Ubuntu and other operating systems
GUI interface

Mac OS X installed on the original CD-ROM

Shortcut keys to start

Startup configuration

To simplify the zonal list

Default boot partition


6, operating instructions

Shortcut keys to start


Description


c
Original CD-ROM to start the installation of Leopard
Alt (Option)
Start into the Startup Manager, you can choose to boot from a partition
Shift
To start in Safe Mode and log in the temporary closure of
Ctrl (Command) + v
Verbose startup mode for
Ctrl (Command) + s
Start for the single-user mode


Set command


Description


#-B
Select the current partition settings as the default boot partition
# P =-
Show only bootable partition
# P = +
Shows that the restoration of Zoning
# G = WxHxDEPTH
For example, g = 1024x768x32 set default startup resolution
~
Cancel all settings

Boot_Camp graphical interface to guide, Leopard original PC CD-ROM to install the video: http://www.tudou.com/programs/view/9wyX20MjGPc/

XP, vista, Win7 support for video: http://www.tudou.com/programs/view/V-_PUcMzu2c/

Default boot partition set up, the Chinese label support video boot Shortcuts:http://www.tudou.com/programs/view/PFdQGJjyQyY/

Show only bootable partition in the menu Video:http://www.tudou.com/programs/view/eShFSYP3V6k/


7, Boot think the installation of

Download the latest version of boot think the installation package, extract the Apple system running after the double-click the installation process need to select the installation location, the default system partition for the Mac OS (Note: Boot think 1.1.0currently only supports HFS + in the primary partition to install).


Select the installation path can click on the bottom left corner after the custom button for custom configuration

Offers three installation modes:


1)
Only option Boot1h election. After installation boot think does not boot directly from theboot think to start, but as usual into the Windows system, and then guided through the browser from the Windows boot / Darwin/standalone/i386 / copy files from the fileboot toachieve the re-boot think guidance, in order to get graphics interface, select the system tostart.


Such installation, the installation package file boot1h only choice to write the partition to install inside a sector that is the command: dd if = boot1h of = / dev / rdiskXsY), in order to be discovered and boot0 or run fileboot


2)
At the same time check the two options Boot1h and boot0 (This is the default installation mode). After installation boot think boot directly from the boot think started to enter the graphical interface, select your system, such installation, the installation package in addition to the completion of a mode of operation, but also to document boot0 write MBR sector of the disk (that is, the command : fdisk-f boot0-u-y / dev / rdiskX).


3)
EFI only option election, the abolition of the two options Boot1h and boot0. Boot think will be installed on the hidden EFI partition GUID partition, select the installation mode to install partitions, select the GUID partition can be arbitrary, the installation program to find hidden with EFI disk partition, and installed to the EFI partition.


The proposed primary use default settings.


8, Boot think the use of
When the boot think the interface is activated, can be used around or up and down arrow keys to achieve the system to start the selection, for the Mac OS system, if the need to enter an order parameter, can be F8 key to enter text mode. Specific operations, see 6

9, Boot think that the issue should be
boot think installation package must contain only the boot drive, if the need to crack the driver, please install itself.

(Qq base 18458890)

download for boot think:
(The same as the three download links, choose a download link on the line)


http://www.mediafire.com/download.php?zymkwgiawmt

http://uploaded.to/file/p2itba

http://www.megaupload.com/?d=NZSZA9II


'Hackintosh > Boot Think' 카테고리의 다른 글

Boot Think 설치하기  (0) 2009.10.27
:
Posted by Ritz®™
2009. 5. 31. 17:47

자동로긴 설정 Hackintosh/Tip2009. 5. 31. 17:47

:
Posted by Ritz®™
2009. 5. 31. 17:38

com.apple.Boot.plist화일 편집하기 Hackintosh/Tip2009. 5. 31. 17:38

:
Posted by Ritz®™