RUNNING OS X (10.5.6) ON THE
GIGABYTE GA-EX58-UD5 (Core i7) MOTHERBOARD
First of all, I really appreciate digital_dreamer.
This posting is from him, you can see his posting in
here.
Many have expressed a desire to have the
Retail DVD Install and
Boot from EFI Partition Retail DVD Install tutorials moved from the growing
Upcoming Intel X58 Mobos & Core i7 CPUs thread to this Tutorials forum for easy access. They have been getting buried in the numerous posts and hard to monitor for updates. Many, perhaps, don't know they were even there.
This Retail DVD Install thread is divided into two parts:
1. DIGITAL_DREAMER'S STANDARD RETAIL DVD INSTALL (included in this post)
This portion will begin by outlining the basic steps performed for the install and what kexts are needed, replaced or deleted. This method entails installing your Mac OS X Retail DVD and a small bootloader (PC-EFIv8). I prefer the Retail DVD install method over the common distros from a legal point of view, as it allows one to purchase a current OS X Retail DVD and, therefore, support Apple. This is a vanilla install with a handful of kexts removed/replaced for full functionality. See these threads for further information:
Retail DVD Guide and
New modified BOOT-132 allows you to boot retail DVDs, Use Mac OS X Retail DVD on hackintoshes!
2. WOLFIENUKE'S BOOT FROM EFI PARTITION RETAIL DVD INSTALL (see next post)
The
Boot from EFI partition method is basically an extension to the Boot-132 method, where the modified kexts are copied to a hidden partition (EFI), leaving your vanilla Retail DVD install untouched on your main drive. This method allows you to run Apple's Software Update without any problems whatsoever. This is arguably the best install method, and one I'm currently using, if you want to keep your system up-to-date with few problems. Making this method even more appealing is the walk-through script written by wolfienuke, where you simply answer a few options and confirm your choices. Although the script runs in the Terminal, no Terminal background is necessary.
STANDARD RETAIL DVD INSTALL -
UPDATE: 1/25/2008
- Updated audio with the latest AppleHDA.kext: Version 1.6.2a37 3outs3ins digital with HDA headphone setup. This update supports HDA front audio: When you plug headphones in, the front speakers will be automatically muted. Also, in System Preferences' Sound, the name Internal Speakers will be changed to Headphones. Additionally, the Microphone inputs include the "Use ambient noise reduction" option.
- Added DSDT patcher. An updated dsdt.aml file will be created and copied to your root directory. For more information on this patcher and why it's needed, see DSDT Patcher, a tool to fix your DSDT.
UPDATE: 1/17/2008
- Tutorial has been updated for 10.5.6
- Standalone kext package and installer package now includes the Voodoo-based 9.6.0 kernel.
PREVIOUS UPDATES:
- Added further instructions for those who may have more than one partition on their drive.
- Updated the Realtek LAN driver with version 1.8.1 from Psystar, which offers dual-gigabit support and enhanced interrupt handling for improved throughput and link detection. This driver fixes the connection loss after wake issue when using DHCP. Turn "Green LAN" on OFF in BIOS so ports can activate automatically when cable is plugged in. (Latest BIOS update must have toggled the "Green LAN" behavior.)
- Simplified script and clarified some instructions.
- Updated AppleAHCIPort.kext to support the Intel ICH10-R Chipset. Now shows proper info in System Profiler.
- Modified instructions for those who need ejecting drives, i.e. eSATA. Option is available to not include "internal fix." Until a real fix is made, all drives would be flagged as "external" and will have yellow icons.
- Fixed stupid paths error in post-patch script.
- If you need any of the vanilla kexts that are removed from OS X 10.5.5 by the script, they are here.
Download Gigabyte GA-EX58-UD5 motherboard kexts - now includes Voodoo-based 9.6.0 kernel. (4MB)
All that's really needed to boot into OS X on this board is the Voodoo kernel, its accompanying System.kext, and dsmos.kext. That's it. Everything else are little fixes for hardware reporting, updated device IDs, audio, LAN, etc. In my case, I also needed the Natit.kext for ATI graphic card support, as without it I just got video corruption and couldn't see the desktop.
One important issue to keep in mind when installing kexts is that non-Apple kexts, like dsmos.kext, and injectors, like HDAEnabler.kext, Natit.kext, etc. are not installed with permissions data regarding them. So, Repairing Permissions will do absolutely nothing in fixing them. With the exception of commercial software that come with their own installers, only Apple-supplied OS software will get their permissions repaired. So, be absolutely sure the permissions are correct for these non-Apple kexts, or your system won't boot. Either use the Terminal to do a
"sudo chmod -R 755" and
"sudo chown -R root:wheel" to the file or use software like
OSx86 Tools Utility to install kexts automatically.
After performing a Retail Mac OS X Leopard DVD install, our modified post-patch script will be performing the following basic steps for this board. If you desire to perform the kext install manually, these are the steps you would want to accomplish for fully operational subsystems:
BASIC RUNDOWN:
Install Mac OS X Leopard Retail DVD
Backup 10 vanilla files from original install: (This is not absolutely necessary, but a good practice.)
- AppleACPIPlatform.kext
- AppleAHCIPort.kext
- AppleEFIRuntime.kext
- AppleHDA.kext
- AppleSMBIOS.kext
- IOAHCIFamily.kext
- IOATAFamily.kext
- JMicronATA.kext
- System.kext
- com.apple.boot.plist (from Library/Preferences/SystemConfiguration directory)
Remove 7 incompatible kexts from install:
- AppleACPIPlatform.kext
- AppleAHCIPort.kext
- AppleHDA.kext
- AppleSMBIOS.kext
- IOAHCIFamily.kext
- IOATAFamily.kext
- JMicronATA.kext
Install kernel and supporting files (ABSOLUTELY NECESSARY TO BOOT!):
- Voodoo-based 9.6.0 kernel by Andy Vandijck (named "mach_kernel")
- Voodoo-based System.kext
- com.apple.boot.plist -(updated with device properties string and busratio=20 flag for Voodoo kernel)
Install updated/modified kexts:
- AppleHDA.kext
(pre-patched for the ALC889a chipset with Targas patcher)
- HDAEnabler.kext
(goes with the included AppleHDA.kext)
- AppleACPIPlatform.kext
(w/reboot fix)
- IOATAFamily.kext
(over 4GB RAM fix)
- JMicronATA.kext
(over 4GB RAM fix)
- IOAHCIFamily.kext
(display drives as "internal" fix. NOTE: If you have removable drives, this kext should not be used.)
- AppleAHCIPort.kext
(ICH10R ATA driver
- RealtekR1000.kext
(on-board LAN support from Psystar's version (1.8.1) of the Realtek R1000 driver)
- Natit.kext
(support for the ATI 2400 to 3800x2 GPU Series from netkas.)
- NVinject.kext
(support for the NVIDIA GPUs. The NVkush.kext is included for those who wish to use it instead.)
- AppleSMBIOS.kext
(for PC EFI compatibility)
- dsmos.kext
(page decryption EFI module - ABSOLUTELY NECESSARY TO BOOT!)
Remove kext cache on new install:
sudo rm -r /Volumes/YOUR_HDD_NAME/System/Library/Extensions.mkext
Repair permissions:
sudo diskutil repairpermissions /Volumes/YOUR_HDD_NAME
DONE!
NOTES:
- Because I have a ATI GPU, the script includes support for it. If you have a NVIDIA GPU, you may need to install a separate kext. If you have the NVIDIA 8800GT 512, try the included NVinject.kext in the downloaded kexts folder.] Already included.
- If you are using DHCP in your Ethernet settings, the RealtekR1000 LAN driver will only grab an IP during boot time, and after wake from sleep will not connect again. Until a fix is made, it is suggested that we use a fixed/manual IP address for your Ethernet connection. This includes inputing your Subnet Mask and Router IP, as well. FIXED with Psystar's version of the Realtek R1000 driver.
You may install these kexts/files via:
- Terminal.
- Kext Helper b7 (and Terminal). This tool is of limited use as it will only install kexts on the active partition.
- OSx86 Tools Utility. This utility will install kexts to the partition of your choice and label them in red for easy visibility. A very versatile tool.
- Universal OSx86 Installer.
- Slimbuild - Boot-132 CD Creator or SlimbuildGUI.
- Retail DVD Install method, which I will outline below.
- Boot-132 install or Modified BOOT-132 install.
- Boot from EFI Partition method - the best method for a totally unmodified OS install that can be updated without any post-patching or user intervention. See wolfienuke's Gigabyte GA-EX58-UD5 EFI Partition Boot Install Script in the next post for a incredibly simple and quick install technique.
INSTALLING OS X LEOPARD RETAIL DVD AND BOOTLOADER:
Download Gigabyte GA-EX58-UD5 Installer. (7MB)
These files include the EFI v8.0 bootloader, kexts, Voodoo-based 9.6.0 kernel, com.apple.boot.plist, and pre-patch and post-patch scripts. Some have asked for a Boot-132 image, such as created from the Slimbuild CD Creator. The problem is that it works best when you include the UUID of
your Install DVD in the boot.plist, which I wouldn't know first hand. I can still make it available, but don't know how successful it may be, as not even I can get it to work reliably.
INSTRUCTIONS:
Much credit and many thanks go to LTL, from whom the scripts and instructions are based on, David Eliott, who created the boot-132 bootloader, Kabyl and many, many other talented individuals that make these projects possible.
If you are already familiar with this method, you don't need to read any further here, but simply make sure you read the scripts well, as there are slight changes. If you are not familiar with this method, go to the
Retail DVD Guide to become acquainted with the process and procedure. However, the procedure in the scripts provided below are slightly different. The following is the basic objective:
PREPARATION
- It is ideal to have two physical drives (not two partitions on the same drive).
- One drive must already have OS X installed and running.
This may mean using another Mac or installing a easy-to-use distro like Kalyway on the smaller/slower drive. (I only mention Kalyway, because it is the only distro I'm familiar with and know works well with this board. There may be more recent distros that can achieve equal success.)
- Make an ISO of your Retail DVD and download the Combo update, if needed.
- Partition your install drive with the GUID Partition Table option from Disk Utility.
- Take note of the Disk Identifier for that drive (Get Info of partition, not volume). It may look like this: disk0s2
The first number following "disk" is the disk number. This second number following the "s" is the partition number.
- Unmount the drive.
INSTALL EFI AND MAKE DISK BOOTABLE:
- Open the pre-patch.sh script in the "EFI_Installer_GA-EX58-UD5" folder in your text editor of choice.
- Update the name of your install drive in the script here: sudo vsdbutil -a /Volumes/Name_of_your_install_volume
- Update (if needed) the Disk Identifier labels in the script (DISKID and PRTNID) to match your own install disk. Remember, the first number following "disk" is the disk number. This second number following the "s" is the partition number. For example, if your identifier is "disk1s2", then the label should look like this: DISKID=1 and PRTNID=2
- In Terminal: sudo -s
- Type in your user password at the prompt.
- In Terminal, cd to the "EFI_Installer_GA-EX58-UD5" folder and run pre-patch.sh as root.
HELP: If the folder is on your desktop, in Terminal: cd /Users/Your_User_Name/Desktop/EFI_Installer_GA-EX58-UD5
- or, type cd, followed by a space, drag "EFI_Installer_GA-EX58-UD5" folder to Terminal window and press Enter
- To run script, in Terminal: ./pre-patch.sh
- When script completes, your install volume should be mounted.
NOTE: If you have more than one partition on this drive and encounter this error in Terminal, "dd: /dev/diskX: Resource busy", it's likely the other partitions need to be unmounted. The easiest way to run this pre-patch script without these errors is to unmount all the other partitions of the target drive via Disk Utility (with the exception of the partition you are installing to). Make sure your target partition is mounted and, then, run the script again. At the completion of this script, your partitions should be mounted again.
INSTALL OS X
- Mount Retail DVD ISO.
- In Terminal: open "/Volumes/Mac OS X Install DVD/System/Installation/Packages/OSInstall.mpkg"
If you are not able to access directory via Terminal:
- In Terminal: defaults write com.apple.finder AppleShowAllFiles TRUE
- In Terminal: killall Finder
- Now, dig down to System/Installation/Packages via Finder
- Double-click OSInstall.mpkg in Finder
- (To hide files in Finder again, in Terminal: defaults write com.apple.finder AppleShowAllFiles FALSE )
- Install OS X to target drive.
- If needed/desired, mount Combo Updater and install, as well.
POST-INSTALL PATCHING:
- Open the post-patch.sh script in the "EFI_Installer_GA-EX58-UD5" folder in your text editor of choice.
- Update the name of your DESTINATION drive:
DESTINATION=Name_of_your_install_volume
- NOTE: If you have removable drives (i.e. eSATA), the following two lines should be commented out "#" or deleted.
sudo rm -r /Volumes/$DESTINATION/System/Library/Extensions/IOAHCIFamily.kext
- sudo cp -r kexts/IOAHCIFamily.kext /Volumes/$DESTINATION/System/Library/Extensions/
- In Terminal: sudo -s (followed by your password)
- In Terminal: /usr/sbin/vsdbutil -a /Volumes/Name_of_your_install_volume
- In Terminal, cd to the "EFI_Installer_GA-EX58-UD5" folder and run post-patch.sh as root.
HELP: If the folder is on your desktop, in Terminal: cd /Users/Your_User_Name/Desktop/EFI_Installer_GA-EX58-UD5
- or, type cd, followed by a space, drag "EFI_Installer_GA-EX58-UD5" folder to Terminal window and press Enter
- To run script, in Terminal: ./post-patch.sh
- When script finishes, in Terminal: exit
REBOOT!
UPDATES:
Most of the time, you can run Software Update without any issues. However, sometimes the updates modify the custom-installed kexts and even the kernel, which may result in a non-booting Mac. In those cases, all you need to do is boot into the other drive and run the
post-patch.sh script again and you should be ready to run.
Again, follow the directions in the scripts very carefully. There are changes that need to be made on your end for a successful install. Being human, I'm sure I goofed somewhere, so provide feedback if there are issues.
Disclaimer: I will not be held responsible for any damages, non-working systems, explosions, dead kittens, screaming monkeys, etc. that may result from following these instructions.
HELPFUL LINKS AND SCREENSHOTS:
•
Gigabyte GA-EX58-UD5 product page
•
Gigabyte X58 BIOS Features
•
Virtual BIOS
•
TweakTown: Gigabyte Technical Support Forum
•
BIOS F4 binary update
• Preconfigured
BIOS profiles (Load CMOS from BIOS <F12>)
Contains default 2.66GHz settings (start with this!), 3.2GHz overclock, and 3.8GHz overclock. These are my working profiles. They likely will work for you if you have set up your system similarly, but that is not guaranteed. The most likely area of change is the RAM speed and timings, so pay attention to that, as I run 1600MHz RAM with 9-9-9-24 timings. Additionally, keep in mind the overclock profiles are for
my board. Although the 3.2GHz overclock settings required no voltage changes, the 3.8GHz settings required a CPU Vcore (1.4v) and QPI/Vtt (1.34v) voltage change, but still well within the maximum allowed for the CPU and chipset. Although these settings are safe, they may be more than your board needs or less than it needs. Only you can determine that through tests. I will not take responsibility for any harm done from overclocking your board.
NOTE: I use the Extreme Memory Profile (X.M.P.) for my Corsair XMS3 RAM. Your RAM may not have a XMP profile or one under the same name, so double-check this setting. For the absolute best in stability, use the XMP profile (if available) or key in your memory timings manually (Your BIOS can only guess your timings with the AUTO setting.)
Current Integrated Peripherals settings in the BIOS:
 Reduced: 86% of original size [ 593 x 443 ] - Click to view full image
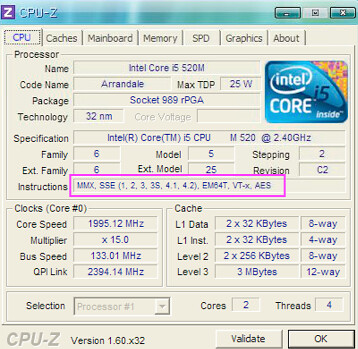
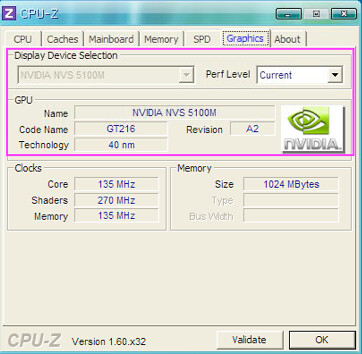
 Working hardware devices:
 (CLICK FOR ACTUAL SIZE)
 Reduced: 86% of original size [ 593 x 445 ] - Click to view full image
 Crunching Prime95 for 5 hours @ 3.8GHz:
 (CLICK FOR ACTUAL SIZE)
 Reduced: 86% of original size [ 593 x 475 ] - Click to view full image
 kind regards,
MAJ
kind regards,
MAJ