달력

12

« 2024/12 »

  • 1
  • 2
  • 3
  • 4
  • 5
  • 6
  • 7
  • 8
  • 9
  • 10
  • 11
  • 12
  • 13
  • 14
  • 15
  • 16
  • 17
  • 18
  • 19
  • 20
  • 21
  • 22
  • 23
  • 24
  • 25
  • 26
  • 27
  • 28
  • 29
  • 30
  • 31

Requirement : Chameleon 2.0-RC2~RC4

Symptom:

1. Install Chameleon 2.0.RC2 ~ 4.

2. ati_9442_1002.rom in /Extra/

3. Modify com.apple.boot.plist


com.apple.Boot.Plist(without kernel flags like UUID !) *

<?xml version="1.0" encoding="UTF-8"?>
<!DOCTYPE plist PUBLIC "-//Apple//DTD PLIST 1.0//EN" "http://www.apple.com/DTDs/PropertyList-1.0.dtd">
<plist version="1.0">
<dict>
<key>Graphics Mode</key>
<string>1920x1080x32</string>
<key>Kernel</key>
<string>mach_kernel</string>
<key>Kernel Flags</key>
<string>arch=i386</string>
<key>Timeout</key>
<string>2</string>
<key>GraphicsEnabler</key>
<string>Yes</string>
<key>EthernetEnabler</key>
<string>Yes</string>
</dict>
</plist>


/Extra/Store_Kexts/:

-EvoEnabler.kext in S/L/E or /Extra/Store_Kexts/_For_System
-LegacyATI4800Controller.kext in /Extra/Store_Kexts


10.6.2 Working:

1. Good Luck!


:
Posted by Ritz®™
2009. 12. 16. 11:50

root 계정 활성화 하기 macOS/Leopard2009. 12. 16. 11:50

'macOS > Leopard' 카테고리의 다른 글

Apple 키보드 매핑  (0) 2013.02.25
맥에서 백업하기  (0) 2011.02.13
응용프로그램을 클릭한방으로 알아서 Update해보자 - AppFresh  (0) 2009.12.03
10.5 BootCamp 드라이버  (0) 2009.02.09
:
Posted by Ritz®™
2009. 12. 9. 06:24

Space 사용 Application/System2009. 12. 9. 06:24

Leopard가 출시되면서 기존 Tiger에서 추가된 기능중 하나가 Expose와 Space기능이 아닌가 한다.

특히 포토샵을 하면서 동시에 이메일 확인, 웹검색, 일정관리, 메신저, 기타 등등을 동시에 수행해야 할 때가 많다.이럴때 윈도우즈에서 흉내내지 못할 기능중의 하나가 이 space기능이 아닌가 하는 생각이다.물론, 윈도우즈에서도 추가로 어플리케이션을 설치하면 이런 기능 정도는 사용할 수 있다라고 해야겠지만,,,,,
Leopard에서는 기본 기능중의 하나이다.

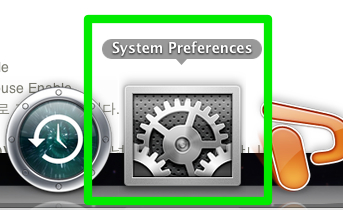
1. 먼저 환경설정을 클릭한다.
mk200000000000.jpg

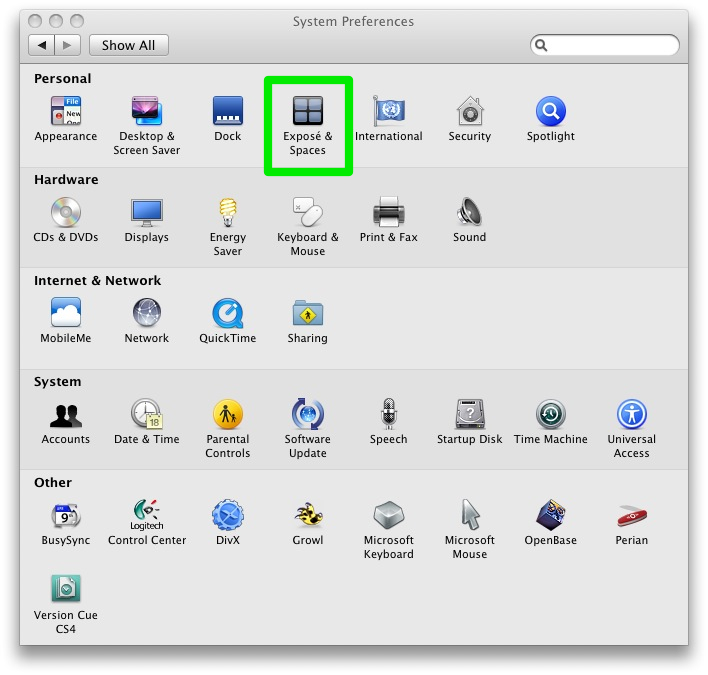
2. 환경설정에서 Expose/Space를 클릭한다.


kk360000000000.jpg
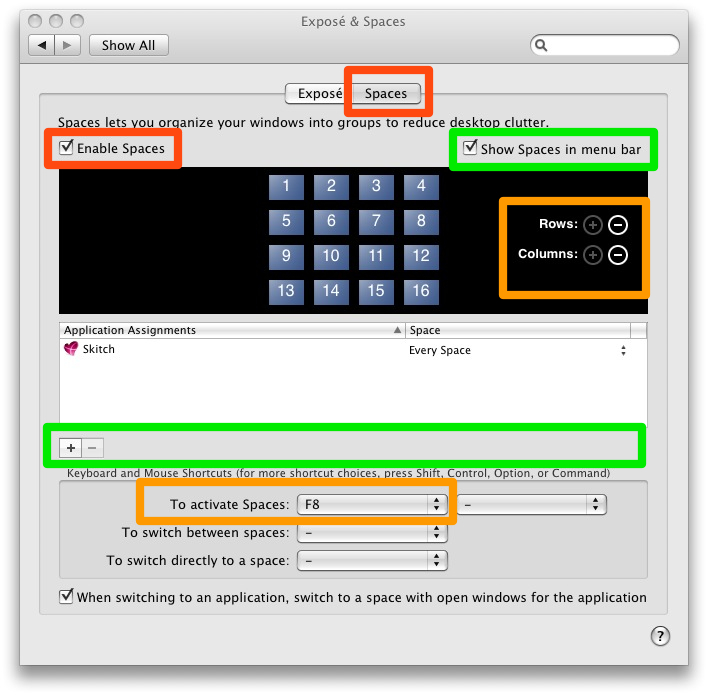
3. 다음 그림과 같이 Space 기능을 활성화한다. 물론 그림과 같이 행/열 수도 추가/감소가 가능하다.
lk350000000001.jpg
4. 이제 F8 펑션키를 눌러보자.
또는 Shift+F8 키를 눌러보자.
직접 해 보신 분들은 감탄사가 절로 나올 것이다.
물론, 이미 사용하셨었던 분들은 별다른 감흥이 없겠지만,,,,
그리고 그림과 같이 사용하는 어플리케이션을 마우스를 이용하여 드래그 앤 드랍으로 다른창으로 옮겨보자.


5. 이 기능들 때문에 맥을 한번 사용하기 시작하면 윈도우즈로 돌아갈 수 없다.

'Application > System' 카테고리의 다른 글

Parallels Desktop 사용방법  (0) 2011.01.25
Parallels Desktop 6 for Mac  (0) 2010.09.14
Tech Tools Pro 5  (0) 2010.03.31
Voice Candy for Free  (0) 2009.11.20
DiskWave  (0) 2009.02.20
:
Posted by Ritz®™
2009. 12. 8. 12:58

The way of mount EFI Partition Hackintosh/Tip2009. 12. 8. 12:58

#sudo -s
#mkdir /Volumes/EFI
#mount_hfs /dev/diskXs1  /Volumes/EFI
#killall Finder

and you can see EFI partition in finder.

:
Posted by Ritz®™
2009. 12. 8. 08:01

Setup Geforce 8xxx-9xxx GT Hackintosh/Graphic Card2009. 12. 8. 08:01

You can get your 8600GT including 8XXX-9XXX series video card working using one of following methods in Snow Leopard.
➊ - Patch DSDT with the video
➋ - Add device (EFI) string to com.apple.Boot.plist
➌ - Chameleon's current auto injection of video / network works if your hardware is identified on PCIroot0 (you can check this in IORegistryExplorer). If your hardware is on PCIroot1 then you might have to use Netkas' PC EFI v10.n. Add GraphicsEnabler=Yes to your com.apple.Boot.plist for Chameleon 2.0-rc3 to inject the device properties.

➍.- After upgarding to 10.6.2, it sometimes did not work EFI String.

- remove nVidia kexts then install 10.6.1 nVidia kexts.

- or remove EFI String in com.apple.Boot.plist and Add GraphicsEnabler=Yes to your com.apple.Boot.plist then add your device-id in Geforce.kext, NVD*

- 10.6.1 NVDAResman.kext (6.0.6) and NVDANV50Hal.kext (6.0.6) in here. installing them in the /Extra/Extensions folder, with a properly configured boot cache will solve the issue. There is no need to install the kexts in /System/Library/Extensions, as the /Extra/Extensions folder will work.

- several 9800 Gt 1024 MB or 512 MB works just fine in 10.6.2 with ATY_init.kext enabler.


* Leopard 10.5.6 이상인 경우에는 위 과정 생략하고 아래과정부터 진행하세요.


Following is one of them for EFI string to com.apple.Boot.plist


1. Start OSx86 Tools then click Add EFI Strings/Boot Flag

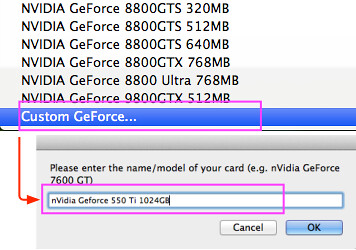
2. Click GFX String


3. Click Choose.

4. Select your Graphic Card


GFX-String

5.


6.


7.


8. Copy and Paste com.boot.Apple.plist file from /Darwin to /Library/Preferences/SystemConfiguration/


:
Posted by Ritz®™


Source : http://www.osx86.es/?p=804

( ES)
Here you leave an application addressed to the holders of CR11Z Sony Vaiocomputers, CR21Z and CR31Z with ATI X2300 using Snow Leopard.

Download : http://j.mp/afwTW0  

Using this application you can have:
Audio, OpenGL accelerated graphics and resolution 1280 × 800,
DSDT corrected for Snow, Speedstep, battery management, trackpad and keyboard.

The application contains context-sensitive help on every button and menu help.

It also comes with "Read me first."

In comments about this article I leave the "Read me first."

Download link following the link to the forum.

21/11/09

Rehubicado battery driver to the folder "Drivers" because of random kernel panics.

Optimized file DSDT.aml (Now supports 4gb of RAM).

22/11/09

Added on Hack "Firewire power conservation" in the DSDT.

(EN)

Versión There is no application for this right now.

Join the forum discussion on this post - (9) Posts

2 Responses to "Vaio EvOBootboX edition."

  1. admin Says:

    EvOVaioBootboX

    Quickstart:

    Choose the RC3 Chameleon bootloader and the system partition where to install.
    Install extra folder.
    Install the drivers for Sony Vaio.
    Reboot.

    Tutorial slow:

    "What is EvOVaioBootboX?
    It is a program that allows you to store / install drivers and bootloaders,
    See it as a toolbox for your hack.

    Before you begin:

    -The application requires to function properly for the following:
    -The user must have administrator permissions (default if the installation is correct).
    "They can have spaces in the name of:
    Bootloaders storage folders / system disks / drivers.

    "The concept is as follows:

    The application focuses on 4 things:

    Storage and installation of bootloaders.
    "" Extra folder.
    "" Of your custom drivers.
    Installing drivers / repair permissions.

    1. Section remove drivers.
    "It's a quick way to delete a driver if you know his name, just select the partition where
    resident / System / Library / Extensions and click "OK" (It will recreate the boot caches after).
    "If the driver lies in the extra of that partition, select the
    extra box. (After deleting the driver file will be recreated within extensions.mkext / Extra).

    2.Sección bootloaders.
    In this section you can add and install bootloaders.

    How to add a bootloader?
    -Click on the bottom of the application on the button "Import bootloader" will open a folder
    contained within the program, there already exist several bootloaders (from team chameleon and
    to Netko). In this folder is where you can put your bootloaders into folders without spaces in the name and
    only with the file "boot" inside. (The application contains the rest of the binaries needed to install
    the boot.)
    "You have to press" refresh "after import / delete.

    How to install a bootloader:
    "First you should locate the disk and partition you want to install the bootloader, click in
    Utilities Osx> "HD info"
    -Located partition and we could say something like:

    SNOW Apple_HFS 200.0 GB disk0s2

    "In this case," disk0s2 "is what we seek:
    disk0 is the disk where you install
    s2 is partition
    "SNOW" is the name of the volume.

    "With that information and we can select disk, partition and volume to install the bootloader.

    EFI TOOL:
    "It's a small tool to format the EFI partition and so it can install drivers and bootloaders
    boot.
    -Note: In Snow Leopard, the EFI partition will be visible (always) after format (on Leopard was
    hidden (always) formatted once.)

    3.Drivers/permisos.

    "This section is devoted to the installation of drivers.
    -First select the target partition and extra if it's installed in / Extra / Extensions.
    -Install the drivers one by one dragging on the square icon.
    -The application caches, repair permissions and recreate the boot.
    "The button" rep permissions "repair the / System / Library / Extensions
    "The button" touch extensions "recreates the boot caches (but not the / Extra / Extensions.mkext)
    "The button" / Extra / Extensions.mkext create "creates the file in the selected partition.
    "The button" Extra / Extensions "open that folder.
    "The button" Extensions "open system / Library / Extensions.

    4.Utilidades OSx.
    -HD info
    Display information on disk utility.
    -EFI tool
    Allows to format the EFI partition

    5.Carpeta extra.
    -Create extra folder with the necessary content in the selected partition.
    "If you want to change the contents of extra (in the application is a selection of content standart)
    only you must click on the button "Import extra" and you can change what you need inside.
    "You have to press" refresh "after import / delete.

    6.Drivers.

    -Install the drivers contained within the program in the selected partition.
    "If you want to change the contents of drivers.
    Contents of drivers:
    Ati drivers for opengl.
    VoodooHDA for Audio.
    only you must click on the button "Import Drivers" and you can add more drivers inside.
    "You have to press" refresh "after import / delete.

    7.Archivos hidden.
    Displays or hides files normally not visible operating system.

    On the Help menu, you can find the help and "about EvOVaioBootboX" where you can update or uninstall.

  2. ritzcarltn Says:

    Good Job!

Leave a Reply

You must be logged in to post a comment.


'Hackintosh > NoteBook' 카테고리의 다른 글

OS X Install Guide in HP DV5-1207, DV4도 칩셋 동일  (0) 2009.12.16
Samsung Q210-FS02  (0) 2009.12.15
DELL M1210 OS X SETUP  (0) 2009.12.06
HP 2133 with OSX?  (0) 2009.11.22
HP CQ40  (0) 2009.11.05
:
Posted by Ritz®™
2009. 12. 6. 19:24

Code injection via DSDT for NVIDIA graphics Hackintosh/DSDT2009. 12. 6. 19:24

Created by Team EvOSX86
In this third guide, board and add to our DSDT code, graphics injection that will enable us to stop using Efi strings or injectors
Nvidia video card.
* Note: We've had success with this technique for some GMA950, ATI X3100 and some of the series X1xxx but not yet in HD.
Tools needed:
Ioregistry explorer
Nvidia graphics card working 100% including video outputs needed (QE and Hardware CI).
Having previously read chapter one and two of the guide
Content:
1. How to recognize where our video card in the registry and its associated devices.
2. Decompilation file and added COFIG DSDT.aml chart.
2a. The loader code.
3. Comparison of our code with Ioreg added Nvcaps, reg and renamed.
4. Basic structure of video devices and the DSDT added to our code.
4a. Example portable.
4b. Example computer tower.
5. Compiling and testing.
APPENDIX: How to clean our DSDT video inputs nonfunctional
1. How to recognize where our video card and registration devices
partners.
After downloading the program Ioregistry explorer, executive, we walk the tree of entries until we find the reference for our
video card, usually tends to be quite clear:
This example is from a laptop with a 256MB Nvidia 8600GT using the latest patches as Nvinject video and injector.
Pic1

As you will see, is not marked in green line corresponds to the card, but the upper, and has an explanation: in the DSDT code does not find his name, but with
the device that houses it.
Let me explain a bit these devices:
Marked in red is the AGP device @ 1, which depends on PCI @ 0, this device houses a device called a sub-VID @ 0, which is our video card.
In turn, the device VID @ 0 contains other devices that do not see, such as LCD, VGA, etc.
2. Decompilation of the code and added dsdt.aml chart.

Assuming that prior to this guide you have got to have a fixed DSDT and operational (HPET and RTC patched etc ...) you make a backup file and DSDT.aml
We have to work on.
In previous guides we have spoken of the binary called "iasl" found inside the folder "tools" created by the patcher Fassler. I repeat the recommendation that
copieis this file in / usr / bin with this I will always be available when you open the terminal and not have to be Recordade where we have given, or drag it to the terminal
every time we change our archive dst.dsl
That said, having copied the binary to start with where we mentioned decompilation of DSDT.aml:
Open terminal as root logueamos us and agree to the folder where we alamacenado the DSDT (cd "path to the folder")
once inside type in "-d iasl dsdt.aml"
This will create DSDT.dsl, we make a copy for backup and have it move away from the tools folder to avoid overcrowding of.
Now prodeas DSDT.dsl edit using a text editor of our choice (suggested textmate)
For this example we will use a DSDT from a laptop.
Note: The code marked in red is not used.
   
The blue outlines the part that we must adapt to our video card.


CODE

Device (PEGP)  

  {

  Name (_ADR, 0x00010000)

  Device (GFX0)

  {

  Name (_ADR, Zero)

  Name (_SUN, One)

  Method (_DSM, 4, NotSerialized)

  {

  Store (Package (0x1A)

  {

  "@0,compatible",

  Buffer (0x0B)

  {

  "NVDA,NVMac"

  },

  "@0,device_type",

  Buffer (0x08)

  {

  "display"

  },

  "@0,name",

  Buffer (0x0F)

  {

  "NVDA,Display-A"

  },

  "@1,compatible",

  Buffer (0x0B)

  {

  "NVDA,NVMac"

  },

  "@1,device_type",

  Buffer (0x08)

  {

  "display"

  },

  "@1,name",

  Buffer (0x0F)

  {

  "NVDA,Display-B"

  },

  "NVCAP",   <----------------   Nuestro NVCAP para salidas múltiples extraído de IOREG.

  Buffer (0x18)

  {

  /* 0000 */   0x04, 0x00, 0x00, 0x00, 0x00, 0x00, 0x01, 0x00,

  /* 0008 */   0x06, 0x00, 0x00, 0x00, 0x00, 0x00, 0x00, 0x00,

  /* 0010 */   0x00, 0x00, 0x00, 0x00

  },

  "NVPM",   <----------------   Nuestro NVPM (gestión de energía), normalmente no hay que cambiarlo, pero es bueno compararlo en IOREG.

  Buffer (0x20)

  {

  /* 0000 */   0x01, 0x00, 0x00, 0x00, 0x00, 0x00, 0x00, 0x00,

  /* 0008 */   0x00, 0x00, 0x00, 0x00, 0x00, 0x00, 0x00, 0x00,

  /* 0010 */   0x00, 0x00, 0x00, 0x00, 0x00, 0x00, 0x00, 0x00,

  /* 0018 */   0x00, 0x00, 0x00, 0x00

  },

  "VRAM,totalsize",

  Buffer (0x04)

  {

     0x00, 0x00, 0x00, 0x20

  },

   "device_type",

  Buffer (0x0D)

  {

  "NVDA,GeForce"

  },

  "model",

     Buffer (0x1F)   <----------------   Dependerá de la longitud del nombre + los espacios + 1.

     {

  "Nvidia GeForce 8600M GS 256 MB"   <----------------   El nombre de nuestra tarjeta y su memoria (a vuestra elección).

  },

   "rom-revision",

  Buffer (0x20)

     {

  "DSDT ROM v.1a #irc.osx86.es (c)"

  },

  "reg",   <----------------   Nuestro REG extraído de IOREG.

   Buffer (0x78)

   {

  /* 0000 */   0x00, 0x00, 0x01, 0x00, 0x00, 0x00, 0x00, 0x00,

/* 0008 */   0x00, 0x00, 0x00, 0x00, 0x00, 0x00, 0x00, 0x00,

/* 0010 */   0x00, 0x00, 0x00, 0x00, 0x10, 0x00, 0x01, 0x02,

/* 0018 */   0x00, 0x00, 0x00, 0x00, 0x00, 0x00, 0x00, 0x00,

/* 0020 */   0x00, 0x00, 0x00, 0x00, 0x00, 0x00, 0x00, 0x01,

/* 0028 */   0x14, 0x00, 0x01, 0x42, 0x00, 0x00, 0x00, 0x00,

/* 0030 */   0x00, 0x00, 0x00, 0x00, 0x00, 0x00, 0x00, 0x00,

/* 0038 */   0x00, 0x00, 0x00, 0x10, 0x1C, 0x00, 0x01, 0x02,

/* 0040 */   0x00, 0x00, 0x00, 0x00, 0x00, 0x00, 0x00, 0x00,

/* 0048 */   0x00, 0x00, 0x00, 0x00, 0x00, 0x00, 0x00, 0x02,

/* 0050 */   0x24, 0x00, 0x01, 0x01, 0x00, 0x00, 0x00, 0x00,

/* 0058 */   0x00, 0x00, 0x00, 0x00, 0x00, 0x00, 0x00, 0x00,

/* 0060 */   0x80, 0x00, 0x00, 0x00, 0x30, 0x00, 0x01, 0x02,

/* 0068 */   0x00, 0x00, 0x00, 0x00, 0x00, 0x00, 0x00, 0x00,

/* 0070 */   0x00, 0x00, 0x00, 0x00, 0x00, 0x00, 0x02, 0x00

  }

  }, Local0)

  DTGP (Arg0, Arg1, Arg2, Arg3, RefOf (Local0))

  Return (Local0)

  }

  }

  }


Renowned for our card in the code outsider.
                                                     
If you look at the letters in blue is suggested, you will see that marked the buffer and the name of the card, why?, It is simple, you will have to change the name of the card
for yours, and the buffer indicating the number of characters (including spaces) is in the name quoted 1 if you change the name but not the buffer, the
compilation will fail.
How to find the buffer (which is also in hexadecimal).
It is very simple, we need a converter decimal to hexadecimal and vice versa.
A site that you can come very convenient is this:
http://www.parkenet.com/apl/HexDecConverter.html
or this:
http://www.paulschou.com/tools/xlate/
Well, he began:
Sample buffer for the line "Nvidia GeForce 8600M GS 256MB, the number of letters and spaces contained here is 30 (decimal), add 1 to the result (actually it
The problem is that the account number starts from zero), which gives us 31, using the websites listed above, we put 31 in decimal and as a result gives us 1F
hexadecimal, ie, the buffer used.
If we change the name to our card, we use the same approach to calculate the size of the buffer.

2a. The loader code.

We will give an overview of the concept of loader code already discussed in the previous guide.
Our code is not ACPI is a string of information that add to the ACPI code, and if we as-is, our record's not OSX not being charged this compatible
ACPI, so this is loaded, we must use a "shipper" which is nothing more than a bit of code that define our entry code and allow its load by
system.
Where to insert the "shipper"?
This is simple, you must seek with the text editor area code _WAK called, and when the definition of it, fit the loader code.
Charger Code:


CODE

Method (DTGP, 5, NotSerialized)

{

If (LEqual (Arg0, Buffer (0x10)

{

/* 0000 */ 0xC6, 0xB7, 0xB5, 0xA0, 0x18, 0x13, 0x1C, 0x44,

/* 0008 */ 0xB0, 0xC9, 0xFE, 0x69, 0x5E, 0xAF, 0x94, 0x9B

}))

{

If (LEqual (Arg1, One))

{

If (LEqual (Arg2, Zero))

{

Store (Buffer (One)

{

0x03

}, Arg4)

Return (One)

}

If (LEqual (Arg2, One))

{

Return (One)

}

}

}

Store (Buffer (One)

{

0x00

}, Arg4)

Return (Zero)

}


Cargo Area:
The code in this area will depend on the machine, and basically you have to find the end _WAK code, which ends:


CODE

Return (Package (0x02)

{

Zero,

Zero

})

}


I include below the code loader.
EXAMPLE:
More cargo area shipper:


CODE

Method (_WAK, 1, NotSerialized)

{

P8XH (One, 0xAB)

If (LOr (LEqual (Arg0, 0x03), LEqual (Arg0, 0x04)))

{

If (And (CFGD, 0x01000000))

{

If (LAnd (And (CFGD, 0xF0), LEqual (OSYS, 0x07D1)))

{

TRAP (0x3D)

}

}

}

If (LEqual (RP2D, Zero))

{

Notify (\_SB.PCI0.RP02, Zero)

}

If (LEqual (Arg0, 0x03)) {}

If (LEqual (Arg0, 0x04))

{

\_SB.PCI0.LPCB.EC0.SELE ()

}

P8XH (Zero, 0xCD)

Return (Package (0x02)

{

Zero,

Zero

})

}

Method (DTGP, 5, NotSerialized)

{

If (LEqual (Arg0, Buffer (0x10)

{

/* 0000 */ 0xC6, 0xB7, 0xB5, 0xA0, 0x18, 0x13, 0x1C, 0x44,

/* 0008 */ 0xB0, 0xC9, 0xFE, 0x69, 0x5E, 0xAF, 0x94, 0x9B

}))

{

If (LEqual (Arg1, One))

{

If (LEqual (Arg2, Zero))

{

Store (Buffer (One)

{

0x03

}, Arg4)

Return (One)

}

If (LEqual (Arg2, One))

{

Return (One)

}

}

}

Store (Buffer (One)

{

0x00

}, Arg4)

Return (Zero)

}


Salváis the file and compile to see if there were errors in the code.
Open the terminal, as root logueamos us and tune into the DSDT folder (cd "path to the folder) then type
iasl-f dsdt.dsl

If errors occur is that you put the wrong charger, if warnings occur, is that it may come before, not do them much attention now.
If no error occurs, delete the file that was generated DSDT.aml and continued work within DSDT.dsl
3. Comparison of our code with Ioreg added Nvcaps, reg and
renamed.
We now proceed to seek the necessary data on our IOREG for insertion into each unit in the code.
NVCAPS or seek first the configuration of the outputs of our video card and NVPM or energy management.
We opened the IOREG and seek our video card, pointing device and look for the entry child NVCAP and NVPM:


Pic2

Once we have NVCAP values and NVPM, amend our code.
Now look at the value of the input REG:


Pic 3

Change value of REG in the graphical code, so you get the real value is in our system.

4. Basic structure of video devices and the DSDT added
of our code.
4a. Example using a laptop.
Let's open the DSDT.dsl and look through the keyword "device" until we get to:


CODE

Device (AGP)


We will find the device tree in this way (different colors for each device):
In short without our code:


CODE

Device (AGP) (Dispositivo madre)

{

Nombre y dirección.

DEVICE VID0 (Dispositivo hijo)

{

   Nombre y dirección de VID0

Inicio del método

{

   Método

   }

   Device (TV)

Device (CRT)

   Device (LCD)

Device (DVI)

}

}


Briefly our code:


CODE

Device (AGP) (Dispositivo madre)

{

Nombre y dirección.

DEVICE VID0 (Dispositivo hijo)

{

   Nombre y dirección de VID0

Inicio del método

{

   Método

   }

   Device (TV)

Device (CRT)

   Device (LCD)

Device (DVI)

Device (GFX) <-------- Nuestro codigo.

}

}

Extended:


CODE

Device (AGP)

{

Name (_ADR, 0x00010000)

Device (VID)

{

Name (_ADR, Zero)

Method (_DOS, 1, NotSerialized)

{

Store (Arg0, MIS4)

SMI (0x9E, MIS4)

}

Method (_DOD, 0, NotSerialized)

{

Store (SMI (0x6D, Zero), Local0)

If (LEqual (Local0, One))

{

Return (Package (0x04)

{

0x00010100,

0x00010200,

0x00010110,

0x00010210

})

}

Else

{

Return (Package (0x04)

{

0x00010100,

0x00010200,

0x00010118,

0x00010120

})

}

}

Device (TV)

{

Method (_ADR, 0, NotSerialized)

{

Return (0x0200)

}

Method (_DCS, 0, NotSerialized)

{

Store (SMI (0x8E, 0x04), Local0)

Return (Local0)

}

Method (_DGS, 0, NotSerialized)

{

Store (SMI (0x99, 0x04), Local0)

Return (Local0)

}

Method (_DSS, 1, NotSerialized)

{

DSS (0x04, Arg0)

}

}

Device (CRT)

{

Method (_ADR, 0, NotSerialized)

{

Return (0x0100)

}

Method (_DCS, 0, NotSerialized)

{

Store (SMI (0x8E, 0x02), Local0)

Return (Local0)

}

Method (_DGS, 0, NotSerialized)

{

Store (SMI (0x99, 0x02), Local0)

Return (Local0)

}

Method (_DSS, 1, NotSerialized)

{

DSS (0x02, Arg0)

}

}

Device (LCD)

{

Method (_ADR, 0, NotSerialized)

{

Store (SMI (0x6D, Zero), Local0)

If (LEqual (Local0, One))

{

Return (0x0110)

}

Else

{

Return (0x0118)

}

}

Method (_DCS, 0, NotSerialized)

{

Store (SMI (0x8E, One), Local0)

Return (Local0)

}

Method (_DGS, 0, NotSerialized)

{

Store (SMI (0x99, One), Local0)

Return (Local0)

}

Method (_DSS, 1, NotSerialized)

{

DSS (One, Arg0)

}

Name (BTVL, 0x64)

Name (DBCL, Package (0x0A) {})

Method (_BCL, 0, NotSerialized)

{

SX10 ()

SX30 (0x19)

SX30 (Zero)

SX11 ()

Store (SX40 (), Index (DBCL, Zero))

Store (SX40 (), Index (DBCL, One))

Store (SX40 (), Index (DBCL, 0x02))

Store (SX40 (), Index (DBCL, 0x03))

Store (SX40 (), Index (DBCL, 0x04))

Store (SX40 (), Index (DBCL, 0x05))

Store (SX40 (), Index (DBCL, 0x06))

Store (SX40 (), Index (DBCL, 0x07))

Store (SX40 (), Index (DBCL, 0x08))

Store (SX40 (), Index (DBCL, 0x09))

SX12 ()

Return (DBCL)

}

Method (_BCM, 1, NotSerialized)

{

SX10 ()

SX30 (0x19)

SX30 (One)

SX30 (Arg0)

Store (Arg0, BTVL)

SX11 ()

SX12 ()

}

Method (_BQC, 0, NotSerialized)

{

SX10 ()

SX30 (0x19)

SX30 (0x02)

SX11 ()

Store (SX40 (), Local0)

Store (Local0, BTVL)

SX12 ()

Return (Local0)

}

}

Device (DVI)

{

Method (_ADR, 0, NotSerialized)

{

Store (SMI (0x6D, Zero), Local0)

If (LEqual (Local0, One))

{

Return (0x0210)

}

Else

{

Return (0x0120)

}

}

Method (_DCS, 0, NotSerialized)

{

Store (SMI (0x8E, 0x08), Local0)

Return (Local0)

}

Method (_DGS, 0, NotSerialized)

{

Store (SMI (0x99, 0x08), Local0)

Return (Local0)

}

Method (_DSS, 1, NotSerialized)

{

DSS (0x08, Arg0)

}

}

Device (GFX0) <------------- Comienzo de nuestro codigo

{

Name (_ADR, Zero)

Name (_SUN, One)

Method (_DSM, 4, NotSerialized)

{

Store (Package (0x1A)

{

"@0,compatible",

Buffer (0x0B)

{

"NVDA,NVMac"

},

"@0,device_type",

Buffer (0x08)

{

"display"

},

"@0,name",

Buffer (0x0F)

{

"NVDA,Display-A"

},

"@1,compatible",

Buffer (0x0B)

{

"NVDA,NVMac"

},

"@1,device_type",

Buffer (0x08)

{

"display"

},

"@1,name",

Buffer (0x0F)

{

"NVDA,Display-B"

},

"NVCAP",

Buffer (0x18)

{

/* 0000 */ 0x04, 0x00, 0x00, 0x00, 0x00, 0x00, 0x01, 0x00,

/* 0008 */ 0x06, 0x00, 0x00, 0x00, 0x00, 0x00, 0x00, 0x00,

/* 0010 */ 0x00, 0x00, 0x00, 0x00

},

"NVPM",

Buffer (0x20)

{

/* 0000 */ 0x01, 0x00, 0x00, 0x00, 0x00, 0x00, 0x00, 0x00,

/* 0008 */ 0x00, 0x00, 0x00, 0x00, 0x00, 0x00, 0x00, 0x00,

/* 0010 */ 0x00, 0x00, 0x00, 0x00, 0x00, 0x00, 0x00, 0x00,

/* 0018 */ 0x00, 0x00, 0x00, 0x00

},

"VRAM,totalsize",

   Buffer (0x04)

   {

0x00, 0x00, 0x00, 0x20

},

"device_type",

Buffer (0x0D)

{

"NVDA,GeForce"

},

"model",

Buffer (0x1F)

{

"Nvidia GeForce 8600M GS 256 MB"

},

"rom-revision",

Buffer (0x20)

{

"DSDT ROM v.1a #irc.osx86.es (c)"

},

"reg",

   Buffer (0x78)

{

/* 0000 */ 0x00, 0x00, 0x01, 0x00, 0x00, 0x00, 0x00, 0x00,

   /* 0008 */ 0x00, 0x00, 0x00, 0x00, 0x00, 0x00, 0x00, 0x00,

   /* 0010 */ 0x00, 0x00, 0x00, 0x00, 0x10, 0x00, 0x01, 0x02,

   /* 0018 */ 0x00, 0x00, 0x00, 0x00, 0x00, 0x00, 0x00, 0x00,

   /* 0020 */ 0x00, 0x00, 0x00, 0x00, 0x00, 0x00, 0x00, 0x01,

   /* 0028 */ 0x14, 0x00, 0x01, 0x42, 0x00, 0x00, 0x00, 0x00,

   /* 0030 */ 0x00, 0x00, 0x00, 0x00, 0x00, 0x00, 0x00, 0x00,

   /* 0038 */ 0x00, 0x00, 0x00, 0x10, 0x1C, 0x00, 0x01, 0x02,

   /* 0040 */ 0x00, 0x00, 0x00, 0x00, 0x00, 0x00, 0x00, 0x00,

   /* 0048 */ 0x00, 0x00, 0x00, 0x00, 0x00, 0x00, 0x00, 0x02,

   /* 0050 */ 0x24, 0x00, 0x01, 0x01, 0x00, 0x00, 0x00, 0x00,

   /* 0058 */ 0x00, 0x00, 0x00, 0x00, 0x00, 0x00, 0x00, 0x00,

   /* 0060 */ 0x80, 0x00, 0x00, 0x00, 0x30, 0x00, 0x01, 0x02,

   /* 0068 */ 0x00, 0x00, 0x00, 0x00, 0x00, 0x00, 0x00, 0x00,

   /* 0070 */ 0x00, 0x00, 0x00, 0x00, 0x00, 0x00, 0x02, 0x00

}

}, Local0)

DTGP (Arg0, Arg1, Arg2, Arg3, RefOf (Local0))

Return (Local0)

}

   } <------------- Fin de nuestro codigo (No incluir esta reseña en el DSDT)

}

}


4b. Example using a computer tower.
We will seek to explore our IOregistry video card, and here we notice a difference with the code on the laptop, and is as follows:
In the computer tower, we will find the video devices that we saw in the previous example, LCD, CRT etc., except in cases of integrated graphics, we
ioreg to look at the site of our graph, usually it be under some PCI devices such as PC1, P0P1 etc. .. depends
motherboard manufacturer, but sometimes we do not see the device with a clear demarcation in ioreg and appears as PCI2BRIDGE or in this case PCIBRIDGE
add the entry directly into the ICP as all these devices have the device "mother" to the main PCI ..... In plates with integrated graphics
we can find something closer to the example of the laptop, but we must not fall into errors, the code must be added in the code
for the device that is located not on our card and the integrated video board.
Set in the PCI code.


CODE

Device (PCI0)

{

Name (_HID, EisaId ("PNP0A03"))

Name (_ADR, 0x00)

Name (_UID, 0x01)

Name (_BBN, 0x00)

Method (_S3D, 0, NotSerialized)

{

If (LEqual (OSFL, 0x02))

{

Return (0x02)

}

Else

{

Return (0x03)

}

}

   Method (_STA, 0, NotSerialized)

{

Return (0x0F)

}

Method (_CRS, 0, NotSerialized)

{

Name (BUF0, ResourceTemplate ()

{


The code continues much longer, but we will take this as a reference.
Here we would have our code added to the PCI video:


CODE

Device (PCI0)

{

Name (_HID, EisaId ("PNP0A03"))

Name (_ADR, 0x00)

Name (_UID, 0x01)

Name (_BBN, 0x00)

   Device (PEGP)

{

Name (_ADR, 0x00060000)

Device (GFX0)

{

Name (_ADR, Zero)

Name (_SUN, One)

Method (_DSM, 4, NotSerialized)

{

Store (Package (0x1C)

{

   "AAPL,slot-name",

   Buffer (0x0D)

   {

"PCI-E Slot-1"

}, },

"@0,compatible",

Buffer (0x0B)

{

"NVDA,NVMac"

},

"@0,device_type",

Buffer (0x08)

{

"display"

},

"@0,name",

Buffer (0x0F)

{

"NVDA,Display-A"

},

"@1,compatible",

Buffer (0x0B)

{

"NVDA,NVMac"

},

"@1,device_type",

Buffer (0x08)

{

"display"

},

"@1,name",

Buffer (0x0F)

{

"NVDA,Display-B"

},

"NVCAP",

Buffer (0x18)

{

/* 0000 */ 0x04, 0x00, 0x01, 0x00, 0x00, 0x00, 0x03, 0x00,

/* 0008 */ 0x0C, 0x00, 0x00, 0x00, 0x00, 0x00, 0x00, 0x07,

/* 0010 */ 0x00, 0x00, 0x00, 0x00

},

"NVPM",

Buffer (0x20)

{

/* 0000 */ 0x01, 0x00, 0x00, 0x00, 0x00, 0x00, 0x00, 0x00,

/* 0008 */ 0x00, 0x00, 0x00, 0x00, 0x00, 0x00, 0x00, 0x00,

/* 0010 */ 0x00, 0x00, 0x00, 0x00, 0x00, 0x00, 0x00, 0x00,

/* 0018 */ 0x00, 0x00, 0x00, 0x00

},

"VRAM,totalsize",

Buffer (0x04)

{

0x00, 0x00, 0x00, 0x20

},

"device_type",

Buffer (0x0D)

{

"NVDA,GeForce"

},

"model",

Buffer (0x22)

{

"POV Nvidia GeForce 8800 GT 512 MB"

},

"rom-revision",

Buffer (0x23)

{

"DSDT ROM v.1a by #irc.osx86.es (c)"

},

"reg",

Buffer (0x78)

{

/* 0000 */ 0x00, 0x00, 0x01, 0x00, 0x00, 0x00, 0x00, 0x00,

/* 0008 */ 0x00, 0x00, 0x00, 0x00, 0x00, 0x00, 0x00, 0x00,

/* 0010 */ 0x00, 0x00, 0x00, 0x00, 0x10, 0x00, 0x01, 0x02,

/* 0018 */ 0x00, 0x00, 0x00, 0x00, 0x00, 0x00, 0x00, 0x00,

/* 0020 */ 0x00, 0x00, 0x00, 0x00, 0x00, 0x00, 0x00, 0x01,

/* 0028 */ 0x14, 0x00, 0x01, 0x42, 0x00, 0x00, 0x00, 0x00,

/* 0030 */ 0x00, 0x00, 0x00, 0x00, 0x00, 0x00, 0x00, 0x00,

/* 0038 */ 0x00, 0x00, 0x00, 0x10, 0x1C, 0x00, 0x01, 0x02,

/* 0040 */ 0x00, 0x00, 0x00, 0x00, 0x00, 0x00, 0x00, 0x00,

/* 0048 */ 0x00, 0x00, 0x00, 0x00, 0x00, 0x00, 0x00, 0x02,

/* 0050 */ 0x24, 0x00, 0x01, 0x01, 0x00, 0x00, 0x00, 0x00,

/* 0058 */ 0x00, 0x00, 0x00, 0x00, 0x00, 0x00, 0x00, 0x00,

/* 0060 */ 0x80, 0x00, 0x00, 0x00, 0x30, 0x00, 0x01, 0x02,

/* 0068 */ 0x00, 0x00, 0x00, 0x00, 0x00, 0x00, 0x00, 0x00,

/* 0070 */ 0x00, 0x00, 0x00, 0x00, 0x00, 0x00, 0x02, 0x00

}

}, Local0)

DTGP (Arg0, Arg1, Arg2, Arg3, RefOf (Local0))

Return (Local0)

}

}

}

Method (_S3D, 0, NotSerialized)

{

If (LEqual (OSFL, 0x02))

{

Return (0x02)

}

Else

{

Return (0x03)

}

}

Method (_STA, 0, NotSerialized)

{

Return (0x0F)

}


5. Compiling and testing.

Now we only save the file and compile it to check for syntax errors or not.
Open the terminal, as root logueamos us and tune into the folder where we have our DSDT (cd "path to folder") Keyboards
iasl dsdt.dsl

If errors occur is that you put the wrong charger, if warnings occur, is that it may come before, not do them much attention now.
If you have them, make certain that brackets have not been orphaned, or deleted.
If not, you can rename the file you have in DSDT.aml the root of the system to "DSDTold.aml" and copy the new (to open created when compiling) to the root of the disk.
We delete the injector that we are using (Nvkush, Nvinject or NVdarwin) or EFI string if we use this method and proceed to reboot. If our site has
been right and proper coding of our graphics should be fully recognized and activated yet.
If you fail the new DSDT.aml (eg freezes the system), you can boot the system using the command DSDTold.aml DSDT = (introducidlo when you see the boot
chameleon by pressing F8 and selecting the installation of Leopard).
We hope that this third guide on the possibilities of DSDT system has been of your liking.
We will be updating the guidelines as new data have ....


ANNEX
In this annex, see how to optimize a laptop, removing the graphic code is not used by OSX, obtaining with this a greater fluidity in the video
because the register is only the code that is functional, our code added.
In the summary view can better see the tree of devices, so we can determine who should stay and who must not be erased to useful code and
prepare for the inclusion of our code of video.
In summary, our code should look like in after deleting unnecessary devices:
BEFORE:


CODE

Device (AGP)

{

Nombre y dirección.

Cabezera de VID0

{

   Nombre y dirección de VID0

Inicio del método

{

   Método

   }

   Device (TV)

Device (CRT)

   Device (LCD)

Device (DVI)

}

}


LATER:


CODE

Device (AGP)

{

Nombre y dirección.

Cabezera de VID0

{

   Nombre y dirección de VID0

Inicio del método

{

   Método

   }

   }

}

}


Extended BEFORE:


CODE

Device (AGP)

{

Name (_ADR, 0x00010000)

Device (VID)

{

Name (_ADR, Zero)

Method (_DOS, 1, NotSerialized)

{

Store (Arg0, MIS4)

SMI (0x9E, MIS4)

}

Method (_DOD, 0, NotSerialized)

{

Store (SMI (0x6D, Zero), Local0)

If (LEqual (Local0, One))

{

Return (Package (0x04)

{

0x00010100,

0x00010200,

0x00010110,

0x00010210

})

}

Else

{

Return (Package (0x04)

{

0x00010100,

0x00010200,

0x00010118,

0x00010120

})

}

}

Device (TV)

{

Method (_ADR, 0, NotSerialized)

{

Return (0x0200)

}

Method (_DCS, 0, NotSerialized)

{

Store (SMI (0x8E, 0x04), Local0)

Return (Local0)

}

Method (_DGS, 0, NotSerialized)

{

Store (SMI (0x99, 0x04), Local0)

Return (Local0)

}

Method (_DSS, 1, NotSerialized)

{

DSS (0x04, Arg0)

}

}

Device (CRT)

{

Method (_ADR, 0, NotSerialized)

{

Return (0x0100)

}

Method (_DCS, 0, NotSerialized)

{

Store (SMI (0x8E, 0x02), Local0)

Return (Local0)

}

Method (_DGS, 0, NotSerialized)

{

Store (SMI (0x99, 0x02), Local0)

Return (Local0)

}

Method (_DSS, 1, NotSerialized)

{

DSS (0x02, Arg0)

}

}

Device (LCD)

{

Method (_ADR, 0, NotSerialized)

{

Store (SMI (0x6D, Zero), Local0)

If (LEqual (Local0, One))

{

Return (0x0110)

}

Else

{

Return (0x0118)

}

} If (LEqual (Local0, One))


Method (_DCS, 0, NotSerialized)

{

Store (SMI (0x8E, One), Local0)

Return (Local0)

}

Method (_DGS, 0, NotSerialized)

{

Store (SMI (0x99, One), Local0)

Return (Local0)

}

Method (_DSS, 1, NotSerialized)

{

DSS (One, Arg0)

}

Name (BTVL, 0x64)

Name (DBCL, Package (0x0A) {})

Method (_BCL, 0, NotSerialized)

{

SX10 ()

SX30 (0x19)

SX30 (Zero)

SX11 ()

Store (SX40 (), Index (DBCL, Zero))

Store (SX40 (), Index (DBCL, One))

Store (SX40 (), Index (DBCL, 0x02))

Store (SX40 (), Index (DBCL, 0x03))

Store (SX40 (), Index (DBCL, 0x04))

Store (SX40 (), Index (DBCL, 0x05))

Store (SX40 (), Index (DBCL, 0x06))

Store (SX40 (), Index (DBCL, 0x07))

Store (SX40 (), Index (DBCL, 0x08))

Store (SX40 (), Index (DBCL, 0x09))

SX12 ()

Return (DBCL)

}

Method (_BCM, 1, NotSerialized)

{

SX10 ()

SX30 (0x19)

SX30 (One)

SX30 (Arg0)

Store (Arg0, BTVL)

SX11 ()

SX12 ()

}

Method (_BQC, 0, NotSerialized)

{

SX10 ()

SX30 (0x19)

SX30 (0x02)

SX11 ()

Store (SX40 (), Local0)

Store (Local0, BTVL)

SX12 ()

Return (Local0)

}

}

Device (DVI)

{

Method (_ADR, 0, NotSerialized)

{

Store (SMI (0x6D, Zero), Local0)

If (LEqual (Local0, One))

{

Return (0x0210)

}

Else

{

Return (0x0120)

}

}

Method (_DCS, 0, NotSerialized)

{

Store (SMI (0x8E, 0x08), Local0)

Return (Local0)

}

Method (_DGS, 0, NotSerialized)

{

Store (SMI (0x99, 0x08), Local0)

Return (Local0)

}

Method (_DSS, 1, NotSerialized)

{

DSS (0x08, Arg0)

}

}

   }

   }


Extended LATER:


CODE

Device (AGP)

{

Name (_ADR, 0x00010000)

Device (VID)

{

Name (_ADR, Zero)

Method (_DOS, 1, NotSerialized)

{

Store (Arg0, MIS4)

SMI (0x9E, MIS4)

}

Method (_DOD, 0, NotSerialized)

{

Store (SMI (0x6D, Zero), Local0)

If (LEqual (Local0, One))

{

Return (Package (0x04)

{

0x00010100,

0x00010200,

0x00010110,

0x00010210

})

}

Else

{

Return (Package (0x04)

{

0x00010100,

0x00010200,

0x00010118,

0x00010120

})

}

}

   }

}


Obviously, if we are to compile after erasing all those devices, we report a number of errors will disappear as many references as well
that we look for the lines marked as errors and remove them as follows:


CODE

Errores generados al compilar cuando eliminamos el device "LCD":

/Users/xxx/Desktop/pruebas dsdt/Tools/DSDToriginal.dsl 721: Notify (\_SB.PCI0.AGP.VID.LCD, 0x86)

Error 4063 - Object does not exist ^ (\_SB.PCI0.AGP.VID.LCD)

/Users/xxx/Desktop/pruebas dsdt/Tools/DSDToriginal.dsl 726: Notify (\_SB.PCI0.AGP.VID.LCD, 0x87)

Error 4063 - Object does not exist ^ (\_SB.PCI0.AGP.VID.LCD)


We move to the line 721 and 726 as shown and we find:

CODE

If (LGreaterEqual (OSID (), 0x20))

{

If (And (Local0, 0x04))

{

Notify (\_SB.PCI0.AGP.VID.LCD, 0x86)

Notify (\_SB.PCI0.VID.LCD, 0x86)

}

If (And (Local0, 0x02))

{

Notify (\_SB.PCI0.AGP.VID.LCD, 0x87)

Notify (\_SB.PCI0.VID.LCD, 0x87)

}

}


If we remove those two entries, and compile again, the errors are gone.

CODE

If (LGreaterEqual (OSID (), 0x20))

{

If (And (Local0, 0x04))

{

Notify (\_SB.PCI0.VID.LCD, 0x86)

}

If (And (Local0, 0x02))

{

Notify (\_SB.PCI0.VID.LCD, 0x87)

}

}


It is recommended to compile every time you delete an entry, so you can gradually correct our code.
Guide by: Roisoft and Pere

'Hackintosh > DSDT' 카테고리의 다른 글

DSDT 생성  (4) 2010.06.19
8600 GTS 256 MB DSDT  (0) 2010.02.18
Fix'y DSDT for ASUS P5W DH Deluxe and Snow & Leopard  (0) 2009.11.06
Windows용 DSDT 추출 및 Patcher  (0) 2009.10.30
Enabling ACPI, EIST, etc for ASUS P5W DH DELUXE  (0) 2009.10.25
:
Posted by Ritz®™
2009. 12. 6. 15:12

IPHONE SDK용 시스템 Mobile/iPhone2009. 12. 6. 15:12


IPHONE SDK용 시스템

참고
http://developer.apple.com/technology/xcode.html

P4 시스템, 10.5.7 이상 시스템에서도 쓸만합니다.

f0027855_4b1545d68ce88.jpeg

:
Posted by Ritz®™