달력

12

« 2024/12 »

  • 1
  • 2
  • 3
  • 4
  • 5
  • 6
  • 7
  • 8
  • 9
  • 10
  • 11
  • 12
  • 13
  • 14
  • 15
  • 16
  • 17
  • 18
  • 19
  • 20
  • 21
  • 22
  • 23
  • 24
  • 25
  • 26
  • 27
  • 28
  • 29
  • 30
  • 31
2010. 3. 13. 03:32

16GB USB Memory Stick Configuration Hackintosh/Install2010. 3. 13. 03:32

8G USB 참고

BootLoader Partition : Mac OS Extended
Retail DVD Image partition : Mac OS Extended
Maintenance 파티션 : Mac OS Extended(Journald)


-BootLoader : 400MB, Install Chameleon / Boot Think or XPC
-Mac OS X Install DVD : 6.93GB
-Maintenance : 8.7GB (PreInstalled OS X for Maintenance)

'Hackintosh > Install' 카테고리의 다른 글

BootCD 종류  (0) 2010.06.07
Disk Image를 마운트하여 Snow/Leopard 설치하는 방법  (0) 2010.05.18
해킨토시 설치하기  (0) 2010.03.06
Install Procedure -2  (0) 2010.02.13
Install Procedure -3  (0) 2010.02.13
:
Posted by Ritz®™
2010. 3. 8. 20:26

iPhone과 맥의 주소록 동기화 Mobile/iPhone2010. 3. 8. 20:26

:
Posted by Ritz®™
2010. 3. 3. 14:33

PC EFI V 10.6 Hackintosh/PC_EFI2010. 3. 3. 14:33


다운로드 : http://files.netkas.org/boot.bz2

소스 : http://files.netkas.org/Chameleon-2.0-RC3-r658-src_PCEFIV10.6-src.zip

먼저 다음글에서 카멜레온 패키지를 설치한 다음 boot 화일만 / 폴더에 복사하여 주면 끝!!

http://x86osx.textcube.com/425


추가 테마 : http://www.mediafire.com/?koznefji54n

Update

이것저것 커맨드가 힘드신 분들은 걍 클릭하여 설치하세요.

패키지 다운로드 : ChameleonRC3PCEFI10.5.pkg.zip

10.5 이기는 하지만 나름 쓸만합니다.


   Chameleon Boot Loader

   =====================

  What is it?

  -----------

  Chameleon is combination of various boot loader components. It is based

  on David Elliott's fake EFI implementation added to Apple's boot-132

  project. Chameleon is extended with the following key features:


  Features

  --------


   - Device Property Injection via device-properties string in com.apple.Boot.plist

   - hybrid boot0+boot1h loaders for both MBR and GPT partitioned disks.

   - automatic FSB detection code even for recent AMD CPUs.

   - Apple Software RAID support.

   - stage2 loader (boot) can be placed as a regular file in the boot

   partition's root folder. It has precedence over the embedded

   startupfile.


   Installation

   ============


  Normal Install (non-RAID):

  --------------------------


I. Installation

- Install boot0 to the MBR:


sudo fdisk -f boot0 -u -y /dev/rdisk0


- Install boot1h to the partition's bootsector:


sudo dd if=boot1h of=/dev/rdisk0s2


- Install boot to the partition's root directory:


sudo cp boot /


  Suppose that your installation is on /dev/disk0s2


   - Install boot0 to the MBR:

   sudo fdisk -f boot0 -u -y /dev/rdisk0


   - Install boot1h to the partition's bootsector:

   sudo dd if=boot1h of=/dev/rdisk0s2


   - Install boot to the partition's root directory:

   sudo cp boot /


  No need to use startupfiletool anymore!


  RAID Install:

  -------------


  Suppose that your installation is on /dev/disk3, which is either a mirror- or a

  stripeset consisting of /dev/disk0 and /dev/disk1

  Mac OS X creates a small helper partition at the end of each RAID member disk,

  namely /dev/disk0s3 and /dev/disk1s3


   - Install boot0 to the MBR of both disks:

   sudo fdisk -f boot0 -u -y /dev/rdisk0

   sudo fdisk -f boot0 -u -y /dev/rdisk1


   - Install boot1h to the bootsector of each boot partition:

   sudo dd if=boot1h of=/dev/rdisk0s3

   sudo dd if=boot1h of=/dev/rdisk1s3


   - Install boot to both helper partition's root directories.

   diskutil mount disk0s3

   cp boot /Volumes/Boot\ OSX

   diskutil unmount disk0s3

   diskutil mount disk1s3

   cp boot /Volumes/Boot\ OSX

   diskutil unmount disk1s3


   - Add "rd=uuid boot-uuid=506D8F03-0596-32D8-BE0B-E3A4E7D5C72A" to your kernel flags

   (replace with your root volume's UUID; find out using "Disk Utility.app", right

click on your root volume, then Get Info"):

   nano /Library/Preferences/SystemConfiguration/com.apple.Boot.plist

   touch /System/Library/Extensions

  Support:

  --------


  If you have any questions, issues etc. feel free to join us

  at irc.voodooprojects.org #chameleon


  Source Code

  -----------

  For downloading the source code please visit the project page at

  http://chameleon.osx86.hu

  Licensing

  ---------

  Chameleon is released under the terms and conditions of

  Apple Public Source License (see APPLE_LICENSE).

  To use "Chameleon" for commercial purposes please contact us at:

  http://chameleon.osx86.hu/contact


'Hackintosh > PC_EFI' 카테고리의 다른 글

PC EFI 10.6 that will work on both Lion and older  (0) 2011.04.29
:
Posted by Ritz®™
2010. 2. 13. 21:33

Install Procedure -2 Hackintosh/Install2010. 2. 13. 21:33

Install Procedure


######################################################################################################
아래의 화면을 보기 위해서는 역시나 다음 글들이 유용할 것입니다.
해킨토시에 관한 다양한 질문들

검색신공 배양하기 구글링 5종 세트

1. 시스템 상황 파악하기
http://j.mp/58hmuA 

2. 추가 조치 방안 및 질문하는 방법
http://j.mp/6Jui2v 

3. 이미지의 종류
http://j.mp/5bKbXc 

4. 드라이버만 골라 설치하기
http://j.mp/7oKbwJ 


5. 관련시스템 설치이력 찾기(제품 모델명이 "GA-EP45" 시리즈인 경우)
http://j.mp/7d8gfp

######################################################################################################


❶ "Continue"를 눌러 설치를 시작한다.


❷ OSX 를 설치할 파티션을 선택한다.

 
❸ 만약 OSX를 설치할 파티션이 보이지 않는다면 Utilities > Disk Utility 를 선택하여 "OSX" 파티션을 만든다.

  
❹ Partition하는 방법 http://j.mp/a6iTKS
❺ 위 글에서 파티션을 만들었다면 다음은 사용자화를 선택하여자기 메인보드의 칩셋에 맞는 드라이버를 선택해야 합니다. 


❻ "Restart" (재부팅)을 클릭하여 재부팅을 한다.
 
❼ 재부팅후 "스페이스바"키를 누르고 "-v" 혹은 "-v -x"등의 부팅옵션을 주어 부팅한다.  메인보드에 따라 부팅옵션이 다양하게 있으므로 자기 보드에 맞는 부팅옵션을 주어야 한다.

다음 단계로 가기. 


'Hackintosh > Install' 카테고리의 다른 글

16GB USB Memory Stick Configuration  (0) 2010.03.13
해킨토시 설치하기  (0) 2010.03.06
Install Procedure -3  (0) 2010.02.13
OS9  (0) 2009.11.25
NEW Intel P55 Mobos & Core i7 860 / i5 750 CPU LGA1156 with Vanilla(10.6.2)  (0) 2009.11.21
:
Posted by Ritz®™
2010. 2. 7. 22:58

Mac OS X 10.6.3 build 10D548 Seed Note News2010. 2. 7. 22:58

You maybe already know following news.

Yea, It's time to buy Mac?


Included in this update
  • - Performance improvements for 64-bit Logic
  • - Addresses compatibility issues with OpenGL-based applications
  • - Includes changes to QuickTime X that increase reliability, improve compatibility and address security.
  • - Improves printing reliability and compatibility with 3rd party printers
  • - Respects the DNS server ordering as specified in Network Preferences
  • - Addresses an issue that causes background message colors to display incorrectly in Mail when scrolling
  • - Resolves an issue that prevented files with the # or & in their names from opening in Rosetta
  • - Resolves an issue that prevented files from copying to Windows shares
  • - Resolves an issue that caused machines using BTMM and the Bonjour Sleep Proxy to wake unexpectedly


Focus Areas
  • - AirPort
  • - GraphicsDrivers
  • - iCal
  • - QuickTime
  • - Printing


When? ^ ^
- Interesting Update certification Authority
- yup, still did not fully support 3.0


- Still did not support 5xxx series.


- opengl 3.0 test there still doesnt work yet
- SleepEnabler for 10.6.3


'News' 카테고리의 다른 글

Mac OS X 10.6.3 build 10D561 Seed  (0) 2010.02.25
Mac OS X 10.6.3 build 10D558  (0) 2010.02.23
10D538?  (0) 2010.01.27
Remote Desktop Admin Update 3.2.2  (0) 2010.01.12
Mac OS X 10.6.3 build 10D522 Seed Note  (0) 2010.01.07
:
Posted by Ritz®™
ASUS P7P55D 메인보드에 해킨토시 설치하는 방법입니다.

1. 먼저 다음 두가지 cd 이미지를 다운로드 받습니다.

- ❶ http://j.mp/bm0Cer 
- ❷ Snow Leopard Retail DVD, *
- UltraISO로 2배속이나 혹은 4배속으로 설정하여 DVD로 구워줍니다.
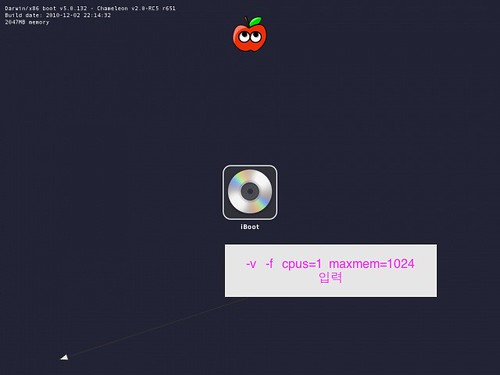
- 부팅시에 "-v busratio=20 cpus=1" 옵션을 이용하여 ❶시디로 부팅합니다.
- ❶시디 로딩이 끝난후, ❷시디로 교체하여 줍니다.
- F5키를 누르고 ❷시디 "Install OS X DVD"를 선택하여 줍니다.
- 아래 그림에서 부팅옵션을 "-v busratio=20 cpus=1" 를 입력하여주고 엔터를 칩니다.
설치과정 보기
iboot01

연동장비 결과 비참

ensemble by apogee
s70xs yahama
dp firewire 800 3-port pcle (siig)
one usb by apogee
FXPansion BFD DRUM

- 설치한후에 재부팅후 스노우 레오파드를 인스톨 시킨 하드를 선택하신 후
-v maxmem=4096 으로 부팅하여 기본 설정을 진행합니다.

- Chameleon 과 10.6.2 combo Update룰 설치합니다.
- 부팅시에 “-f -v -s”옵션을 주어 싱글유저 모드로 부팅한 후, 'exit" 커맨드를 입력하여 정상부팅합니다.
* Kext Help7을 이용하여 랜 드라이버 설치하여 주기
* 공유기 DMZ 서버 설정하기


2. Study

http://www.apple.com/support/snowleopard/
#############################################################

검색신공 배양하기 구글링 6종 세트

1. 시스템 스펙/상황 파악하기
http://j.mp/58hmuA

2. 추가 조치 방안 및 질문하는 방법
http://j.mp/6Jui2v

3. 해킨 설치 이미지의 종류
http://j.mp/5bKbXc

4. 특정 패키지 혹은 드라이버만 골라 설치하기
http://j.mp/7oKbwJ


5. 관련시스템 설치이력 찾기(제품 모델명이 “GA-EP45” 시리즈인 경우)
http://j.mp/7d8gfp

6. p55-ud3r i5 750 보드에 4850 일 경우- 밥떠먹여주기 프로젝트팁

http://j.mp/8DfTQv
:
Posted by Ritz®™
MAC OSX를 설치하고 사용하려고 하는데 네트웍(인터넷)이 안될 경우가 있다.

1. 이런 경우는 먼저 랜케이블이 제대로 연결이 되어 있는지를 확인한다. (LED 확인)
2. 다음은 시스템 환경에서 다시 설정해 준다.
3. 이도 저도 안된다면 다음과 같은 방법을 사용한다.

- “-f -v -s”옵션을 주어 싱글유저 모드로 부팅한다.
- $/sbin/mount -uw /
- $cd /Library/Preferences/SystemConfiguration
- $mv preferences.plist preferences.plist.Bak
- $mv com.apple.network.identification.plist com.apple.network.identification.plist.Bak << 우선은 이 부분은 적용하지 말자. 안될경우 다시 싱글유저부팅부터 다시 시작하여 이 단계를 적용한다.
- exit


4.이렇게 적용하여 주면 시스템이 reset이 아닌 다중유저 모드로 부팅진행하면서 네트웍 설정을 자동으로 다시 잡아준다.
물론, 이때 랜선은 연결하여 두는 것이 좋다.


#############################################################

검색신공 배양하기 구글링 6종 세트

1. 시스템 스펙/상황 파악하기
http://j.mp/58hmuA

2. 추가 조치 방안 및 질문하는 방법
http://j.mp/6Jui2v

3. 해킨 설치 이미지의 종류
http://j.mp/5bKbXc

4. 특정 패키지 혹은 드라이버만 골라 설치하기
http://j.mp/7oKbwJ


5. 관련시스템 설치이력 찾기(제품 모델명이 “GA-EP45” 시리즈인 경우)
http://j.mp/7d8gfp

6. p55-ud3r i5 750 보드에 4850 일 경우- 밥떠먹여주기 프로젝트팁

http://j.mp/8DfTQv
#############################################################


:
Posted by Ritz®™
2009. 12. 25. 02:14

맥에서 커널패닉에 대한 대처 macOS2009. 12. 25. 02:14


뭐 아시는 분들은 대개 다들 아시겠지만,,,:

Snow Leopard(10.6)에서 커널패닉이 일어나는 경우가 있습니다.

시작할때나 혹은 종료를 하고 나면 검은 화면에 컴퓨터 재시작하라는 메시지가 뜨고 멈추어 있습니다.

이런 경우에는 다음과 같이 하여 커널패닉 원인을 찾아낼 수 있습니다.

1. 부팅시에 "-v -f"로 부팅하여 종료하게 되면 화면에 좀더 자세한 커널패닉 관련 메시지가 나옵니다.

2. /var/log/system.log를 분석하여 본다.

3. 드라이버를 설치할때 최근에 설치한 드라이버나 소프트웨어를 제거하여 본다.

4. Little Snitch, CleanApp, Parallels, VMware Fusion, Rubbernet 등의 Growl 에 등록된 프로그램을 제거하여 본다. 여기에 등록된 프로그램은 시스템 시작시에 부팅속도를 느리게 하는 원인이 될 수도 있습니다.

5. 한달에 두번정도는 디스크 유틸리티에서 권한수정을 실행하여 줍니다.

6. 콘솔창을 열어 시스템 로그 화일을 분석하는 능력을 기릅니다. 일반적인 로그와 특정 소프트웨어를 설치하고 난 이후의 로그화일을 비교하면 쉽게 해결방안이 나오는 경우가 많습니다.


물론, 이외에도 다양한 원인으로 커널패닉이 발생하는 데, 이런 경우에는 보통 안전모드나 Verbose 모드로 부팅하여 커널패닉을 일으키는 kext나 혹은 부팅이 지연되는 시점을 파악하여 원인을 분석해야 합니다.

참고 : http://osx86.tistory.com/1116


:
Posted by Ritz®™